I can always count on the followers to help me out, thank you, Terry. It's a padded seat, I needed that to describe a chair I have over on CDHM.
Merry Christmas and Happy New Year!
Kris

Learn how to make miniature dollhouse furniture, mini paper accessories and get techniques, tips and monthly tutorials.
Friday, December 24, 2010
Thursday, December 23, 2010
Upholstery Term?????
I have a question for you, I always turn to you followers for answers. What is the name or term for the type of seat on an upholstered chair that is not the removable seat cushion type, it would probably have springs in the seat and just be upholstered into the chair? If anyone can help I would really appreciate it, Kris
Suede Paper 2
I used coconut. I found a good website for rugs, www.woodworkersauction.com. I know it doesn't sound like a rug site, but get on and go to rugs. I "save image" into my minis file, then when I need to print I will double click on the picture and then it goes into the program where you print photographs. I will click "fix" and set the saturation all the way up, then click print and choose my size. I have been successful in sending the paper back through the printer to print the rug over at least 3 times. I have also been unsuccessful doing this, it will double expose if not exactly lined up. It's always a "keep you fingers crossed kind of thing". When it works, it is so good, the colors and patterns are beautiful. When it doesn't, you are wasting paper. So mostly I just print once and say I'm satisfied! It's fun to do and you are making them yourself, of course you can drive yourself crazy looking for the "perfect" rug. Have fun! Kris
P.S. I just went to the website and it is "under construction", I don't know what they are doing, I hope they will still have rugs. What is so perfect about this particular website is the rugs save in a large size, we don't have to enlarge them. Will keep an eye on the site and hope for the best.
P.S. I just went to the website and it is "under construction", I don't know what they are doing, I hope they will still have rugs. What is so perfect about this particular website is the rugs save in a large size, we don't have to enlarge them. Will keep an eye on the site and hope for the best.
Wednesday, December 22, 2010
Suede Paper
I have finally gotten the color cartridge for my printer so I tried out the suede paper I bought from www.franticstamper.com. I am glad to report that it does work in the ink jet printers. The suede paper I bought from www.dragonflyintl.com worked the first time, but I couldn't get it to work after that. That paper came in a shrink wrapped package, flattened, after I opened it I think it "fluffed" out and became too think to run through the printer. I left the franticstamper paper set out for a month and it went through the printer just fine. Soooooo, if you want to make some quick and inexpensive rugs buy the suede paper from franticstamper.
See 'ya next year! Kris
P.S. This stuff is for making the quick mini rugs I wrote about in an earlier blog. I told you to buy the suede paper from someone else, buy it from frantic stamper instead. Copy and paste rugs off the Internet to make your rugs.
See 'ya next year! Kris
P.S. This stuff is for making the quick mini rugs I wrote about in an earlier blog. I told you to buy the suede paper from someone else, buy it from frantic stamper instead. Copy and paste rugs off the Internet to make your rugs.
Wednesday, December 15, 2010
Turning on a Drill Press, Part 2
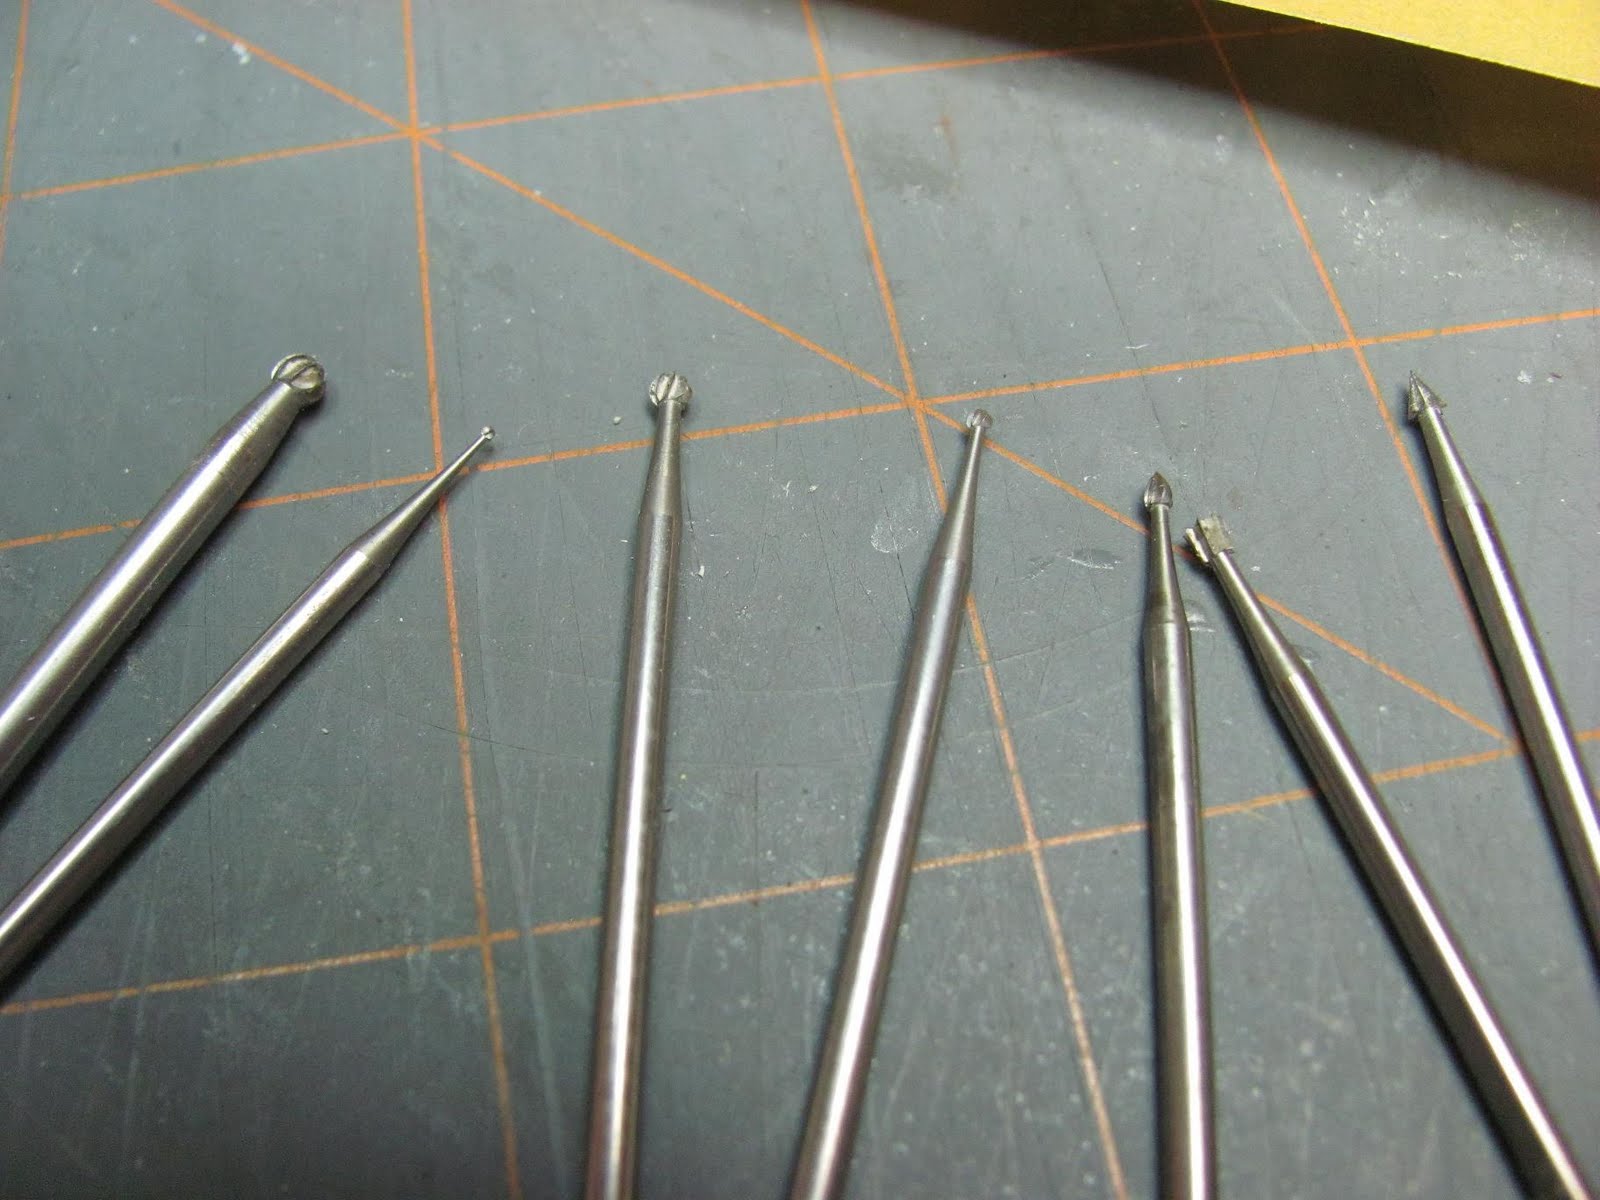
 This is a picture of a round cutter, it dropped out of the line up and I did want to show it to you. I generally use cutters that measure 1/16" or less.
We are ready to start chucking up some wood.


 Mark the center on one end of the square stock of basswood.
Make a hole in the center with a "T" pin.


Place the stock into the chuck and the end of the stock on the pin. Tighten the chuck. We don't want the bottom of the stock to be against the wood holding the "T" pin, leave a little space at the bottom. If your stock is touching the wood holding the "T" pin and you begin turning you are going to smell burning wood because of the friction between the two pieces of wood.
First you round with sand paper to the diameter you need for your project. I cut a pattern from poster board; the first one is for diameter. You can buy calipers for measuring; this poster board works fine, though.
Sand until you have the diameter needed.
Ahh, design - For right now that's trial and error. Basically playing with the cutters, they aren't lathe tools. You will have to try them out and get the feel of what you can do with them. For my designs I go from pictures and try to copy what I see.
I'll measure where I need to make the first cuts. I am using Joy's lamp for an example. Most of the time I convert a full size turning to 1 inch scale measurements. For this example the picture of Joy's lamp was the right size to measure from. The cuts are where I am going to be starting and stopping the shapes on the turning.
I use this piece of poster board with the tick marks to transfer the measurements to the stock on the drill press.
Right now you can just play with making the shapes where you want to get the feel of the turning drill press and the cutters.
I turn on the drill press and using a pointed cutter I cut into the wood at the marks I've made.
I use any combination of cutters and sand paper to get the shapes I want. The cutters aren't designed for this, so it's trial and error. What works for me may not work for you, or you are not comfortable with that particular cutter.
When you are satisfied with the piece, finish off with fine grit sand paper.
This is a large turning, it's for a floor lamp. The smaller the turnings, the more difficult the turning is to do. Basically, the drill press is a makeshift lathe, it's not going to do everything a lathe can. For making spindles for things like this floor lamp base, table lamp bases or spindles for a porch railing the drill press can work for you.
Doing all of this on the Dremel is pretty much the same but your turnings are going to be smaller in diameter, not over 1/4" in diameter, (using the 1/8" dowel glued into the top).
I hope some of you are able to try this out.
Have fun, expand on it, make it better, just keep making minis!
Merry Christmas and Happy New Year ! ! ! !
December Project, Turning on a Drill Press, Part 1
 This blog is about turning on a drill press or Dremel with it's Workstation. The name drill press implies drilling holes; yes, that's what it is for. Turning is making spindles, like on a stair railing. You can make lots of symmetrical turnings for other things, too. Normally a lathe is used for turning; it holds the wood horizontally, the drill press holds the wood vertically.
If you have never used a drill press please have the person you are borrowing it from read my blog. Have them help you get started. I should also mention to wear eye protection when using the drill press and Dremel/Workstation.
We also have a lathe and my husband makes beautiful things on it. Right now his is making oak spindles for a staircase. I've tried turning on the lathe and I don't like it. I seem to be able to turn more easily on the drill press. With a lathe you can do more like making bowls and vessels. I am busy upholstering furniture and haven't gotten to that point.

 I have a Dremel and its Workstation. The Workstation holds the Dremel in a drill press set up. I started using the combination to turn porch spindles to save some money on a project. The results aren't always symmetrical. The Workstation isn't as stable as a drill press so one side of the turning might have a little less design cut into it. We can always turn that side to the wall!
If you already have a Dremel maybe a Workstation would be a good accessory for you. I like it for drilling multiple holes, say in seats for wicker. The Workstation only works with certain models of Dremel so check before making your purchase.
If you find you like turning, a bench top drill press runs around $100.00 at Home Depot or Loew's. It's a cheaper buy than buying the Dremel and Workstation together. Lathes generally cost more than drill presses.


 Another difference between the drill press and Dremel/Workstation is that the Dremel will only accept up to 1/8" diameter bit, cutters and for turning, wood. To turn a larger piece of wood you have to drill into the center on one end and glue in a 1/8" dowel. The dowel will then be placed into the chuck.


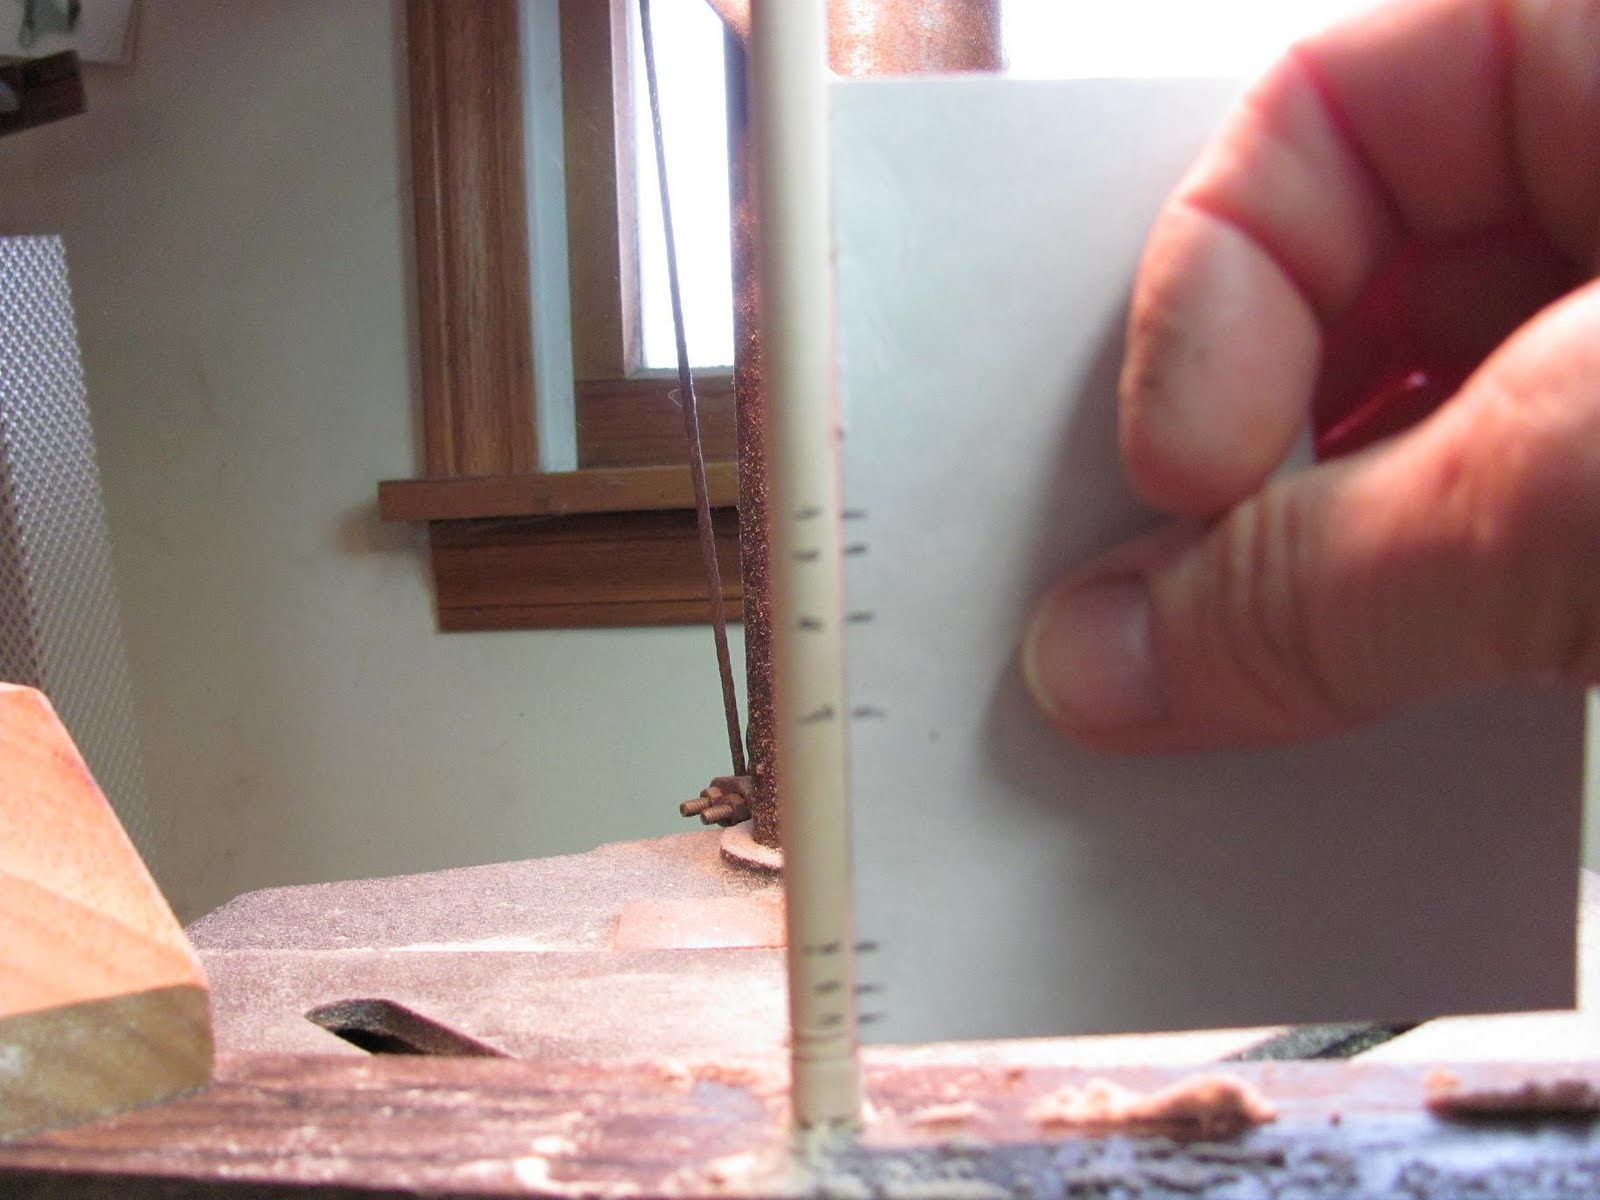
You see in the picture I have clamps holding a piece of wood with the sharp end of a "T" pin in it. You will have to do this with the Dremel or drill press.
The "T" pin holds the bottom of the wood, while the chuck holds the top.
The chuck on this floor model drill press holds 3/8" square stock. If I want to turn something from larger stock I would drill a hold in the center on one end and glue in a 1/4" dowel, (I mentioned this above for the Dremel). I am working in miniature and I don't do this very often.
A lathe has chucks for turning larger diameter wood and a "center" at the end to hold the wood, it's for turning wood. We are making the drill press do something it's not intended for. But a drill press is something a lot of fathers and husbands have in the workshop/garage.
Use "hardwood" for the "T" pin set up, not a pine 2x4. The "T" pin gets hot and it will drill itself down and out of the weed after you turn a few pieces and you will have to hammer it back up into the wood to stick out again. Google hardwood and you will find names of wood that qualify.
After you have made this "T" pin set up use clamps to secure it to the drill press table or the Workstation table. I've used my husband's wood clamps but "C" clamps work fine.
Clamping the "T" pin set up takes a little time because it has to be centered under the chuck. If it's not centered your finished turning won't be symmetrical.
I will chuck up a piece of wood and line up the pin under it. Make sure it's centered front to back and side to side.
I've got my spindle speed set at 2300. Most drill presses have a belt at the top, it's under a lid, to set different speeds. Most Dremels have speed settings, when you turn the Dremel on set the speed where you are comfortable. If you have trouble with the turnings breaking, change your speed.
So now you are set up. I use basswood square stock. You might think to use dowels, they are already round. Dowels are hardwood and will dull my steel cutters. Woodcarving sites have carbide cutters, just haven't found the need to buy them. Carbide cutters would last longer. I use Dremel's engraving cutters all sizes and shapes. I use sand paper; 120 grit for rounding the square stock. I use the finer grits to finish the turning. I use the round ball shape the most, smallest diameter on up. Dremel has 3 sizes of 4 different shapes. Micro-Mark carries cutters, too. I have found that the woodcarving sites are cheaper than Micro-Mark, though.
End of Part 1
Sunday, December 12, 2010

Merry Christmas to all !
I am putting up my Leg Lamp for you to see since it's the season for the movie, "The Christmas Story". I love that movie and watch it a lot at this time of year.
If you have seen the movie you know about the lamp. The father wins second place in a contest he enters and wins the lamp. He loves it, the wife doesn't and "accidentally" breaks it when she is watering flowers.
I love the lamp and made one in 1 inch scale. Giselle Sullivan made the leg for me, with a hole in the bottom for the wiring to go through. She was so helpful with getting the stocking on, Matte Modge Podge. The shade has a wooden frame I steam bent the pieces to the shape I wanted. The shade in the movie is large and I wanted the same shade so I couldn't use a ready made miniature. I mixed some dye I had to get the color of silk I wanted. The craziest part was the fringe, I twisted embroidery floss back onto itself a little at a time for each strand. Took forever, I am crazy, but I think it looks great. One day I will get around to making a Christmas scene with the lamp in the window just like the movie!!
TTYL Kris
Tuesday, November 30, 2010
CDHM.org
CDHM.org is Custom Dolls, Houses and Miniatures. This is a wonderful website that enables people like me to sell my upholstered miniature furniture without having my own website. They offer many, many different handmade miniatures for sale, quality miniatures. Marlene, the lady I have had many an e-mail conversation with about my inability to work a computer, is a wonderful person, so helpful and understanding. Without CDHM I wouldn't be selling my furniture. They only charge $5.00 a month to put 10 pictures up in a category, they set you up with the first contact with a client, after that it's your baby. It's been wonderful. They have many more things they offer their artisans once you become a member. Please go there and shop awhile. Kris
CDHM.org I-MAG
Hi guys,
I have something to tell you, CDHM has selected me for the artisan gallery in their i-mag for the month of December! I was really surprised and pleased. So tomorrow go over and see me and some of your furniture on display in the i-mag. Thanks to you for making this all possible, I really enjoy communicating with you through the blog and e-mails, making furniture for you and thinking up things for you to make!
Thanks, Kris
Saturday, November 27, 2010
Floor Lamp for Joy

Hope everyone had a nice Thanksgiving.
This is the floor lamp I was telling you about. I turned it on a drillpress using sandpaper and engraving cutters that are used with the Dremel.
I chucked up a 3/8" x 3/8" piece of basswood and turned it round using sandpaper. Then I used the Dremel engraving cutters to make the design.
It's not that hard to do. I have made porch railings using the Dremel and its WorkStation (drillpress) the same way. I like using the drillpress better, it doesn't wobble, the Dremel wobbles.
If any of you have a husband or dad that has a drillpress in their shop you could use it to make lamp bases, porch posts and more.
If you are interested on how to go about doing this, let me know and I will get a project together for you.
Talk to you later, Kris
Wednesday, November 24, 2010
HAPPY THANKSGIVING!!!!!!!
I want to wish everyone a Happy Thanksgiving, I know it's a day early, but I'll be busy tomorrow as most of you will be, too. I'm staying home for Black Friday, so to those who are going out, good luck and keep a sense of humor about you, it helps. TTYL Kris
Sunday, November 21, 2010
I have a question ???
I have had a request from a visitor to become a follower. You guys know I don't know what I am doing. Could someone post a comment on how you go about becoming a follower. She doesn't have any accounts on Yahoo or Google. Go slow, so I can learn, too. Thanks Kris
Inches vs. Centimeters
Hi Caterina, I will try to include centimeters on the projects from now on. I don't know why I don't do it now, the centimeters are on the the same ruler I use for inches.
For the large lamp shade measurements: 3.5 cm long; measuring inside the lines for the width of the top 11 mm; measuring inside the lines for the bottom width 19 mm; the glue line at the top of the shade is 4 to 5 mm down from the top.
I think the most important measurement is that the top of the shade be the same as the sides of the center.
The small shades I make are 2.5 cm tall. Have fun, Kris
More Shade
If you do the lamp shade, plan on making a few. You don't have to cover them with fabric, just make the shades and put them away for another project. That way you don't have to start from scratch. I works well if you are on an assembly line type of production for the shades. By the time you get done with one step on the last shade you can start the next step with the first shade. Kris
P.S. I have been told by a follower to suggest using LEDs for your lights and this shade would be all right to use. Thank You, Judy.
P.S. I have been told by a follower to suggest using LEDs for your lights and this shade would be all right to use. Thank You, Judy.
The Shade
Hi, just wanted to thank everyone for the nice comments. It really helps keep me going!!
I did cover the raw edge on the back of the shade. I folded a hem in the same fabric as the shade, as small as fold as I could, and pressed with an iron. Then I cut the fabric away from the larger piece, it helps to fold the hem if you are still working with a larger piece of fabric. I cut a narrow piece, then I folded a hem on the other side of this narrow strip and glued it on top of the raw edge on the shade. It looks like you've put a piece of fabric on top, but it's not a raw edge showing. My fabric was cut on the bias, I don't know if it needs to be on the bias, a piece cut on the straight grain could work just as well. Talk to you all later, Kris
I did cover the raw edge on the back of the shade. I folded a hem in the same fabric as the shade, as small as fold as I could, and pressed with an iron. Then I cut the fabric away from the larger piece, it helps to fold the hem if you are still working with a larger piece of fabric. I cut a narrow piece, then I folded a hem on the other side of this narrow strip and glued it on top of the raw edge on the shade. It looks like you've put a piece of fabric on top, but it's not a raw edge showing. My fabric was cut on the bias, I don't know if it needs to be on the bias, a piece cut on the straight grain could work just as well. Talk to you all later, Kris
Friday, November 19, 2010
Lamp Shade, Part 4

 Part 4
Cut out another center and dry fit. You will have to trim this piece. I find it easier to trim a little on all sides to keep the shape even. Use a glue stick to glue the fabric to the center and trim off the extra fabric. Trim out the hole.
**A tip about using a glue stick. I use a glue stick a lot for upholstery. I found if you use a piece of glossy photo paper for your glue mat when running the glue stick over the card stock, and you will go past the edges of the card stock, the glue dries and you can use the piece of photo paper forever.**
Glue the fabric covered center into the top of the shade.
Trim around the bottom of the shade, evenly, a little less than an 1/8 of an inch. Snip into the corners of the scallops. glue the raw edges of the fabric to the inside of the shade.
At this point the shade is finished. You can glue Bunka to the top and bottom edges. Doll makers have lots of pretty trim to use, check some of them out on-line.

 I am going to show you how I make fringe and I am going to glue that to the bottom of my shade.
Unravel an edge of your fabric. Pick an edge, sometimes the fabric's edges will have 2 different looking edges according to the warp and weft of the weave of the fabric. Even the colors of the threads may be different.


Unravel until you can pull 1 thread all across the edge.


If you have a rotary cutter and ruler use them to straighten the edge. If you don't have those, use your sharpest scissors.
I unravel about a 1/4 inch; the choice is up to you.
Run a line of glue just above the unraveling. Let the glue dry.
Very carefully cut along the top of the line of glue.
Very carefully apply a line of glue, one scallop at a time, to the edge of the shade. Lay the glued edge of the fringe into the glue on the edge of the shade. Don't worry if your fringe breaks, just butt the edges and keep gluing.
**This fringe can be used on pillows, too. After your pillow is finished glue the fringe into the seam on the outside, tucking the fringe into the seam with tweezers.**
Depending on how your fabric reacted to the glue you may not need to add a trim to top of the fringe.
The green silk needed a trim to cover where the glue darkened the top edge of the fringe. The blue fabric looks like I added a ribbon to cover the edge, but I didn't.
I used 2 strands of embroidery floss for the twisted trim on the green shade. Twist the floss until it will twist back onto itself when folded in half.
As I said this is a large shade for a floor style lamp. My shades for a table lamp measure about an inch tall, that's 12 inches in full size.
When I finish Joy's lamp I will post a picture of it for you all to see. I have to turn the base and make her shade in white. I am going to try and make a little pompom trim, too. I don't know about that, yet. I will share if it's successful.
Have fun, expand on it, make it better, and just keep making minis!!! Kris
Lamp Shade, Part 3
 Part 3
Cut your fabric on the bias. The bias has more stretch. We are going to cover the shade in one piece of fabric.


 Start with your shade in the middle of the triangle, on the wrong side of the fabric. Apply the glue to one pattern shape. Smear the glue out, leave no thick places of glue, a nice even and thin layer of glue. Smear the glue so that you think it is almost dry.
Press the fabric into the glue and smooth out the fabric.
Apply glue to the next pattern shape. Be careful not to get glue onto the fabric, but be sure to smear the glue right up to the fabric. Pull the fabric over and smooth it down onto the glue.
Go to the pattern shape on the other side of where you started and apply glue, smoothing it out until it is almost dry. Stretch and press the fabric onto the glue.
Now, you have 3 pattern shapes with fabric glued to them.

 Keep alternating the shapes back and forth until you have 1 pattern shape left.

I want you to trim the fabric at the top and bottom of the shade, not the final trimming, just take some of the extra fabric off.
Trim off one side of the fabric to the middle of the last pattern shape and glue it down.
Trim off the other side to overlap the glued down end. Glue this last bit down. I know this is a raw edge and if you want to try to turn a hem in it before gluing, go ahead but my shade is going against a wall!
Trim the extra top fabric to the length of the top lip and glue down.
End of Part 3
Lamp Shade, Part 2
 Part 2
Depending on how good my drawing was and how good your cutting was you might need to trim the center. Just slightly, don't change the shape of the center, let the shade relax around the center and come into shape.
Push the center into the shade up to the line. Don't use any glue yet. It's going to look like it's not going to fit, push it up and let the shade conform to the center.


 After the shade has relaxed, (it takes a few minutes) and it is fitting, apply a line of glue to the underside of the center and shade. Let this dry.


 You can make lamp bases out of just about anything. In the office I used a miniature vase and in Carl's Room I used a wood turning. The new beads that are out now can make some pretty lamp bases.
For the miniature vase in the office I filled in the top of the vase with a piece of wood cut into a circle to fit the hole in the top of the vase. I also cut a hole in the center of the piece of wood to fit a toothpick. I glued the wood circle into the top of the vase. The toothpick holds up the shade. I painted the wood circle and the toothpick gold.
Carl's Room, Carl is the Siamese cat. My daughter, Sam has a Siamese cat named Carl.
I trimmed out the shade with Bunka and added tassels to the wood base.
I am going to turn a base for this floor lamp. I use a drill press to turn on, not a lathe. I seem to be more comfortable with turning a piece vertically than horizontally. If this interests any of you I can show how this is done in another project.
Let the glue on your shade dry overnight or most of the day. After the glue has dried paint the shade with acrylic craft paint inside and out. Since we are using card stock, paint the inside and let dry and paint the outside and let dry, or vise-a-versa. Painting both sides at once tends to weaken the card stock and we don't want to lose our shade now.
When the inside and outside are really dry use sand paper, I used 180 to 220 grit, to sand the surface and get any glue bumps and ridges from edges that aren't butted. Generally smooth the surface. Paint again.
I used white; my shade is going to be white. I would paint my shade the color of the fabric I am going to use. Some shades are painted gold inside before you've covered the shade in your fabric.
I've covered this shade in silks, cottons and shiny polyesters. They all seem to work well. Test your glue out on the fabric. Some fabrics soak up more glue than others and leave a mark on the outside while other fabrics refuse to glue at all. I use Aleene's No-Sew Glue to glue the fabric to the shade. The glue stick is used a little later.
End of Part 2
Subscribe to:
Posts (Atom)