

I have saved this picture for a few years hoping to make the bed. I have finally gotten around to making it this month.
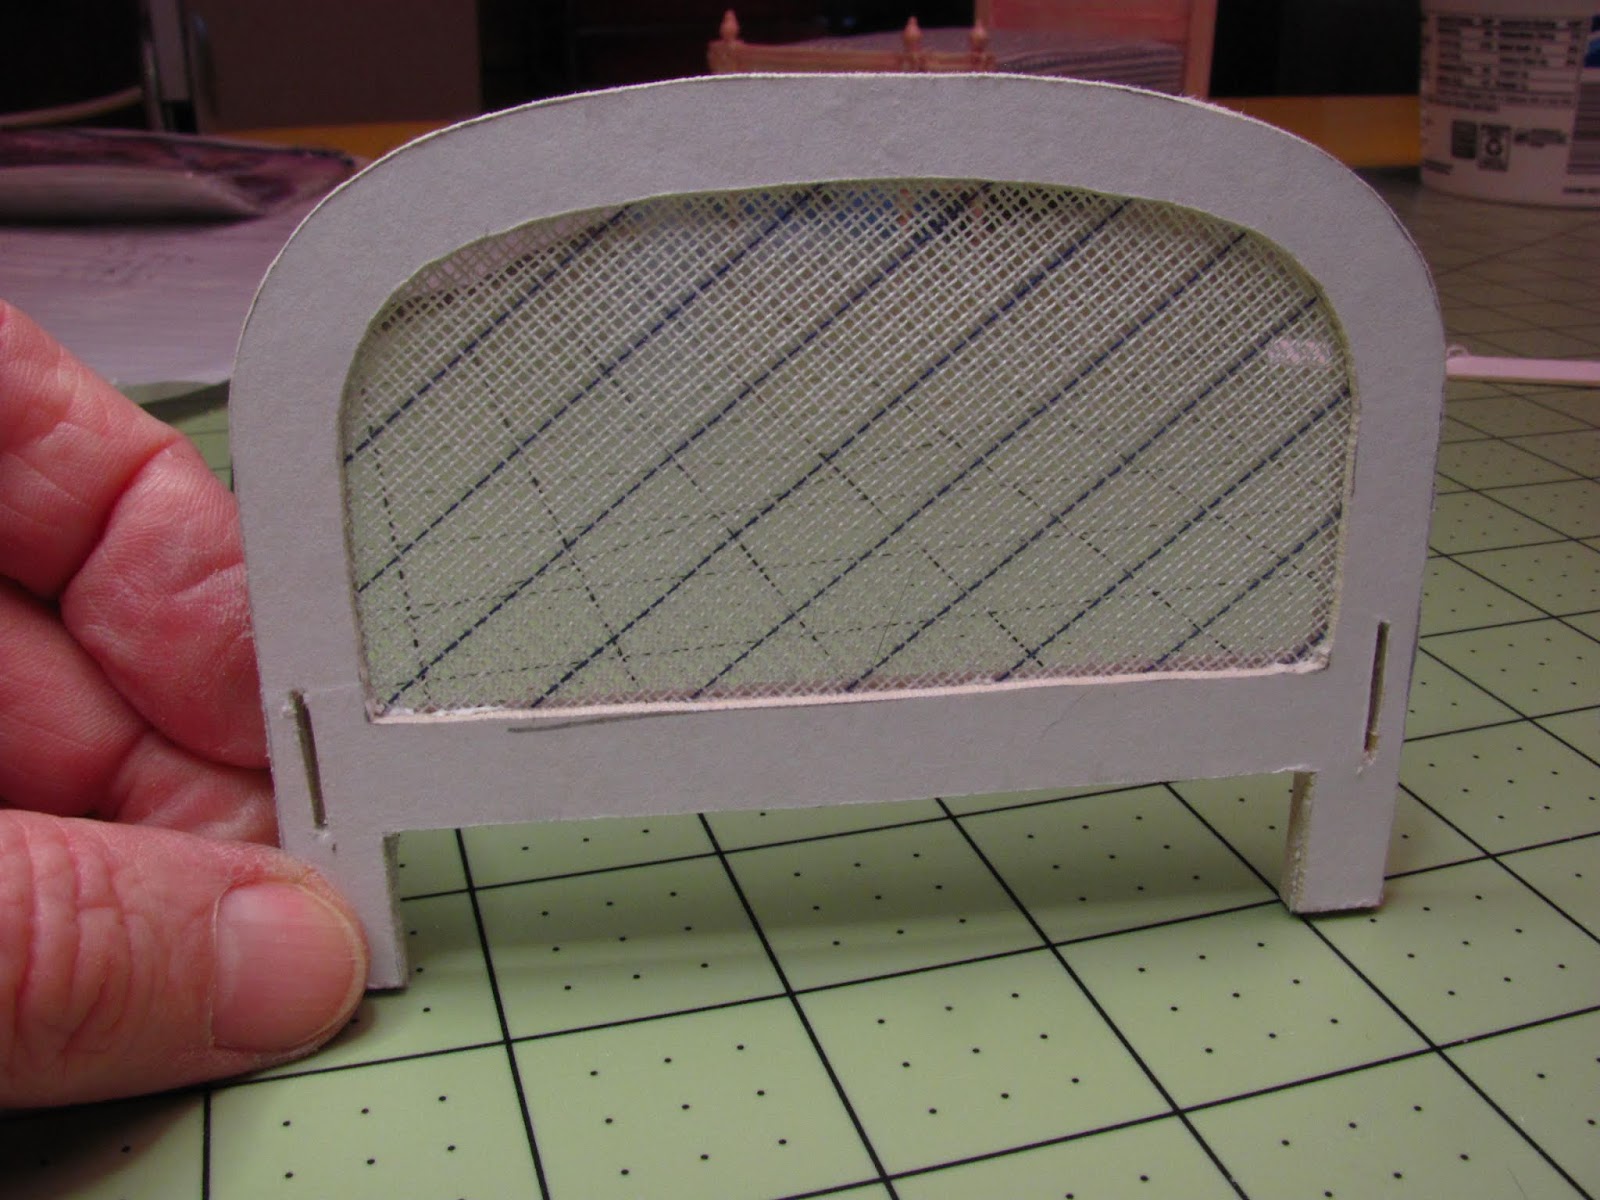
The headboard and footboard have caning in them. Although I have made caned furniture in miniature I did not want to go into that here. I will show you later what I used to make my bed look like it was caned.

This is the Shabby Chic Bed made from the tutorial on the blog. I am making a twin bed so you can use the mattress from that tutorial for this bed, too.
By changing the measurements you can make this bed into a full size bed, just make the headboard a little wider for what you need.
My headboard is a little wide for a normal twin bed. Again, you can change these measurements to fit your room size.

For the caning I used waste canvas, 14 count.
I painted it using acrylic craft paint, you could use spray paint.
Here are the patterns for the headboard, footboard and the patterns for cutting the waste canvas. Follow the instructions for RE-SIZING THE PATTERNS from the "Things to do, Things to see" list at the left side of the blog. I would print them out onto card stock so tracing around them would be easier.


Trace the patterns onto mat board, 3 times.

I am going to use my scroll saw to cut these out. So I have glued two pieces of mat board together and traced. I have also traced another set onto a single layer of mat board.
You can cut out the three layers using a craft knife. When you have finished glue two headboards together and two footboards together. Use tacky glue for gluing.

To cut out the center of the headboard I first cut a hole in the center. I removed my blade and put the mat board under the hold down. I put the blade back in and cut the center out. Remove the blade to remove the mat board. Put the blade back in and cut around the outside of the headboard.
Looky, Looky what I have. I was very generously gifted with a new cutting mat!! It was so nice I was saving it for when I was taking pictures for the blog. I forgot to get it out, it's out now. I really didn't like using the craft knife for the first time but that's what it's for, itsn't it? I was trying to figure out how old my grey mat is and I know I bought it before my last child was born, she's 28 so it's older than that. Thanks so much for the gift, I really appreciate it.

After you have finished cutting you should have two sets. One set is two layers of mat board glued together and the other set is only one layer.

I am adding something to this bed that I did not on the Shabby Chic bed. I want to mortise in the side boards to make the bed more sturdy.
This is the headboard. Measure 1/8" in from the sides; 5/8" up from the bottom; the slot is 1/2" long.
Cut the slot at least 1/16" wide. Do not cut through. Cut down to the next layer of mat board.

This is the footboard. Measure 1/8" in from the sides; 5/8" up from the bottom; the slot is 1/2" long.
Cut the slot at least 1/16" wide.
This slot you cut through.

Cut the side boards for the bed. The strips are 1/2" wide and 6 5/8" long, cut two.
I used a square to make sure I had square ends to keep the bed nice and square.

Try your side boards for fit. Trim out more mat board if needed.
Do Not Glue In, Yet.

Use the pattern to cut the waste canvas. I put my pattern on the diagonal to get the caned look.

Use tacky glue to glue the waste canvas onto the single layer footboard.

Glue the doubled layer of mat board on with the waste canvas sandwiched between.
So you have one side a little thicker than the other.
The single layer will be facing the mattress.

I experimented with the headboard first to see if the waste canvas could pass for caning. I was pleased with the results. This process was not photographed.
Trace and cut out the headboard waste canvas using the pattern. Glue this to the SINGLE LAYER headboard. Glue the doubled layer headboard on top making sure the slots are showing.
When you are looking at the bed finished the doubled layers will be facing you. The single layers will be facing a wall (that's the headboard) and the single layer of the footboard will be facing the end of the mattress.

I used card stock to veneer the cut edges of the bed.
I had to use a diagonal cut for the headboard.
I cut this a proud 1/8" wide. Cutting the strip 5/32" was too wide. You can measure the thickness of the head and footboards to check this for yourself.

I used tacky glue to glue the card stock strips onto the edge of the bed.

I also covered the bottom edge of the bed.

So far, so good.
As I mentioned earlier you can use spray paint to paint the whole bed. I did not.
For my sample I cut the waste canvas, placed it onto paper and painted with acrylic craft paint. I turned the canvas over and painted again. I used a "T" pin to poke through the paint in the holes. I painted heavy to give the canvas some thickness.

Before you paint please sand the edges to take the sharpness off. I sanded around the inside edge and around the outside edge of the bed.
Since your canvas is all ready glued in we are going to paint it all together.

I painted the canvas first on the foot board getting it to look the way I wanted. I ONLY poked through the large holes in the canvas and left the others. That doesn't mean I covered them in on purpose I just left them the way they were.

This is a sample of waste canvas sprayed with spray paint.
Try it out to see which you would like to use.

I painted two to three light coats of paint on the mat board. Let the paint really dry before you repaint. This is after all paper and you are making it wet and it soaks through. Don't rush this.
After that I sanded lightly and gave the mat board a nice smooth last coat of paint.

I've missed a couple of pictures here, sorry.
To hold the mattress you need to cut two more strips of mat board. These are 1/2" wide and 6 3/8" long.
Use tacky glue to glue the new strips to the sideboards. Center these strips leaving a 1/16" on each end.

This picture shows the new strips glued to the side boards. The cut edge of the new strip is glued to the side board so that it doesn't show on the outside of the bed. Let this dry.
Glue the side boards into the head and footboards. Square up the bed and Let this dry.
To give the bed more stability I glued two wide strips of mat board onto the sideboards.
Measure between the sideboards, on the inside.

I cut two strips of mat board and glued them to the side boards.
Let this dry.
Yes, I could have substituted one large piece instead of gluing these and the second strips to the side boards. Your choice.

I sprayed a couple of coats of satin finish on the bed, the waste canvas, too.
You are now ready to dress your new bed.
Have fun, Expand of it, make it better,
Just Keep Making Minis!