
Learn how to make miniature dollhouse furniture, mini paper accessories and get techniques, tips and monthly tutorials.
Thursday, March 22, 2018
1 INCH SCALE SEWING BASKET - How to make a doll house sewing basket from needlepoint canvas.

First of all I want to thank everyone that sent Get Well Wishes to me. I needed them. That flu wasn't anything to mess with.
This is the sewing basket we are going to make this month.

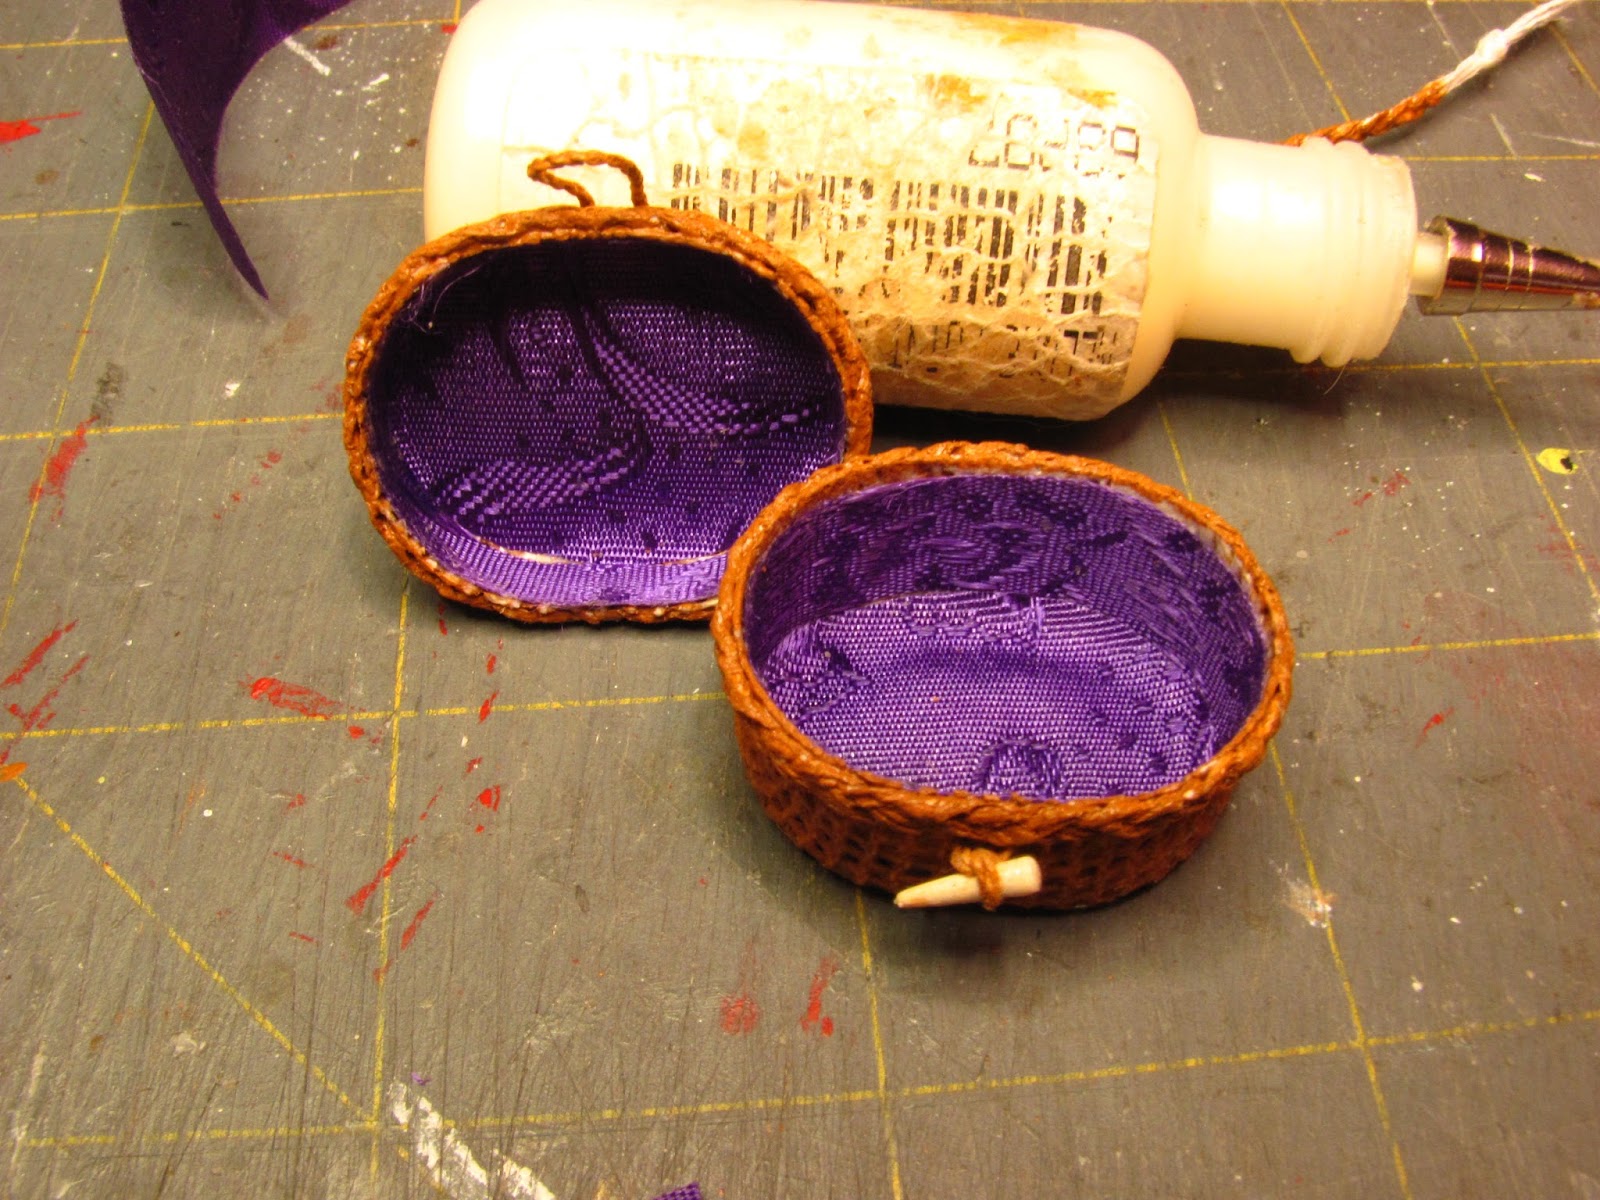
I lined the basket with ribbon and bunka.

This is an old idea, I know I've seen it in NutShell News and this book also explains the technique.
Good Book by Venus A. Dodge.

This is a collection of my unused baskets.

Close up on the sewing basket.

Close up on the picnic hamper. I must have made this almost 20 years ago. The cups on the right side are tops from glue bottles, the thermos is Fimo. I didn't have Chrysnbon dishes so I made the forks and plates from Fimo, too. Those forks look pretty crude!

Needlepoint was very popular in the 60's and 70's. I had a lovely store devoted to needlepoint in a town not far from me. I could buy scraps from her. I love the natural canvas and I especially liked the double weave that is shown on the right.

Ah . . . . time has passed, she closed her store and my cheap supply of needlepoint canvas dried up.
The last time I looked at Michaels they did carry needlepoint canvas, only in white.
I buy the 12 count.
I have checked into buying canvas, you have to buy a yard and last time I checked it was over $30.00. A little pricey for me.

This little basket was painted with brown glass stain to make it look like wicker. I will dry brush the white canvas with a mixture of craft paint to get it to a brown I like.

Lets talk about glues.
I used something 20 years ago that was the bees knees. I remember throwing it out because it had developed mold on top. I forgot what it was and have been struggling ever since to find what I used.
You see that I have tacky, yellow wood glue and Mod Podge on the table.

Tacky does not dry hard enough. You won't be able to work on the basket without it being squashed out of shape.

After I struggled getting the canvas off the form using the Mod Podge the basket was not stiff enough to work with.

The canvas popped off the plastic form easily with the yellow wood glue. It will be stiff enough to get the basket done.
Alas, I am still looking for the right glue.
I am thinking that the old natural canvas was heavier and was just stiffer to begin with.
We will work with the yellow wood glue.

Forms can be from anything you like the shape of.
I am sorry to report that the oval Reese's Pieces container is no longer available.
On the left you will see that I made some oval shapes from Fimo.

I am going to use a couple of prescription bottles for forms. Cut a couple of squares of canvas. I have learned to cut generous squares, these are about 2 1/2 to 3 inches square.
You will need a couple of rubber bands, too.

Slightly wet the canvas, don't get it soggy.

Stretch the canvas over your form.
Watch the weave, keep it straight and even. You will use the lines for sewing on the toggle and handle later.
I wrap my rubber band twice, good and tight.

Apply the glue to the surface of the canvas with an old brush, bottom and sides.
Come back tomorrow when the canvas is good and dry. Don't rush this process.
I will make several basket forms at a time so I have them ready for finishing when ever.

Pull out 6 threads from the long side of your canvas.

You will have to trim the canvas off after 2 to 3 threads or your thread will break when you try to pull it off.

Tie all six strands together with a knot at one end.

Braid the six strands, two by two by two.

Apply a little glue to one side of the finished braid. Rub the glue into the surface.
Be careful not to lose the texture of the braid.

Remove a couple of more strands of canvas.
Twist one strand until you can't twist anymore, until it starts to buckle.

Divide the strand in half and let it twist back on itself.
I use a hook to help with this.

Make another strand the same way so you have two of these.
Apply a little glue to the surface of these strands. Be careful not to lose the texture of the surface. Just a tiny bit of glue is needed.
Let all of this dry along with the baskets.

We're back.
Pop the baskets off the forms.
I mixed up a color of basket I liked and dry brushed it onto the baskets.
Don't glop the paint on you want to see the texture.

Apply paint to the braid and the twisted strands.
Apply the paint to both sides of the braid.
Be careful, don't apply too much paint.

After the paint is dry trim off the extra canvas.
That's Digger, one of my cats on the table with me.

I have trimmed the basket down to the size I am going to use.
The bottom is about 1/2 inch tall and the top is about 1/4 inch tall.

We are going to put all of the pieces on the surface of the sewing basket before we line it.
This is the toggle, I make it from a toothpick.

The loop.

The handle.

I have sanded the end of the toothpick to the shape I like. I rounded the end a bit.
Make marks on the toothpick at 3/16 and 1/4 inches.

Use your craft knife to score a line on the 3/16 inch mark.
Don't cut through.

I am using a triangle shaped file to widen out the scored line.
Be careful, don't cut the tip off.

This is my little file set from Micro-Mark.

This is the groove I made. This will be where the twisted strand you made earlier will be tied.
I painted my toggle an off white to imitate ivory or maybe whale bone. I finished it with a satin finish compatible with the craft paints I used, Delta and Folk Art.
Set this aside for now.

This is the top of the sewing basket.
I didn't take enough care watching my weave, I'm a little crooked.
I've cut out a couple of threads for the braid of the handle to go through.

Put the ends of your handle through the slots .
You can cut about 5/8 inch of braid and then pull the braid back to the height of the handle you like.

When you have the handle right apply a little glue to the ends and bend them against the top.

Place the top back onto the form to help glue the handle in place.
I will place the top and bottom back onto the form through out this process to re-shape and help with the gluing.

While I have the top on the form I am going to glue the braid onto the edge.
Let this all dry.

Put the bottom back onto the form and glue the braid onto the edge.
When the glue is dry on the top and bottom dab a little paint to cover the white edge on the top and bottom baskets.

Here are the top and bottom so far.

You have painted and finished your toggle.
Tie one of the twisted strands into a loop.

Put the loop onto the toggle and tighten.

Cut the toggle away from the rest of the toothpick.
Sand the end of the toothpick and paint and apply finish to it.

Find the center side of the bottom of the basket and widen out.

Feed the ends of the strands through to the inside of the basket.

Trim the ends and apply glue to the basket. Bend the ends of the strands into the glue.

Put the bottom of the basket onto the form to press the strands to the side of the basket to dry.

I've got the top back on the bottom and I am finding the center of the front of the top for the loop.

This is the top. I've threaded the twisted strand through the front and I am gluing one side of the strand onto the basket. I am leaving the other side unglued to be able to move it.

I am fitting the loop over the toggle.
I want to be able to close the basket and actually use the loop and toggle to lock it.
I will try out the size a few times.

When I have it right I will glue the other side down and return the top to the form.

Cut a length of ribbon to fit around the form.
I use this ribbon because I don't have to worry about raw edges. I can cut and not have loose threads hanging.
I could apply glue to the raw edges or even turn the raw edges of fabric but using the ribbon is easier.

Cut two strips to go into the top and bottom basket sides.
Dry fit the width and length before gluing.

Still using the yellow wood glue for the next steps.
Start the ribbon at the front of the basket so you won't see the seam.
Glue the ribbon into the bottom and the top on the sides.

Trace around your form onto card stock.

Cut out the shape and dry fit into the basket. Cut two of these.

Use the card stock shape as a pattern to cut two ribbon shapes for the top and bottom.
Glue the ribbon shapes into the top and bottom of the baskets.

You can ignore these next few pictures and stop with the above picture.
I like having the padded top and bottom in the sewing basket so this is what I do.
Glue the card stock shape onto thin batting and cut around the card stock.

Cut out the ribbon larger than the batting covered card stock.

Use a needle and thread to gather the edge.

Put the batting covered card stock into the gathered ribbon.
Draw up the thread and knot off.

Showing the finished pillow to fit into the top and bottom of the sewing basket.
No folds or wrinkles around the edges.
Make two.

Glue one into the bottom of the sewing basket on top of the ribbon you glued in earlier.

Glue the second one into the top of the basket as you did for the bottom.

For the hinge I use matching sewing thread.
I have doubled the thread.

I sew two "hinges" connecting the top to the bottom.
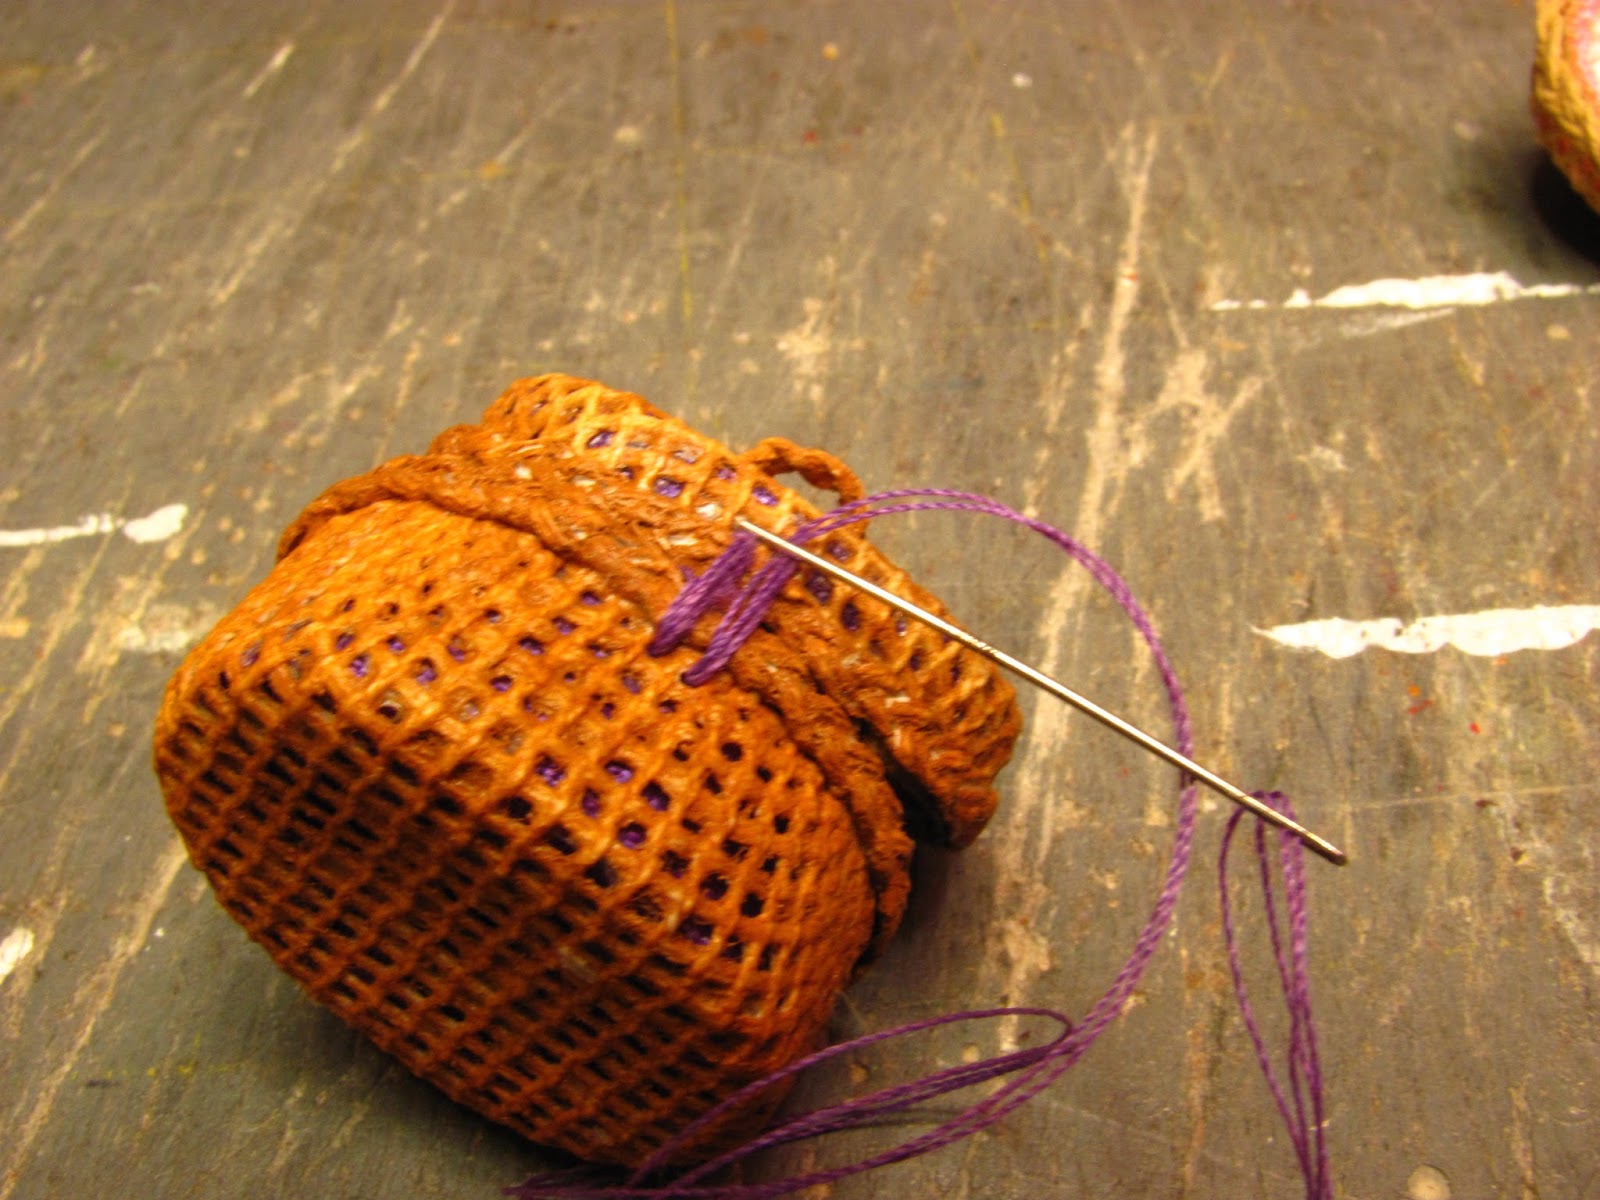
Insert the needle into the canvas but not through the ribbon.

Bring the needle and thread out and clip close to the canvas.

I paint the thread on the outside of the back.

Bunka is used to trim the edges
Google "Bunka for miniatures" to find out what this is if you are not familiar with it. It's cool stuff. It is a woven thread that is unraveled to create a ruffled/squiggly thread. Miniaturists use it for everything from flowers to mini clothing. I've seen it used to make some beautiful rugs, too.

This is the finished sewing basket all locked up and ready to travel.
Find a bunch of forms and make a bunch of baskets to make for later. You'll always have something ready to do. These make nice gifts to give other miniaturists, too.
Have questions? Want to send me a picture of a finished tutorial . . .
camceiling@frontiernet.net
Have fun, Expand on it, Make it better . . . .
Just Keep Making Minis!
Talk to you later,
Kris
Subscribe to:
Posts (Atom)