Showing posts with label Pictures of Room Boxes. Show all posts

Monday, November 19, 2012

First Apartment, I wish . . . .


This is a picture of "First Apartment".  I am going to show you how to make the clock/radio that's on the book shelf.


Now, if I had really had this apartment in the '70s it would have been yellow and orange with those 1960's flowers all over.  As it is, it's bright enough.  I thought I would try green, but I couldn't get the green the way I wanted.


Always wanted the Eero Sarrinen chairs, did I spell that right?  I made these from little plastic wine glasses.
Remember the record player that that folded up to go inside the case?


This is supposed to be a hide-a-bed, if I were really there you would see the bed part!

On the shelf is the clock radio we are going to make.


I made the afgan, a reminder of home, since I'm away in the big city, doing what I have no idea!


I am writing the project now, it should be up by late tonight.  Kris

Sunday, February 12, 2012

ANOTHER ROOMBOX


This is a roombox I made a while ago.  "Princess of Quite A Lot".  I like Mary Engelbreit designs so I decided to create a roombox with her flavor.  The basic design came from a Mary E. post it note.


The little shelf in the foyer is from Mott's book of furniture patterns.  The rocking chair is made from beech wood, this looks a little like oak wood in miniature.  The pattern for that came from Mott's pattern book, also.  The stove is Chrysnbon, of course.  I've always wanted a painted floor in my house so I painted this floor with a design I found on Mary E. post it notes.  The lamp shades on the sconces, (they are really candle holder sconces) are the screw caps from tubes of frosting.  I bought frosting just the other day and found they had changed the packaging!  No more lamp shades : (  I always liked the frosting caps better than the toothpaste caps.  The edge had a wider pleat.  I had a terrible time needle pointing the picture, glad I did it, but I won't be doing any more tiny, tiny needle pointing!  My husband bought the plates for me and there was no signature on them.  The little grey rabbit in the rocking chair is from a pattern from the book "Furnish a Doll's House" by Michal Morse.  The sewing stand is a copy of my friend's full size sewing stand.  I am going to make a pattern for this and make it in mat board for the blog later this year.  Remind me if you don't see it !!


I like making roomboxes with nooks so I made this one to house a table and chair set.  I found the chairs in an advertisement in Miniature Collector.  An artisan was having a class at the Chicago show and she had a picture of the chairs she was making.  I don't sell these chairs but I did make a pair for myself.  I wanted the window to be different so I made up a design with 3 small panes at the top and 2 large panes at the bottom.


I bought fabric with Mary E. sayings and designs and cut it up.  I cut out the "Princess of Quite A Lot" and made a rug.  I had to paint in some of the design since another saying overlapped it.  I glued it onto card stock and made fringe for the edge.  By the time the project was over that piece of fabric looked like Swiss cheese!
The table cloth started out as a white square.  I cut and glued the border on using bits and pieces.  The checker board is a scrap booking border.  I used "Wonder Under" to make some parts of the fabric "iron on".  The flowers on the bottom table cloth was made this way.  I know it was crazy to cut all of those flowers out singly but I did it anyway and ironed them on the way I wanted it to look.
The small table if from a full size furniture pattern book.  Even the doilies came from the Mary E. fabric.


I wanted to show you the wind chime.  I saw this in the "Home Companion", that's Mary Engelbreit's magazine.  I made the teapot, cup and saucer from Fimo and used Chrysnbon spoons.  So cute.


Some of you may know I have a pet rabbit that runs loose in my breeze way were I work.  His name is Ginger.  Before I had him, though, I had another.  My kids saved him from dogs.  The former owners got tired of him and dumped him out here in the country.  He was white and definitely a tame rabbit, they thought, "A rabbit is a rabbit."  Well, the dogs were chasing him, we don't have dogs so they weren't our dogs.  My kids heard the racket and went to find out what was going on and they brought this big white rabbit in the house.  I took to him quickly and he was "Bunny".  He passed away and I remembered him by putting the rabbits in my roombox.  He looked a little like the one on the floor by the checkered chair, not white/white, but not grey either.

I hoped you liked the tour.  I am going to begin work on the February blog, finishing the kitchen cabinets.

TTYL  Kris

Tuesday, May 11, 2010

Quilt Cottage


Hi everybody!

This is my quilt cottage. I am working on some furniture but I didn't want you to think I had forgotten about you, so I thought I would give you some pictures to look at.

I didn't make the pottery and I didn't make the sewing machine, but I did make the cabinet for it. The plants and flowers were kits from Hanky Panky. I didn't make the cats, Mini Me is on the front porch and there is another cat sleeping on the quilt.
Yes, I did make the blue secretary's chair, used mine to copy from, mine is orange, though. I made all of the other furniture and most of the accessories.

If you have any questions about this room box, please ask and I will try to answer your questions.


Friday, April 9, 2010

Ethan Allen Room Box


Hello Everybody!
I thought I would put up another room box I made. For this one I copied a picture right out of the Ethan Allen Furniture catalog.
I built the box and used drywall compound for the plaster finish. Painted a base color and then worked in dots of color mixed with a glaze to keep it from drying out too quickly. My husband cut maple flooring for me. I built the windows so I would have deep sills.
I bought tin from Micro Mark to put into the pie safe. The little wooden basket on the floor is a copy of one I have in my room. My daughter painted the Chrysnbon rooster for me. I love it. I painted the tea set and the pot on the coffee table is made from paper! I copied the rug from the catalog and cross-stitched it freehand.
I found that was easier for me than to try and draw the design. The pot in the window with tulips is also made from paper. I painted the plates to match what was in the picture from the catalog. The basket on the bench is woven paper. I was taking a basket making class so I tried out what I learned in miniature. I made the garden clogs from green Fimo.
The fabric on the couch and chair have been miniaturized on the computer. I tried to find fabric that would kind of match the picture, then miniaturized it.
On the right wall is a hanging planter with ivy in it. My youngest daughter had given me a full size wall planter for Mother's Day. I loved it, so I made a miniature one to hang in this room box.
I cut the "paintings" out from a fine arts catalog.
I didn't make the striped bowl on the pie safe but I did try my hand at the apples.
I like to crochet and I made the little afghan for the arm of the couch and the doily on the coffee table.
The little candle holder is a modge-podge of bits and pieces. It starts with a Chrysnbon saucer, then I cut a cheap metal candle holder top off from the rest of it and then the top is a clear glass vase. The books on the table are photo copies of books about miniatures.
I made this room box when I didn't have alot of resources available and I had to depend on myself to figure out how to go about making something.
The only things I didn't make are: the tea set, the plates on the wall are Chrysnbon, the blue glass bottle in the left window, the clay flower pot in the left window, the bowl on the pie safe, the plate holding the candy on the end table and the Chrysnbon rooster.

Thursday, February 25, 2010

Pictures of My Current Project, Put On Hold!


This is an unpainted pine catalog corner cabinet my daughter left here at home when she moved to Chicago. It was free to her, now free to me! This all started in "Miniature Collector", they had an article about a miniatures store, the owner's mother had decorated a beautiful antique Queen Anne corner cabinet with a dollhouse inside. I have always wanted a dollhouse in a piece of furniture, a baby house. Suddenly I remembered the corner cabinet Katie left and now I have my baby house! Hope you enjoy the pictures, I have had fun figuring out how to make everything.
I didn't make the pottery, that's a weakness of mine, love Jane Graber. Didn't make the red step stool, that's Aztec, I think.
Made the doors and trim around the front hall, it's all poster board! Used my Dremel and it's workstand to make the turnings on the kitchen cabinets and the center island. The hall floor is from a rubber stamp from Michael's, big square block with different sides to stamp marble, how cool. The furniture is all from Ethan Allen, with a few changes I've thrown in.

If you have any questions on how I did anything, just ask and I will gladly try to explain it here in the blog.

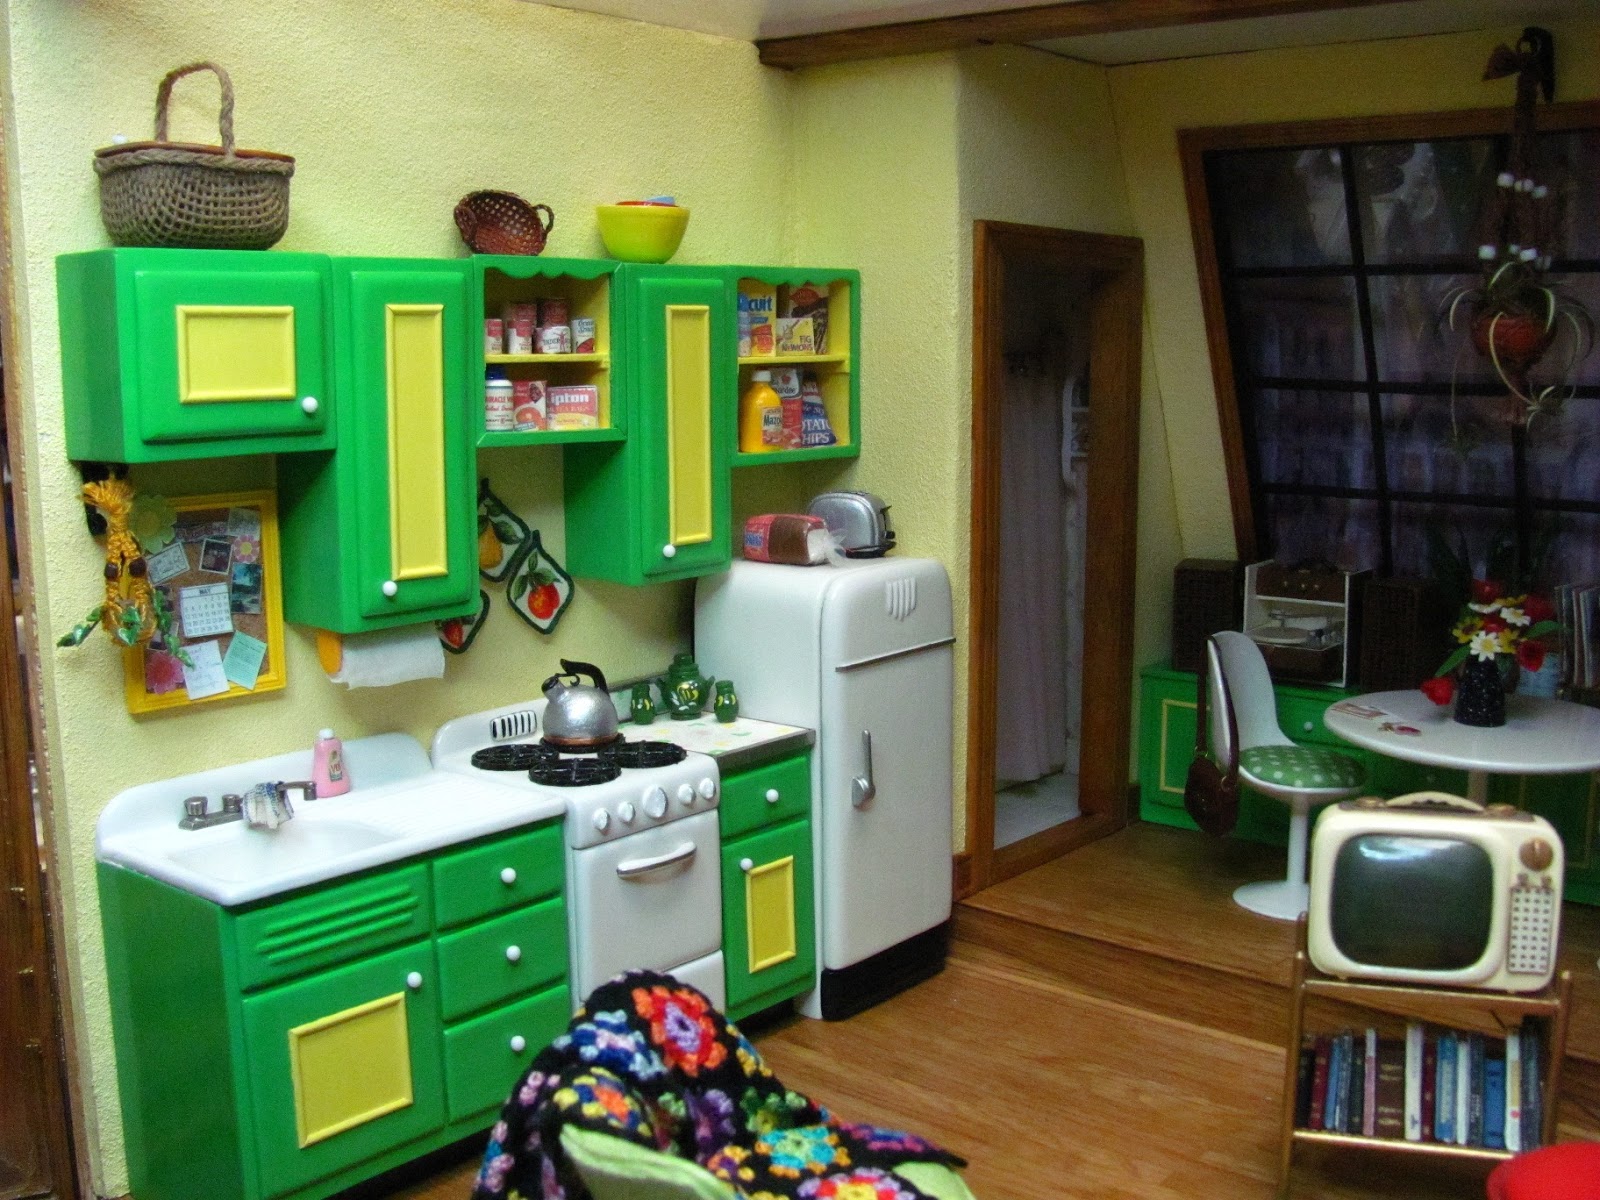
The rug on the kitchen floor is a copy of one from the Internet printed on the ceiling paper from a previous blog entry. The counter tops in the kitchen are painted to look like red granite and the baker's rack has painted black granite. No, the kitchen sink in not a china one, I made that from wood and painted it, several times. The faucet is from aluminum tubing and wood, I turned the handles with my trusty Dremel and workstand. I didn't like the door hardware available so I made mine from wire, it's twisted, painted black and I used a diamond paper punch to make the escutcheons. The banjo clock on the wall is from a picture I found on the Internet. I laminated very thin slices of wood to create the curved outer box of the clock. I did make the teapot on the table, my experiment with fimo.
I have more to do to the back porch. I made the door and screen door. I made the windows, the ones I can afford seem so chunky. I want 4 murals to represent the seasons. I have a goose, and I am going to dress her!

The fabric on the couch and chairs by the bay window have been reduced on the printer. I do that alot, the color isn't always the same, but it works most of the time. I reduced the fabric for the chairs in the kitchen, too. I bought a coordinated set of fabric from Keepsake Quilting for the living room. I used Jacqueline Kerr Deiber's instructions to make a piece of caning for the back of the chair in front of the desk. I didn't drill holes in the chair, though. I laminated an oval and sandwiched the caning between it and the chair back.

Going to do a bedroom and a yellow and blue "ducky" bathroom on the top shelf, that is if I ever get back to it.

I especially love that this cabinet is in my workroom, with me, and that's where I am basically all of the time! This is my little dream house.

Kris

P.S. Yes, that's the lady leg lamp from "A Christmas Story" I had to make one for myself. Don't where I'm going to put it, though.

P.S.S. I don't know if you know this, I just learned it, but if you click on a picture you can make it bigger, full screen.

Tuesday, February 16, 2010

Carl's Room

I call this Carl's Room because the little cat inside looks like Carl my daughter's Siamese. I have 3 cats living with me, all grandcats!
I used d.Anne Ruff's chair and ottoman kit. This kit is very good. If you ever get a chance to buy one, try it, you'll like it!
I started with the border at the top. I found this in the scrapbooking isle at Michael's. Ahh, the scrapbooking isle, so many things we can use. Although, I am a little disappointed that they have gone to large punches. There for a while I was getting some wonderful punches for flowers. I am still hoping and looking for an ivy punch. I know Hanky Panky Crafts has the handmade punches for ivy but they are too expensive for me just wanting to make ivy once in a while. So, I am still looking!
Anyway, I loved the border, bought it, and kept it for a long time before I knew how to use it. The rest of the furniture I copied from catalogs. I do that a lot! The fish pictures on the wall are from the catalog. The lamp shade was tricky, gluing all of the pieces of card stock together. I used Elmer's, still the best for paper to paper.
Kris

Watering Can Potting Shed

This is my watering can potting shed. It's a happy little place I wish I could go to this winter!
I've made petunias, thank you Hanky Panky Crafts. I have finally understood the instructions and they turned out beautifully. I made my own columbines and passion flowers. I used a Fiskars punch for the daisies. This was fun to do, I made practically everything in here. Let's see I didn't make the chair, that's Chrysnbon, the rake is Sir Thomas Thumb, and the face on the wall is from Hobby Builders. My friend, Mary made the "spill" in front of the chair. Think spring! Kris

Tuesday, December 29, 2009

First Apartment


This room box represents what I thought would be a great first apartment back in the '70's. What a dreamer!
I'm going to start on the left side and go around the room explaining what I did.
To start with in the left corner hanging from the upper cabinet, you can't see it here, but I will post more pictures, is a 90 degree wall bracket. It imitates wrought iron filigree. I made it with black quilling paper. You can also cut paper 1/8" wide and paint it black. I used it for a plant hanger, the plant is in a starter bowl made from a clear pony bead. I made the plant from Fimo and the macrame hanger is buttonhole thread. In the '70's plants were very popular. The plants I made are from Fimo or florist's tape.
The sink, stove and refrigerator are made just like the Vintage Kitchen's, I just made them in apartment size. The bowls on top of the cabinet and holding the popcorn are painted to look like Pyrex Ware. I made them from quilling paper also.
The bathroom is just a peek, but the shelf inside is nice. I copied one from an old S&H Green Stamps catalog. It's made from quilling paper, too.
Remember the stereos that folded up? This is all thin basswood and Fimo. Now, the table and chairs were something I always wanted to have, I've had to settle for them in miniature! These I will explain how to do later. They are made from the little plastic champagne glasses, taller plastic wine glasses and basswood. And lots of gesso!
The brick wall is just a brick red plastic brick sheet that's been painted flat white and sanded a bit in spots.
The book shelf has sliding doors made from brown cross stitching paper. This makes good pegboard, I remember furniture having pegboard sliding doors. The T.V. is a copy of what I had when I first got married. It's a bit tedious, but I think it's worth trying.
The rug is punch needle using embroidery floss with the loops cut off. The pictures are from catalogs and picture frame from Hobby Builders used to make the frames. The shelf on the wall has false drawers. The table is copied from and old decorating book. The lamp base I turned on a lathe and them used gesso to give it the stippled texture. We can talk about improvising a lathe. And everybody had a boomerang ash tray your aunt made at ceramics!
I crocheted the afgan from embroidery floss and made the chair, couch and ottoman from pictures from old decorating books.
If you have any preferences of where to start please let me know, I would be happy to oblige.
TTYL Kris

Wednesday, July 29, 2009

Picture of the Kitchen Room Box

Here's a bigger picture of the room box. I will publish this once in a while as I go around the room. I think we'll make the stove next. If you want patterns e-mail me. Kris

Friday, July 17, 2009

1 inch minis, Kitchen Room Box

This is my kitchen room box. Before making this box I did a little research by buying a few old "Better Homes and Gardens" from a flea market, circa 1940. Let's take a tour. I made the box with a false back to allow for a window scene and pantry. The floor is painted to look like linoleum, the cabinet doors and drawers do not work, there's a teapot, round tin, toaster, a canner with jars of beans inside, a percolator, flyswatter, calendar, wall shelf, stove, canister set, sink, cookie jar, lots of stuff in the pantry, refrigerator, radio, table and chairs, cutting board and knife and the basket of tomatoes and beans.
I plan to share with you how I made most of the minis in the scene on this blog. If you have any questions about the "how to's" please contact me at my e-mail address.
I plan on expanding and selling KITS in the future, flowers, upholstered furniture and whatever else I think that you would like. Keep me informed, I'll do my best. Kris