Caterina, Merry Jingle has sent some links for you! How cool is that, this Internet thing is super fantastic!! Thank you Merry Jingle :D.
Kris

Learn how to make miniature dollhouse furniture, mini paper accessories and get techniques, tips and monthly tutorials.
Saturday, June 26, 2010
Hi Caterina
I love playing on-line looking for stuff, I get lost sometimes and forget about the time. The Internet takes you off and you don't know where you will end up. I can't believe there isn't anything on the Tyrolean style or decor. I know it was popular in the US maybe sometime in the 1940's, I think, at least what we thought was Tyrolean. I just couldn't stop looking because I was convinced that the Internet had everything. We need to tell Google they have missed something don't we? Maybe you could use the suede paper on another project. If you have trouble getting it through the printer, my printer can be fussy, try giving the paper a press with your iron. I am going to try this, I didn't have trouble the first time, then I waited a while before trying it again and the printer said it had a paper jam, stupid printer. Maybe it was the humidity? Or . . I had just taken it out of it's shrink wrapped package, that's why I think a little press with the iron will make it work reliably. I had good luck the first time and even was able to send the suede paper back through to print the rug over and over about 3 times without getting a "double exposure" thing going on. The paper fed perfectly every time and printed exactly in the same place as the first time. I like to feed the paper back through to darken the colors.
For July the project is going to be the heat registers we have in the older homes in the US. I have an example shown in the bathroom room box that is in the blog with the shelf that uses quilling paper. As I am not a world traveler I don't know whether these are universal, maybe someone can let me know.
Talk you all later . . . . . Kris
Friday, June 25, 2010
To Cockerina
Hello Cockerina,
I have spent last evening and this morning searching, Dolomite Alps, Tyrolean Style Rugs, Tyrolean Souvenirs, Tyrolean Weaving, Tyrolean Decor, . . . . .I even went into Italian Rug Stores looking for examples, I couldn't find anything. I am sorry, I tried a lot of different combinations to get different sites. I did find www.souvenirs.cc Albert Demetz, Export:Handcrafts, he didn't have any rugs but some beautiful examples of painted furniture, maybe if you contact him he could direct you to a site for Tyrolean rugs.
I found another site www.fancygoodsofeurope.com, this has some good pictures of china we could copy and glue to plates.
When I was looking in the hotels and places I looked at for decor they had rugs on the floor that were Tyrolean, where did they find them? I don't know. Are you in Italy? Some store must have a catalog for this, even maybe hand weavers selling traditional style rugs.
My husband had an idea, go to a library, maybe a university library and look up traditional Tyrol textiles. Maybe they have some books that will show some examples for you.
And I have to say I was very impressed with your blog!!! I am not computer literate at all so I can't do anything with mine. I just keep it simple so I can understand it, but I loved looking at yours, loved the music and the little flowers that followed the cursor.
I think that your Tyrolean retreat is going to be very cool, I liked the way you have designed it. Will it be in a particular time period or is it going to be contemporary? Are you going to be making the furniture, the painted furniture is very pretty. There is a book about painting in that style for miniatures, Scottie's Bavarian Doll Haus with Decorated Furniture by Scottie Foster. I have used it and can paint the simple things. This style of painting takes as much practice as any other type to gain the skill and I don't have the time nor inclination to devote to it.
Good luck with your search, I am sorry I couldn't be of any help.
Kris
Thursday, June 24, 2010
What Happened?
What in the world happened? I gained over 20 new followers almost over night. WOW! Hello, and I hope you enjoy making minis with us.
I just want to remind you all that I do have some instructions early in the blog. They are "wordy" with no as you go pictures, but are really worth a look.
Aged Painted Finish, March 8, 2010
Cheater Rugs, Part 2, Feb. 26, 2010, talks about buying suede paper from www.dragonflyinternational.com for making rugs with your printer.
Cheater Rug, Feb. 23, 2010, these are ideas for quick rugs.
2 Fancy Faux Finishes, Feb 15, 2010
Vintage Kitchen, Nov. 28, 2009 back to July 24, 2009, toaster, canning pot, stove, refrigerator, sink and cabinet and table.
Contemporary Shell Lamp, July 17, 2009.
And if you have any questions about anything in any of the room boxes I would be happy to make it into a blog project for you all.
Dangerous Mezzo, I was looking around online for fabric and I found Clarice Cliff fabric, who knew? It's at www.quilts - kits - online.com and made by Fabric Freedom and called Deco Dance. If I still quilted I would buy some, but I know if I bought it now it would just sit and my kids would have something else to throw out!
I am working on chairs for Merry Jingle, so I have to get back to work.
Again, Welcome to all the new followers.
TTYL Kris
Tuesday, June 22, 2010
Twining with Threads for Your Basket

 Miniaturists I am left handed, so if I have this started wrong for you please try to reverse these instructions. Once you get what is going on it's very easy to do.
I have used button hole thread that has been twisted back on it self to make it thicker. Any thread or twine that you like will do, if it's the right scale.
Divide the thread in half and loop it over the end spoke.
Pick up the outside thread. . .

 and put it behind the second spoke.


Should look like this.
Now, pick up the outside thread. . .
(this "outside" thread changes every time, you see)
And place it behind the third spoke.
Pick up the outside thread and place it behind the fourth spoke.
You are always picking up the "outside" thread and placing it behind the next spoke, all the way across.
This is a wickering technique, twisting the reed around the spokes. Lots of variations and can get very complicated but beautiful.
If you have trouble let me know.
TTYL Kris
Wire Handle For Your Basket

 I make a wooden handle from a toothpick. I use toothpicks a lot in my work! Cut off the pointed end and about an 1/8th of an inch from the end make a groove with a file, my file has sharp edges and a little rounded on the broad sides, you can use a triangle file, too. I round out the groove and move to the other end leaving a middle that's about 3/16 of an inch. Make another groove, don't cut off the handle yet.


 With your trusty "T" pin make a hole in the center of the end of the handle, just a hole, don't go waddling it out or you might break your handle.
I use a hand drill I bought from Hobby Builders, it's called the mini drill and it's $12.49, #37800 and comes with bit sizes #52 - #74. I put the smallest bit in, #74, and start the hole.
Continue to drill, but hold onto the handle like I am in the picture, this way you can feel if you are going straight. If not, you can correct it. Drill through, and cut off your handle.
I reinforced my sides by punching a small circle, 1/8 of an inch hole punch, and gluing them to the inside of my basket in the middle of the sides at the top.
Using the "T" pin and a block of wood to support the side, pierce a hole on the sides, in the middle, at the top through the rim.
I used green paddle wire from the floral department, it's 26 gauge. Any wire you have that will fit into the hole in your handle will do fine. You can also paint the wire. Slip the wire into the handle and bend the whole thing around the end of your basket. Cut off to just a little past half the length of your basket. Leave enough to go inside and fold over.
Thread the wire into the basket and bend over to secure.
There is the basket with the twining and wire handle.
I hope you all give this a try, it's fun to weave them and fun to fill.
Kris
Sunday, June 20, 2010
Just Back From Michaels
Hi Everybody!
Just got in from Michaels, and I found something you might be interested in. In the cake decorating section on a the side of an end cap there are some nice texture templates. They are from Duff Goldman, Charm City Cakes, I believe he might have a reality show? Anyway, these are clear plastic, Impression, Texture Tiles. I think they might be used with fondant. There are two that we maybe could use with Paper Clay or paper mache', the cobblestone and brick.
I also bought a Mary Engelbriet ( is that spelled right?) metal can with a window already in it, I don't when I will get to it but maybe a half scale scene? Oh, and a clear acrylic little paint can with rubber ducky design around the bottom, just enough room for a pedestal sink to load with stuff. These are two things I absolutely can not resist, Mary E. and rubber duck designs.
I will get the 2 other bits for the baskets, I thought I might let you digest the basket making instructions before I add on.
Kris
Thursday, June 17, 2010
Paper Baskets


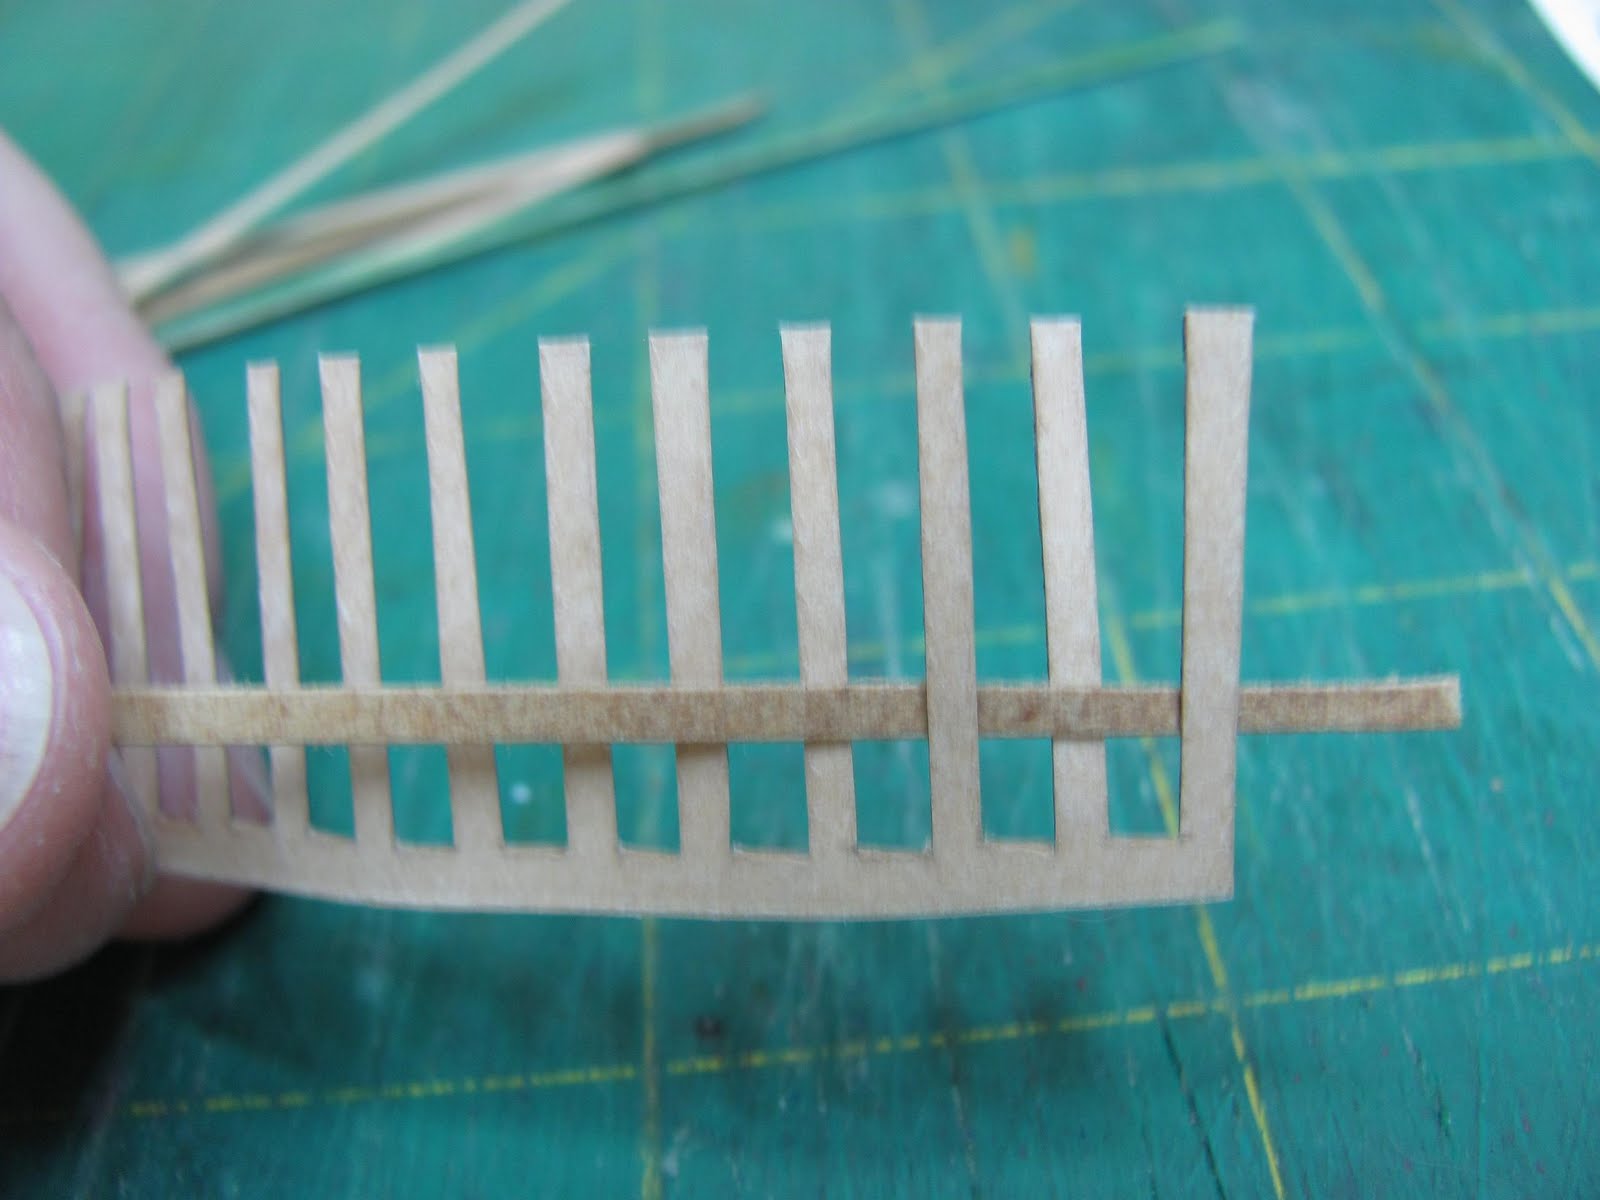
I don't know why I can't get the drawing for the basket bottom to print out the right size, but the other drawing, the spokes, do. Left click on the drawing and a new page will come up, click on your file button and click print. If you have trouble, let me know. You will have to draw your own bottoms, I use a architect's template for circles and ovals.
These baskets imitate Al Chandronait's baskets, I hope I have that spelled right. His baskets are exceptional.
Print your spokes onto card stock, copy and paste plenty of spokes to fill a page and save for later.
I used white card stock, if you have to go out and buy card stock you might want to look at the browns and tans, basket colors and maybe some contrast colors, too. I used Minwax oil base stain, Ipswich Pine to color my card stock. I have also used it to color tan card stock with good results. If you buy colored card stock, though, you don't have to stain.
Cut out the spokes, I used a steel rule and craft knife. If you feel more comfortable with scissors, by all means use them. I know I have my ruler upside down, I don't like the cork setting it up off the table, I can't seem to set the ruler on the line so I turn it over.
I left the lines on when I cut, it made them a little wider and sturdier. By the way I built the spokes on Paint in Windows. Set the spokes aside.
Keeping the ruler on the spokes when cutting the bottom of the spaces keep the spokes from tearing.
I also used card stock for the bottom. If you have basswood, 1/16" thick and can cut it, use it instead. You can also use poster board glue together to get 1/16" thickness.
Trace your bottom pattern onto the card stock 3 times. Cut out around all 3 and cut another piece of card stock out the same size.
Apply Elmer's white glue to the card stock. Lay the other piece on top.


 I find if I smear the glue back and forth and up and down with the 2 pieces until the glue grabs, then line up the edges, give it a good press with your hand and the card stock will not ripple.

It can get messy, try not to get glue on the card stock.
Cut the 3 shapes out and glue together doing the smearing until the glue grabs, line up the edges and give them a good press with y
 our hand.
Test fit the spokes around the bottom, I had a picture to show this but it just doesn't want to stay in the line up.
Trim off what you don't need. You want the spokes to overlap by one spoke.
From card stock cut weavers. These are a healthy 1/16" wide. I use a steel rule and craft knife, but if you have a paper trimmer use it, it saves a lot of time.
You can cut some weavers a little wider for accent weavers to add interest. These can be painted, stained another color, you can also use felt tipped markers to color them. You can also use think threads to weave into the spokes, called twinning. I will be posting that very soon.
Three weavers need to be cut a little wider for the rim and handle.
If you need to stain, do it now. If you don't and get glue on the card stock that spot won't take the stain and it will show a light mark. Stir the stain to get the pigment up off the bottom.
Hold the spokes, bottom, weavers and handle by tweezers and dip into the stain.
Set them aside to dry on newspaper.
When everything is dry begin weaving. Over and under, alternate this on every row.
Under, over. . .
Under. . . .
Over.
Done with one row.
Begin another row, this time opposite of the first.
Over, under, over, under, over. . .
I weave at the top of spokes then I gently push the weavers down.
Push them close to the first row.
I wove 5 rows with an accent row of green in the middle.
Put a dot of glue under every spoke and weaver, do this on one side, then turn over and get the other side.
Trim the spokes and weavers off.
Bend the woven piece around your finger.
Starting at the middle of a side apply a thin line of glue, I used Elmer's again.
Keep applying glue and rotate the woven piece around the bottom, holding it in place until the glue has grabbed.
Finish by overlapping 1 spoke and glue the side seam.
Take 2 of the wider weavers and glue them together.
I had another picture drop out, sorry.
I want you to bend the handle around the end of the basket to shape. Hold it there for awhile until it will stay in the shape of the basket.
The height of the handle is generally half of the length of the basket. Add a little more to glue to the basket.
Glue the handle to the outside of the basket.
More missing pictures, I had 34 to show you, I guess Blogger just didn't want you to see them all.
Now, take the other wide weaver and glue it around the top of the basket over the top weaver. Hold this all together with small clamps.
At least we have the finished basket full of summer vegetables.
Will post sometime this weekend for the twining and a wire swing handle.
Kris
To Wanda
To Wanda, Look at April 24 and you will find the project explaining the paper pottery. Will be posting soon, Kris
Wednesday, June 16, 2010
To Chris P.
I use quilling paper to make "paper pottery". I believe if you look in April under the posts named paper pottery you will find them. It's not quilling, but using the quilling paper.
I will be making up the project for you all today, taking pictures and writing, I hope to post it Friday. TTYL Kris
I will be making up the project for you all today, taking pictures and writing, I hope to post it Friday. TTYL Kris
Monday, June 7, 2010
Everyday gets better, I try not to get a picture of him in my head, if I do the tears come.
I have an idea for a new tutorial for you all, I am going to try to get one out a month, maybe another one if I have time. I do enjoy teaching. I posted the last one near the end of the month so I think I will keep on that schedule.
Thank you for helping me through this, it really did help reading your kind words, I reread them all of the time!
Kris
Wednesday, June 2, 2010
Hi Guys, Thank you for all of your kind words and encouragement, I've gone back to read them several times. My husband and I are "critter" people and we will always have something running around on the place. We just didn't expect this to happen, we raised one before, he was doing so well, just getting to the fun stage, running around and playing, poking into things and exploring. Fidget wanted to be with me, wanted to see what I was doing, curl up and nap.
I am feverishly upholstering furniture, trying not to think of him, it's getting better, time heals. When I need to be near him I look at the baby picture, it's the only one I took, and I read your kind words. Thank you for taking the time to send them, Kris
I am feverishly upholstering furniture, trying not to think of him, it's getting better, time heals. When I need to be near him I look at the baby picture, it's the only one I took, and I read your kind words. Thank you for taking the time to send them, Kris
Subscribe to:
Posts (Atom)