

This tutorial came about when I was asked about the thread I used when I made the watering can. It's crochet thread, Coats & Clark, Classic. The miniaturist wanted to weave baskets with it.

I suggested using waxed linen, 2 ply. The wicker furniture makers use waxed linen, 3 ply.
I purchased some 2 ply months ago wanting to weave baskets but never got around to it.
The miniaturist said she couldn't get the 2 ply so I thought I could do the same thing with painted crochet thread.
This is the result of a question from a miniaturist and my experimentation.
I hope you enjoy it.

You will need 26 gauge covered wire. I have the kind that is wound with thread. Sometimes it's a little tedious to work with because the thread will unwind. There is a different kind, Fibre-Craft makes it and it has more of a coating. I am told it's easier to work with. She buys it from www.createforless.com.

Choose a "basket" looking color and paint the crochet thread and one piece of the covered wire.
I just dip my finger and thumb in the paint and run the thread through and hang it up to dry.
I cut the thread 24 inches (70 cm) long. It seems an easy length to handle.
Four pieces should do for a little basket.
Don't forget to paint one piece of the covered wire, too.

The moulds should be at least 1 inch (2.5 cm) tall. I like to use plastic because the tacky glue will not stick and I can wipe the glue off.
Remember 1 inch equals 1 foot for sizing the basket. You don't want to make the basket too big. You have to fill it after you've made it. A big basket takes more to fill!

I made the bottoms from mat board. I traced around the Reese's Pieces container, then drew another line about an 1/8" (4mm) inside the original line. I cut on the new line. For the other moulds I used my circle and oval templates to measure for the bottoms.

You want the mat board bottoms to be smaller than the bottom of the mould.

Cut the mat board bottom out. See how it's smaller than the bottom of the hair spray cap.

We are going to drill holes into the edge of the mat board. (I suppose you could drill into the flat face of the mat board and bend the wire out from the mat board, but I think that would create bulk.)
You see my little pin vise drill on the table. This is a good little tool.
You will need an UNEVEN amount of holes. We want as many spokes, that's the 26 gauge wire, as we can get into the mat board edge.

The circle you see is 7/16" (6mm) in diameter. I have 17 pieces of wire to stick into it.
Cut the wire into 1 inch (2.5 cm) pieces, cut one piece 2 1/2" to 3" (63mm to 77mm), that's your handle.

After trying to devise a method for measuring where the holes should be I gave up and just started marking free hand. Remember you must have an uneven number. Also, it's better to error on having too many spokes than too few.
Use a "T" pin to pierce a hole in the edge.

Now, drill a hole, removing paper so that the wire will have a place to be.
If you skip this the mat board will be hard to keep together. It will split apart.
When you drill, hold the mat board between yours fingers and thumb, squeezing it, almost. You will feel the drill.

So, this is what you need to do: Pierce a hole with the "T" pin, drill out the hole, dip the end of the wire into YELLOW WOOD GLUE, get a good amount on the wire and put the wire into the hole. If you are using the wound thread type of covered wire I found if I twisted the wire in the direction that the thread was wound it helped. This twisting kept the thread from unwinding.

I've got my first wire in, it's the handle.
You see all of my marks?

Go around the circle, piercing, drilling, dipping and inserting at every other mark.
Be sure you are holding tightly to the circle.
When you have half the wire in, place the assembly onto your table and press hard to seal the mat board together.

Now, begin again, piercing, drilling, dipping and inserting until you have all the wire in.
Press on the mat board again to seal.
I like to leave this to dry, if not over night at least several hours.
If you don't let this dry adequately the wire spokes will twist while you are weaving causing you headaches.

I wanted to show you how the mat board sealed around the wire spokes.

After your bottom/spokes assembly is dry you can paint it a "basket" color.
Leave this to dry.

Center the bottom of the basket onto your mould.

Fold the wire spokes down around the mould. You will have to do this at the edge of your table because of the long handle wire.

Lift your basket off the mould and tacky glue the end of the painted crochet thread to the bottom.

Press the basket back onto the mould.

Begin to weave, over, under, over and under. Pull tightly and the basket will begin to grip the mould before you know it.

Second row begun.

Over, under, over and under . . . .

You see, I haven't even gotten up the side and the basket is staying on the mould by itself. I am holding the hair spray cap.

Try to keep your weaving even. Every so often set the basket up at eye level and check.
If you find you are high on one side use your tweezers to push the thread down.
This will only move 2 rows at the most, so check often so you can keep everything looking nice. Doesn't hurt to unweave if you need to neaten things up a bit.

You are going to run out of thread.
Weave under with the thread that's running out. That's the original thread end you see on the right.
Place a new end behind the spoke your ending thread is coming out of and just continue to weave.
You will trim the ends off when you finish the basket.

I usually weave until I have a 1/2 inch (13 or 14mm) high sides. This is a 6 inch (15.5 cm) basket in life-size.
I don't like them too deep, then I have to fill it!
See my ends where I started new thread?

Carefully PUSH the basket off the mould. If you pull, the basket comes off and then you squeeze the basket misshaping it. If you do this, put the basket back on the mould to reshape.
Trim the ends of the thread close to the weaving.

Trim off the spokes close to the weaving. Don't leave any wire sticking up. Don't cut your handle off.

Use the painted wire for the rim. Bend the wire around the mould.

Cut the wire, leaving a little extra, maybe a 1/4" (6 or 7mm).
Slip the wire off the mould and straighten it.

Apply tacky glue to about 1/2" (13 or 14mm) to start.
Start winding the thread around the wire.

Continue to wrap the thread until about 1/2" (13 to 14mm) is left of the wire.
Apply tacky glue to this end and wrap the thread to the end of the wire.

Bend the wire rim around the mould to shape.

Place the basket back on the mould and apply tacky glue to the edge.

Press the rim down on top of the basket.
Trim the ends so they butt, apply glue to the ends.
The rim is glued on the outside of the handle.
Hold this until the glue tacks and is holding the rim to the basket.

Carefully push the basket off the mould.
Use small clips to hold the rim together until the rim is dry.

To get the length and shape of your handle right, find a cylinder to shape it around. I am using a 7/8" (22mm) dowel here but you could use anything around the house.
Trim the handle to the top of the rim.

I threaded the crochet thread onto a large eyed needle, a tapestry needle.
I want to sew a "X" at the base of the handle.
I inserted the needle from the inside of the basket and came out right under the rim.

I crossed the thread over and behind the handle.

There's the "X".
Apply tacky glue to the end of the thread inside the basket.
Don't cut the thread that the needle is on.

Start wrapping the handle with the crochet thread.
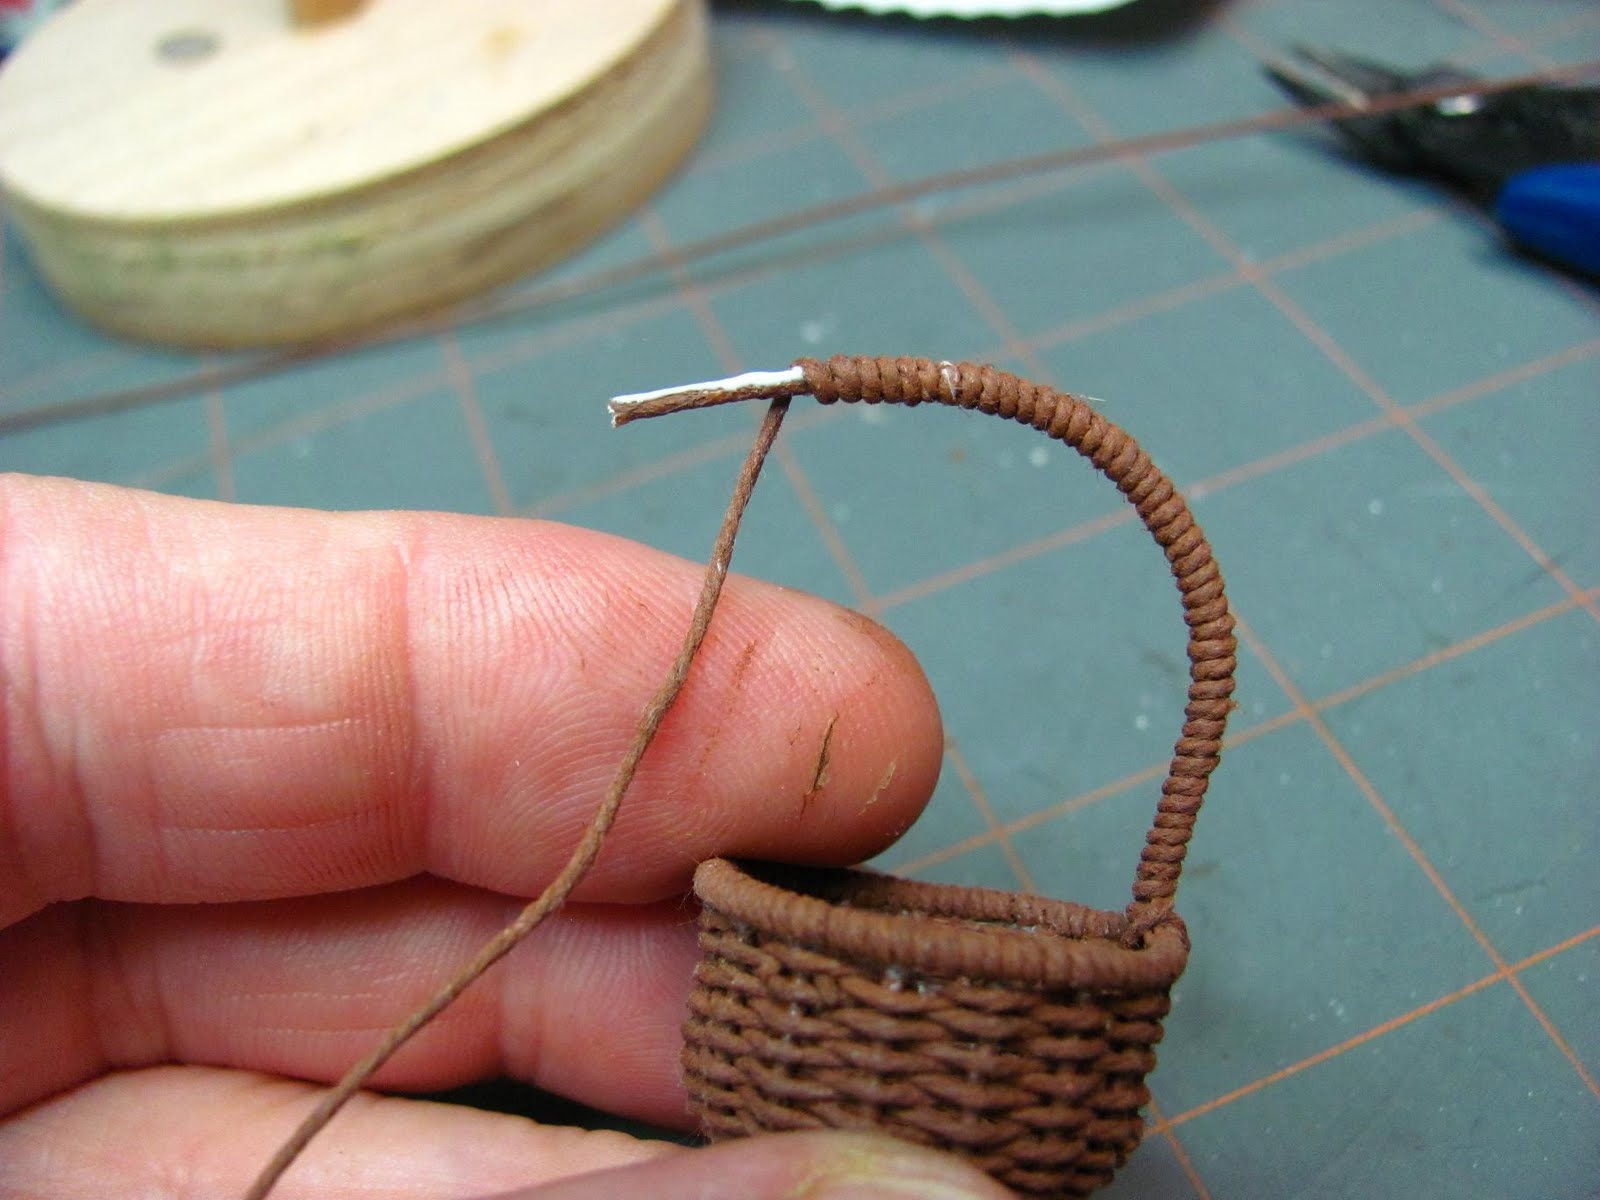
Wrap the thread until you have about 1/2" (13 to 14mm) left.
Apply tacky glue to the wire and finish wrapping the handle.

The handle has been wrapped, don't cut the thread.
I didn't even take the needle off while I wrapped the handle. I am going to need it to sew another "X".

Apply tacky glue to the rim and press the handle down onto the rim.

When the handle has dried sew another "X" on this side of the basket.
Trim off the extra thread and apply tacky glue to the end.
Touch up any paint you might have missed.

I have some little plastic clamps I bought when I first go into miniatures. I know Hobby Builders still carry them. They come in handy for this type of thing.

This is the basket made with the Reese's Pieces candy container.

These are the baskets made from my Fimo mould.

This is the basket made from the cap of my hair spray bottle.

I am showing the difference between the baskets that I painted with the glass stain. I painted BOTH baskets with the golden brown, I painted the one on the right with the glass stain, too. I really like this one.

This is also showing the glass stain effect.
Both baskets were painted with the autumn brown and the one on the right was painted with the glass stain, too.
I hope you have fun trying this out. I think you be very happy with your finished baskets. I will have the item number for the Fibre-Craft wire for you with the next post. I have something else to share, how to make a fly swatter. I will try to have it posted tomorrow.
Have fun, expand on it, make it better, just keep making minis!!!