

Hello, Hello! I know I missed August. My husband grows a garden every year and I can the vegetables for him. He's a big help with the canning, too. I put up over 115 pounds of tomatoes, mostly made into juice for him, some whole tomatoes for me. Lots of green beans were canned and I made grape jelly. Our blackberries didn't do well so I bought strawberries and peaches and made them into jam. Our pantry shelves are very colorful this year.
I saw this cabinet on-line and thought it would make a good tutorial for you.

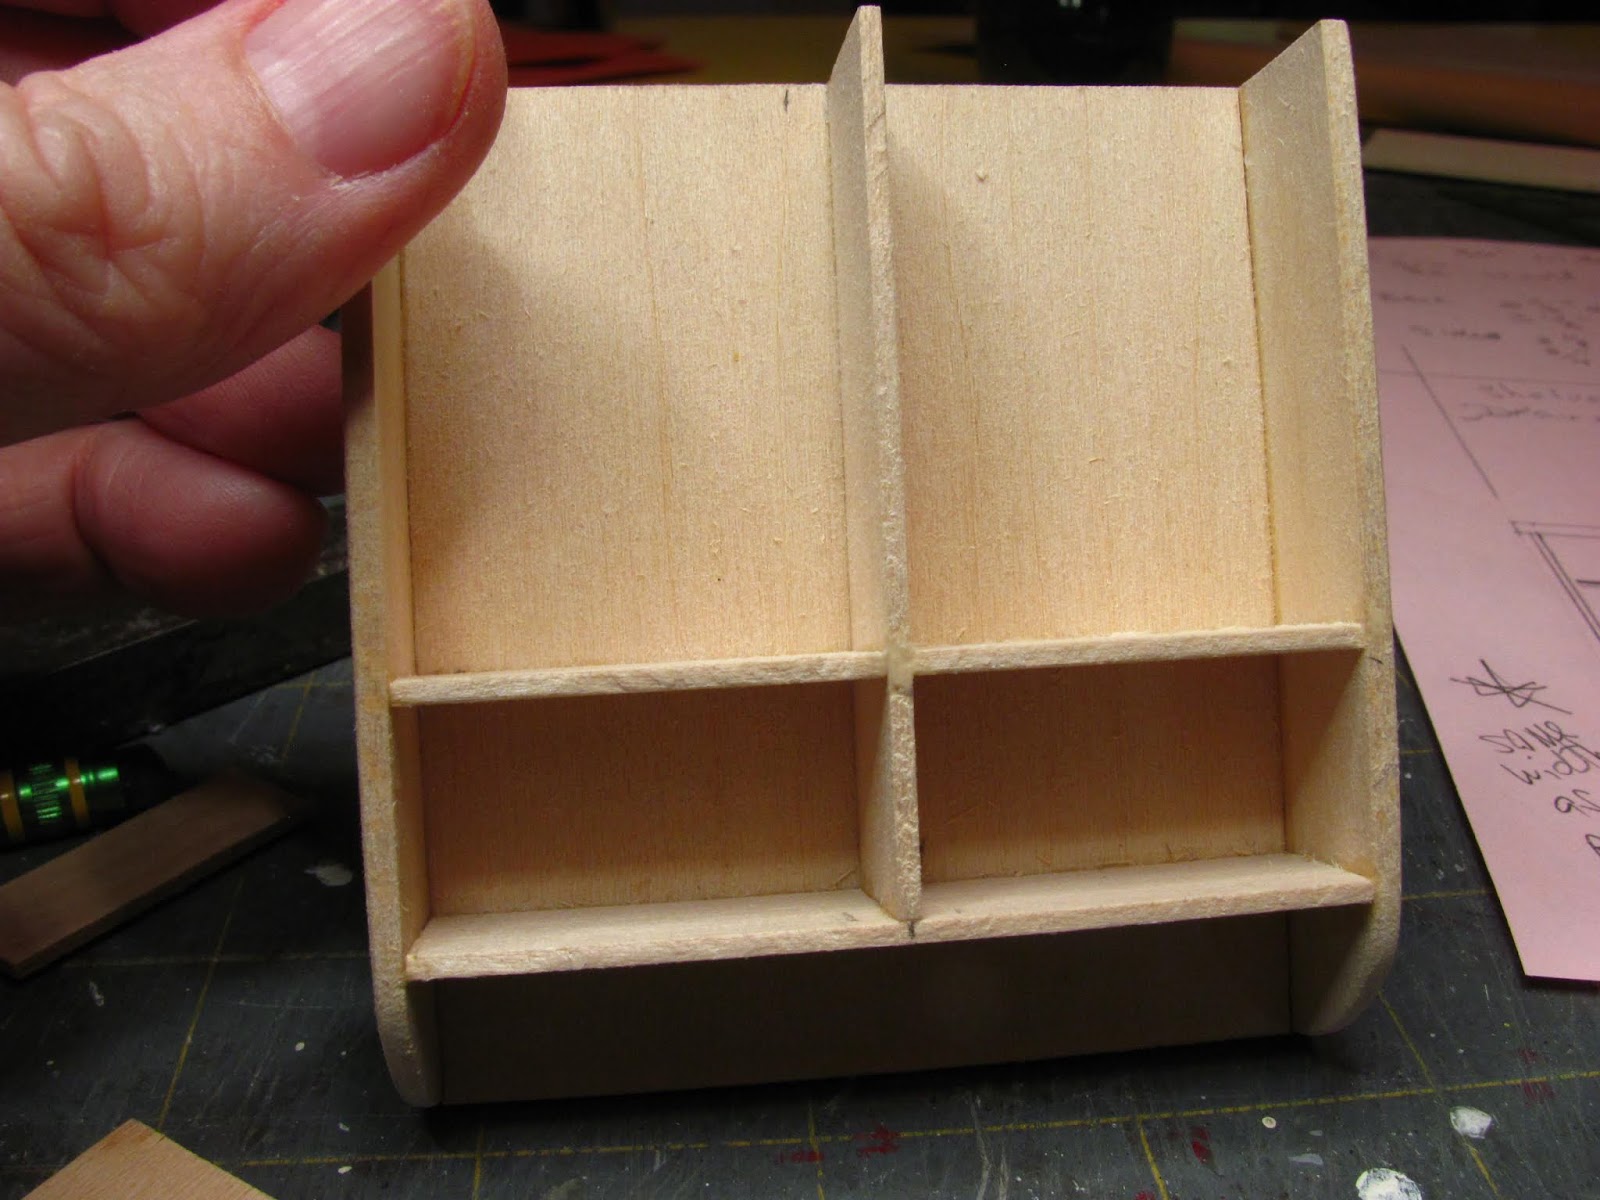
The drawers and door open so you can fill them.
The door is a little thick, I would recommend using 1/32" thick basswood for the outer layers and keep the middle layer 1/16" thick. The door would then be 1/8" thick instead of 3/16".
Another design change, I would make the drawers narrower. I think they might be a little too tall for the cabinet. Making the drawers narrower will give you more room for the space between the shelving. It's up to you.

I used wooden knobs from Hobby Builders Supply, Item #12007, 18 knobs for $5.36. The metal hooks are from Hobby Builders, too (www.miniatures.com)
Item #65714, four hooks for $4.99.
The wire mesh is something I bought from Michaels a long time ago. I checked on-line to see if Michaels has it and I couldn't find it. I then Googled Paragona wire form or Amaco wire form and found Dick Blick carries it as did a few other places, they deal in clay supplies. I used the 1/8" pattern.

Let's get started building the cabinet.
I am using basswood. It is so much simpler to use wood. Yes, you can make this from mat board if that's what you have. Considerations have to be made for mat board and wood is just easier to use.
This cabinet will be glued together using yellow carpenters glue, either Elmer's or TiteBond.
Cut the back and sides from 3/32" thick basswood. The back and sides are the same length or height, 3 1/8", the grain is vertical on both pieces.
After cutting that length set the saw to 2 11/16" and cut the width of the back. With the saw still set at 2 11/16" cut the bottom shelf that holds the drawers. This is cut from 1/16" thick stock, and will fit between the sides just like the back. It's easier to cut this now so you don't have to re-set the saw. The grain will be horizontal on this piece. I'll cut the depth of the shelf later along with the other shelves. Set this piece aside after you have it cut. You might want to mark what it's for so you don't use it for something else, it's been done.
Back to the sides, the sides are 3/4" deep or wide. Above is a picture of a side. After I have the width cut I am marking the curve at the bottom using my circle template. I am using the 1 5/8" circle to mark that curve.

To make identical cuts I am using glue stick to glue a scrap of paper to one side of a side.
Apply glue stick to the paper.
(For more complicated cuts I will use yellow or white glue, not tacky, letting it dry. Yellow or white glue holds better.)

After applying glue stick to the paper press the other side onto the paper. Line up all the edges and let this dry for about fifteen minutes.
You might want to clamp this if you have clamps, the wood might curl away from the glue.

I used my scroll saw to cut the curve.

Pop the two pieces apart, peel off the paper. Give the surface a light sanding to remove the glue residue.

These are my two sides and the back.

Use yellow carpenters glue and glue the sides to the back.
Glue the sides to the side edges of the back. Do not glue the sides on top of the back.
PLEASE LET THIS DRY THOROUGHLY BEFORE GOING ON.

The shelves and middle divider are 5/8" deep, your first shelf is cut to length all ready.
Set the saw to 5/8" and cut the bottom shelf that width.
With the saw still set on 5/8" cut at least 10" of 1/16" thick basswood for the shelves and middle divider.

I cut myself a cheater block so my shelf will be level when glued.
This piece of wood is 1/2" wide. That is the space left at the bottom of the cabinet. The cheater block doesn't have to be exactly the width of the back just close.
Glue the shelf in.

Let the glue tack, then carefully remove the cheater block.
You should have a level shelf.

I am going to explain this technique again. Someone misunderstood how this is done.
Sometimes it's hard to find the middle mathematically.
I want to find the middle of this piece. Measure beyond the middle, mark.

Using the same measurement, measure from the other side and mark.

Now measure between your two marks.
I did not say to eye it and find the middle, we measure.

I have the middle of my piece of wood.
Just something I thought I would pass on. I use it a lot.

Find the middle of your cabinet back.

Find the middle of the bottom shelf.

Measure and cut the middle divider.
Center the divider on your marks and glue into your cabinet.
Remeasure to make sure your space at the top is the same measurement as the space at the bottom.
It isn't as important to have exactly the same width on each side but it is important that the space be square or you will have trouble with your cabinet door.
Let this dry a bit.

The second set of shelves hold the drawers.
Measure between the left side and the middle divider.
When you have that measurement cut your shelf. Check that the width all the way up the left side is the same. Cut two more shelves for the left side. Set these aside for now.
You'll notice I've gone and cut myself another set of cheater blocks for trying to get my shelves level. Cut a couple of pieces of scrap wood 21/32" tall, that's the space between these shelves. I am sorry about the 32" measurement. That's just past 5/8". At this point you change the distance between these shelves and the ones above. You are going to be measuring on your own so it's up to you.
Glue the shelf in, let it tack and carefully remove the cheater blocks.
You have another shelf for inside the cabinet, it is cut narrower to fit behind the cabinet door. Go ahead and cut this shelf to length now. We will cut it's depth later. Set it aside and mark it.
Glue the other shelf in and let this assembly dry for a bit.
From the looks of the next picture I got into the zone of constructing the cabinet and forgot to take pictures of gluing in the upper two shelves.
Cut some scrap wood for cheater blocks 9/16" tall, that's the space between the shelves on the left side of the cabinet. Glue your two shelves in using yellow carpenter's glue. Let this assembly dry for a bit.

I am measuring for the drawer fronts. They are cut from 3/32" thick basswood. This is my measurement. I must stress at this point you are going to have to measure for yourself and cut to your measurements. We all make our cuts a little differently, yes we do. The width of a pencil line makes a great difference when making miniature furniture.
I want to leave a little room for the drawer to slide in and out easily so I am going to cut the height of the drawer front at 5/8". That will leave a little room at top and bottom. Cut a piece of 3/32" thick basswood, enough to cut two drawer fronts from 5/8" wide. The grain is horizontal, set this aside.

Since I know the height of the drawer front I can also cut the height of the sides from 1/16" thick basswood. Cut the drawer sides, enough to cut four sides from.
Put two drawer sides into the drawer space and measure the width of the space left. I am measuring for the drawer bottom.
I cut my drawer bottom at 1 1/8" wide.
The grain of the drawer bottom is going from front to back. The grain of the sides and back of the drawer is horizontal.
I know the drawer front, the sides and bottom aren't finished, yet. They still need to be cut to length.
With your saw still set at 1 1/8" wide cut a piece of basswood for the back.
Mark all of these pieces so that you know which is which.

I've slid in the drawer bottom with the sides (remember the sides haven't been cut to length, yet).
Everything seems to slide all right.
Measure the depth of the drawer space, minus the thickness of the drawer front, 3/32".

I cut my drawer bottoms 1/2" deep.

My saw is set at 1/2" and that is how long my sides need to be.
I have two drawer bottoms and four sides ready to be glued together.

Glue the sides to the edges of the bottoms.
Please let this dry before going on.

Your back is all ready cut to length when you cut your drawer bottom. What you need to do is cut it's height or width.
Measure on the inside of the drawer the height of the sides and set your saw and cut the backs.
Glue the backs onto the bottom and between the sides.

Measure along the bottom front of your drawer and cut two drawer fronts that length.
Glue the drawer fronts onto the drawers.

I cut a top from 3/32" basswood. I cut it so that 1/8" is extra at each side and across the front.
My top measured 3 1/8" long (from side to side) and 7/8" deep. The grain is horizontal.
Glue your top onto the top of the cabinet.

My right side shelf is all ready cut to length. The shelf needs to be 3/16" less than the depth of the other shelves. 3/16" is how thick my door is.
I mentioned this before, I think I would have liked to use 1/32" thick wood for the face and back of the door, that would have the door be 1/8" thick. If you do this adjust the width of your shelf, add a 1/16" to my measurement.
My shelf width is 7/16" wide.
This picture is showing the thickness of my door, three layers of 1/16" thick basswood brings the door even with the face of the cabinet.

I've made a cheater block for this, too. I've divided the space in half and cut my block 7/8" wide.
Glue the shelf in and let it dry a bit.

So far so good.

The full-size cabinets had metal hooks and I liked that. I thought it paired well with the metal mesh in the door.
I looked through my stash and found these coat hooks and they were too big.
I used cutters to cut the bottom part off. I used the smaller bottom hook for my cabinet.
Set these aside for now.

I am measuring for the stiles (the vertical part of the door frame) for the cabinet door.
I cut them 1 3/4".
The width of my stiles is a fat 3/16". I thought 1/4" was just to wide. If you are buying your wood buy strip-wood 3/16" wide.

I've cut two stiles, will cut two more. You are going to have a front and back to your cabinet door with the wire mesh between.
Measure between the stiles for the rails (the horizontal part of a cabinet door).
I cut my rails just shy of 13/16" to make sure I have space to open and close my door.

I have four stiles and two pieces of 1/16" x 1/16".
The 1/16" x 1/16" will be glued between the doors making the space for the wire mesh.

Here are all my stiles and rails to make a front and back cabinet door.
Ignore the shorter 1/16"x 1/16" on the left side of the picture.
You will measure and cut 1/16" x 1/16" pieces when the door is further along.

Glue the rails between the stiles for the front and back.
Glue the 1/16" x 1/16" long pieces onto the stiles. Glue them so that the outside edges are even.
Then measure and cut pieces of the 1/16"x 1/16" to fit between the longer pieces on the sides.
Make sure all the edges are even.

This is the package for the wire that I used to fill the cabinet door.

A picture of the whole front of the package.

This company is also known as AMACO. As I mentioned before I did find it on-line, seems to be used by hobbyists that use clay.
I used to find this product at Michaels in the isle where the glues are sold or by the Fimo.

This wire is very flexible and you can change the width of the diamonds.

I painted my wire a brassy color and cut it to fit inside the frame I made with the 1/16" x 1/16" strip wood.
Glue the other cabinet frame onto of this assembly.
If you have clamps you may use them, just be careful to not mark the surface of the doors.

Ready for a pin hinge.

But wait . . . when I was painting my wire I found that the paint would fill the diamonds . . . hmmm . . . . do I still have some stained glass paint stuck somewhere?
Yes, I had two little pots, blue and purple. I usually buy a little kit once every couple of years just to keep it on hand.
(When making paper pottery I will use glass paint as a finish, it looks exactly like glaze. You'll find that in the "Things to do, Things to see" list.
I painted my wire mesh black and then filled in with the stained glass paint. Wouldn't this look great on English cottage windows??

Or I could have put this in my cabinet door.

Back to putting in the pin hinge
To help keep the door steady I cut a couple of pieces of scrap wood the same width as my shelf, 7/16".

I've set my door into place.

With pin hinges you need to have the pins the same distance from the edges at top and bottom. If the pins are not in the same place the door will have trouble opening and certainly not open straight. The door will be wonky.
So we measure but we have a top that extends beyond the rest of the cabinet, problem number 1.

Measure not more than an 1/8" away from the side or front and mark. I usually measure 3/32".
I forgot to sharpen my pencil, my mark is too big and messy.

Remember the top extends 1/8" beyond the body of the cabinet.
Add that on and make your marks.

I am using a "T" pin to start my hole before I drill.
Problem number 2 is that I have a shelf to drill around.
I have tried make cabinets leaving the problem parts off until I fit the pin hinge and that certainly could have been done here. I usually can get around this and set the pin.
I cut straight pins off and use them for my hinges.

I drilled holes for my wooden knobs and glued them in.
I used super glue, medium thickness to glue on the metal hooks.
I know I've done this cabinet using wood and saws that some of you don't have. As I mentioned before you can use mat board just go back and review some of the cabinets I've made using mat board and I am sure you can make this, too.
I do apologize for missing August.
I've added some new and beautiful pictures to the Follower's Gallery, please go and take a look what other miniaturists have been doing with the tutorials and cheer them on.
And I know I haven't said this in a very long time, Thank You All for reading and sending me all the appreciation that you do. You all make my day and keep this blog going.
Have fun, Expand on it, Make it better . . . .
Just Keep Making Minis!!
Talk to you later, Kris