THANK YOU!!!!! I KEEP SAYING I HAVE THE BEST FOLLOWERS IN THE WORLD, IT'S FIXED!! BAD DIGGY
LOVE TO YOU ALL

Learn how to make miniature dollhouse furniture, mini paper accessories and get techniques, tips and monthly tutorials.
Sunday, September 21, 2014
I know this is dumb but Digger, my cat laid on the keyboard last night while I was putting up the tutorial. He did something and now everything is smaller, the screen is still maximized but all the content went small. Does anyone know what he did and how I can fix it back??? The print is just too small
Signed,
Desperate in Bunker Hill
Signed,
Desperate in Bunker Hill
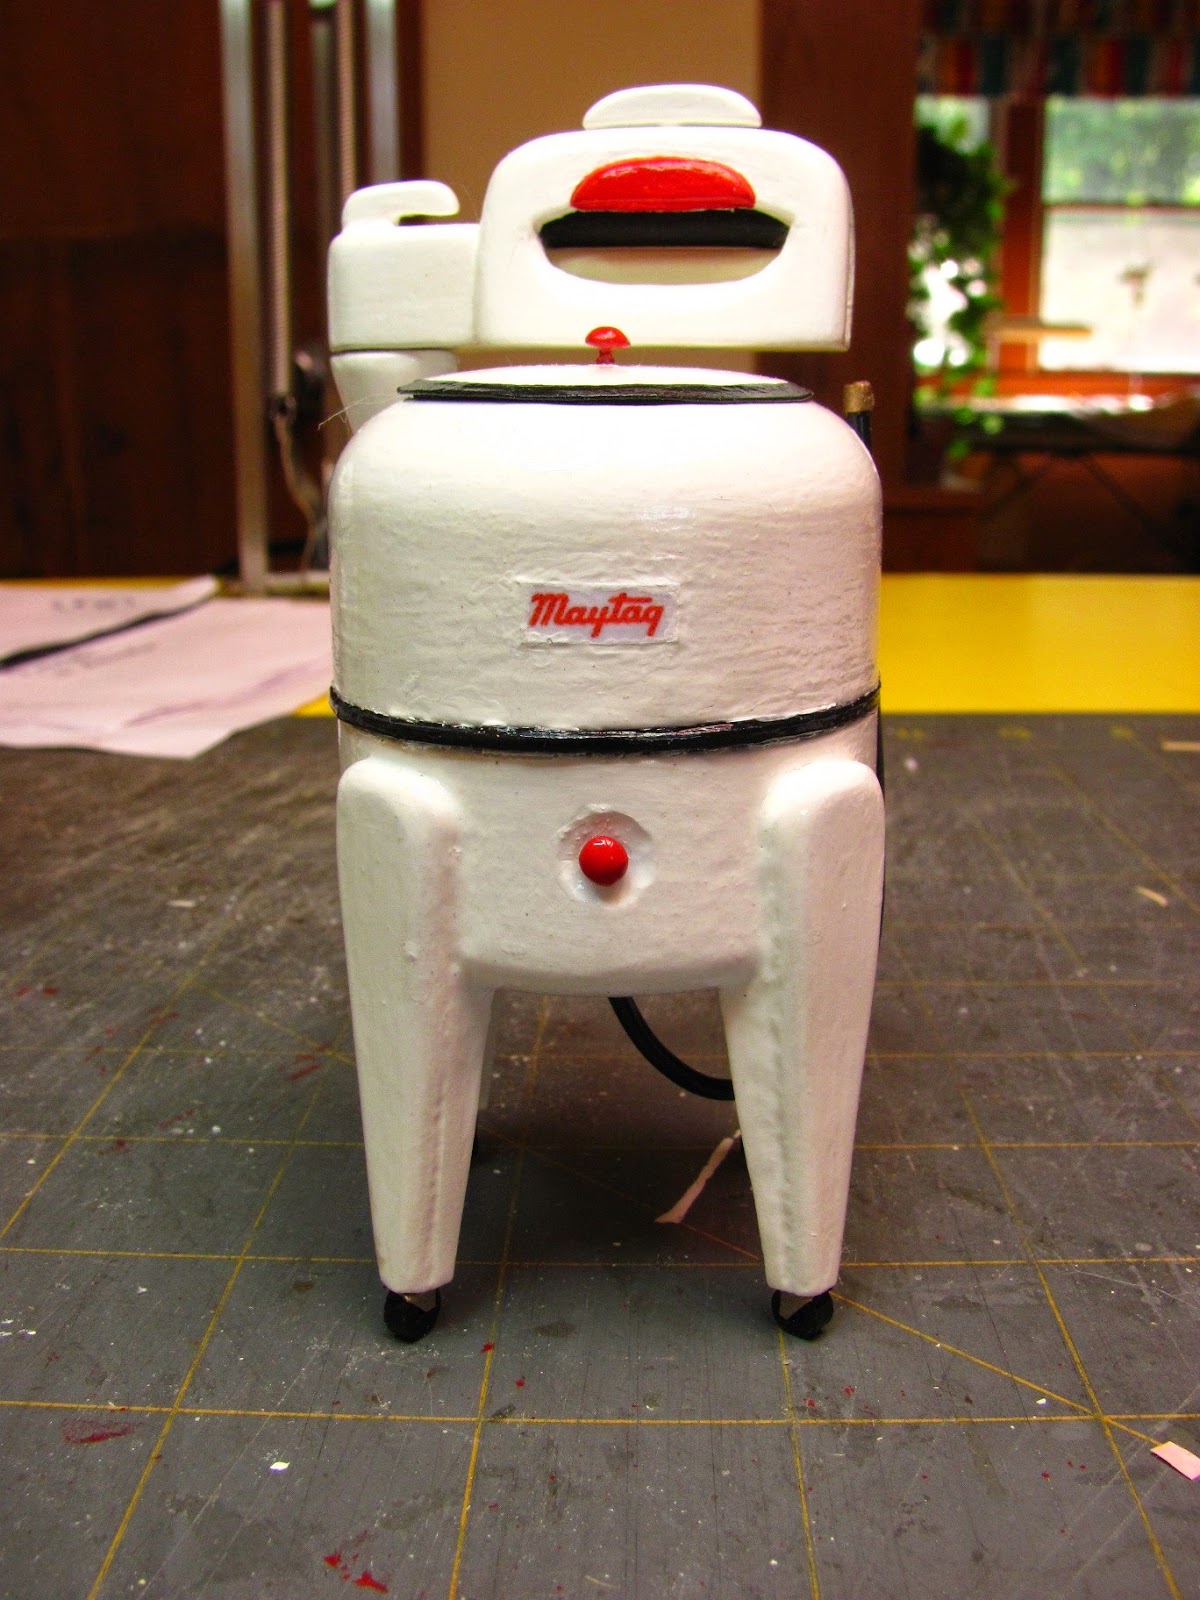
1 INCH SCALE WRINGER WASHER TUTORIAL - How to make a 1 inch scale wringer washer.

First there is Chris. She sent me the idea of using pill bottles for the body of the washer. I had been wanting to make a wringer washer like this for years but couldn't get it started. The pill bottles were the thing.
Then there is Judi. This wonderful lady has this washer, in aqua. Used it to wash her family's clothes for years. Even after a stay in the hospital she was still sending pictures and measurements to me.
I hope you all noticed the very professional patterns that were contributed by Nancy. These patterns are perfect and just what this tutorial needed. Nancy came to me after I had published the vintage kitchen stool offering her services. I hadn't needed patterns until now, I contacted her and she donated her time to make them for us.
I want to give a big thank you to these ladies for helping me get this tutorial out to you!!
I started the second washer on Monday of this week and it's now Saturday. It's finished and so am I!
This is not an easy tutorial, don't rush, take your time, let the glue dry.
Please take the time to read the whole tutorial before you start. I try to take pictures to explain what I am doing but sometimes only words can do this. This is a huge tutorial. It has over 300 pictures. Take your time, take it one step at a time.
Let's get started.

In the previous post I explained a few of the things you will need.
The first is a bottle of Ibuprofen from Wal-Mart, maybe in more ways than one! There's a lot of sanding of small parts and your hands will ache.
Please look closely at this bottle and be sure to get the right one.

I used my tape measure to show you what its circumference is.

This is the second bottle you will need. This comes in a box, again look closely and get the right one. This is for the tub of the washer. Set this aside for now.

Take the label off of the large bottle. I used paint thinner to remove most of the date stamp.

You will need 220 and 300 grit sand paper.
I used this to rough up the outside of the bottle. It will also remove the rest of the date stamp.
I did this so the plastic would accept paint. I did not know if the slick outside would keep the paint on.
Finish with the 300 grit paper.

I also keep emery boards on my table. They are good for getting into tight spots and you can add even pressure to sand because of the board.
My cats like to chew on them, too, go figure?????

You are going to make a gauge. I use a piece of square basswood and a brad.
A brad is a nail without a head, a nail has a head. Just so you know.

Measure 13/16 inch.

Make a hole in the basswood with a "T" pin for the drill bit to start.

I am using my Dremel to drill. Chuck up a bit that is the diameter of the brad.

Just a note, I am going to be using my scroll saw to cut the mat board.
If you don't have one of these and I do recommend that you get one, you can use your craft knife and cut the mat board singly and glue the pieces together.

When you drill your hole don't go all the way through, only part of the way.
Start your brad and hammer it through.

Make sure the point is at 13/16 inch. If it's not knock it a bit with the hammer.
This is your gauge it's got to be right or the proportions of the top and bottom will be wrong.
I bumped mine a bit to get the point on 13/16 inch.

Move the gauge around the bottle to score a line into the plastic of the bottle.

I've got my line to follow to cut the bottle apart.

You cut this with your craft knife, I used the scroll saw.

Pull out the brad so we can reset it to make another gauge.

This measurement is 15/16 inch, mark with a "T" pin.

Drill your hole part way again and insert the brad.
Check to see if the point is at the right measurement.

Cut the neck off the bottle. Leave the curved part of the bottle.

The neck has been removed.

I sanded my cut edge a bit.

Turn the bottle upside down and mark with your gauge.

Here's the line, cut it apart.

Here are the three pieces of the bottle.
The middle piece is waste.

If you need to sand your cut edges smooth, do it. I had to because the scroll saw leaves a little bit of a rough edge.

Set the bottom onto a circle template hole and mark the quarters all around.


This is my leg pattern, mat board, a pencil and sharpener. Keep the pencil sharp so you can trace close to the pattern edges.

If you are using a craft knife to cut with, keep a sharp blade in it.
You will cut single layers of mat board and glue the pieces together using yellow carpenter's glue. You will need to cut eight legs and glue two together and have four legs.

Using 220 sand paper sand the edges of the legs.

The picture above is of the top and this is the bottom of the leg.

This is the front of the leg.
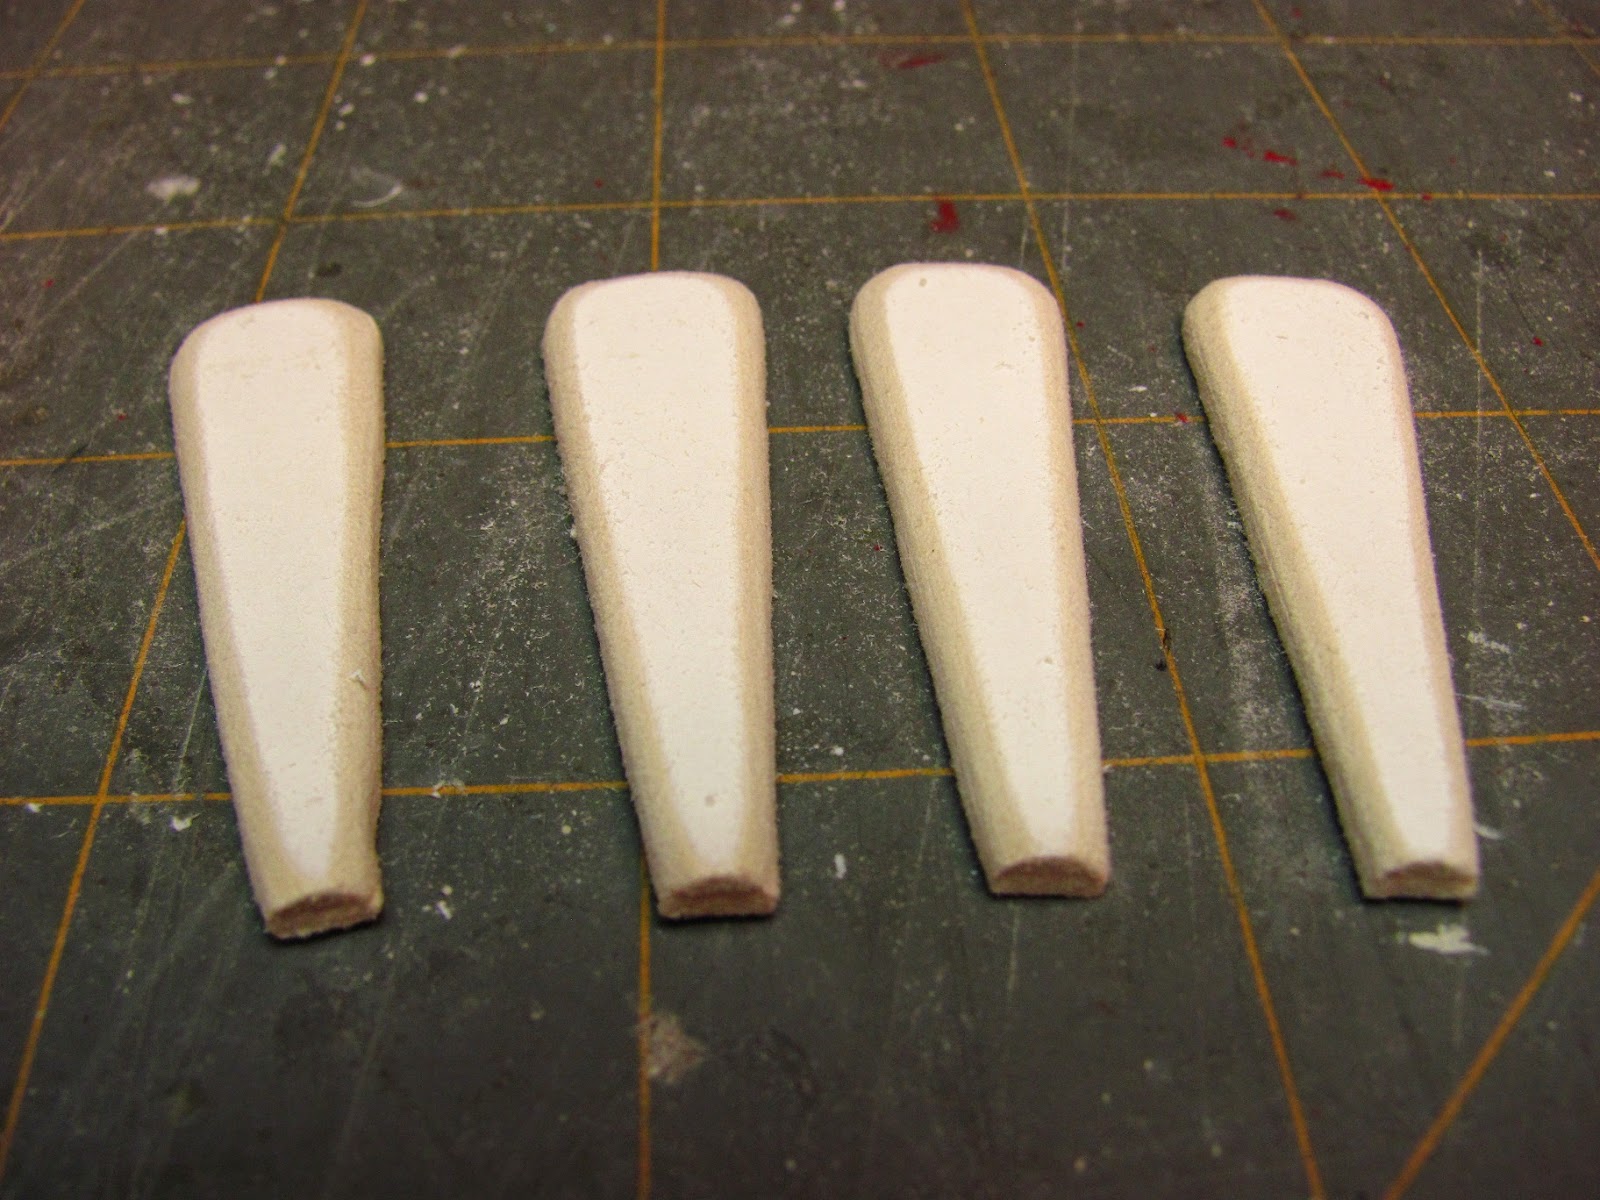
Here are all four of the legs. Finish sanding with 300 grit sand paper.

Use the "leg with sides" pattern to trace onto card stock four of them.
I am using manila file folders for my card stock. I found a bunch of used ones no one wanted, oh boy for me!!

Before you cut them out, score on the pattern lines. Use the back of your craft knife.

Rough cut the pieces out and fold on the scored lines.
I want you to fold with the scored side inside the fold. I know this is a little harder to do. If you fold with the scored line on the outside it will have a ragged edge that is hard to cover with paint. We want smooth edges if we can get them.

Use carpenter's wood glue to glue these pieces to the legs.

The washer needs a hose and I used wire.
This is wire that is used to wire your house, it's 12/2 with ground. It can be bought in small amounts a foot or so.

The wire above is heavy and hard to bend. If that's all you can get, all right.
This is appliance wire or bell wire. This is easier to bend.
All of this wire has a solid copper core.
Don't buy automotive wiring, it has a stranded copper core, it won't stay the way we bend it.
To find the appliance or bell wire try an ACE HARDWARE store. They are very helpful and will probably have it. If any of you ever put together the outside garden hose kits this is the wire in it.
Find a drill bit the same diameter as your wire.

Drill a hole in the center of the bottom of the washer.

I use the glue on the left, it's thinner and will go through my little precision applicator. This is the glue I will use to attach parts to the plastic body.
You can try out the other glue, I'm sure it will work.

Place the leg on the edge of your table.

Bend the top of the leg over the edge of the table.
Glue the legs over the pencil marks you made earlier marking the bottom into quarters. Turn the bottom over and fill in with glue .
I used the Grrrip glue for this.

The legs are on. Do you see how the leg sides are up at the curved bottom?

This is the circle template, we will use this a lot in this tutorial.

The 1 7/8 inch circle should fit over your bottom.

On a single layer of mat board trace a circle.

Center the template over the circle you just drew and draw a 1 3/4 inch circle.

Cut this out on the inside line and the outside line. This is the washer's gasket.

I am showing you this picture to show you the gasket.
And to let you know I changed my mind about using an acrylic varnish to seal the edges of the mat board.

This mixture was suggested to me a long time ago and it works better for sealing the edges. The paints sticks to it so you can sand without the paint peeling off.
Equal parts paint and wood glue.
Paint the outer edge of the gasket with this mixture.

Paint the cut edges of the legs and the leg sides with this mixture also.
You can turn the bottom over and paint up under the legs, too

Trace a 1 3/8 inch circle onto card stock.

Center the template over the circle you just drew and trace a 3/4 inch circle on the card stock.

Cut the circle out and cut it open.

Roll this around into a funnel shape until it's 3 layers thick.

Glue the layers together using yellow carpenter's wood glue.

This is a 1/4 inch dowel. You can work with about a 5 inch piece.
Sharpen it a bit.

The hole in the funnel shape will be tight and it will slide onto the dowel easier with the end shaved off a bit.
I want a tight fit, less to sand and fill later.

Push the funnel shape to the end of the dowel.

The end of the dowel is even with the top of the funnel.

Fill the funnel with yellow glue.
Let your glue set up a bit. Use your paint and glue mixture to re-coat the gasket edge and the legs if they are dry.

Use 220 grit sand paper to sand the seam and around where the edge of the funnel meets the wood dowel.

I am going to use the 1/2 inch circle.

I traced a 1/2 circle onto 1 layer of mat board. I cut the pencil line off and I had a good fit for the top of my funnel. Glue it on.

I am filling in under my legs with more glue. This time I'm using the yellow glue. I am filling in to make sure they stay on.
So far, I am feeling very confident about the durability of this piece having made two and messing with them daily.

Mark the center of the top of the funnel to drill a hole into the mat board and wood dowel.

I drilled a hole into the funnel and into the wood dowel beneath the mat board.
The diameter is that of a tooth pick.

I have my tooth pick glued in with wood glue.
Trim to 3/8 inch.

Measuring from the top of the funnel, measure 1 3/4 inches and cut the dowel.
Role the dowel on the table to cut with your craft knife.

Sand the bottom the dowel.

This side will be glued toward the washer.

This is a side.

This is the outside, the side you will see on the outside of the washer.

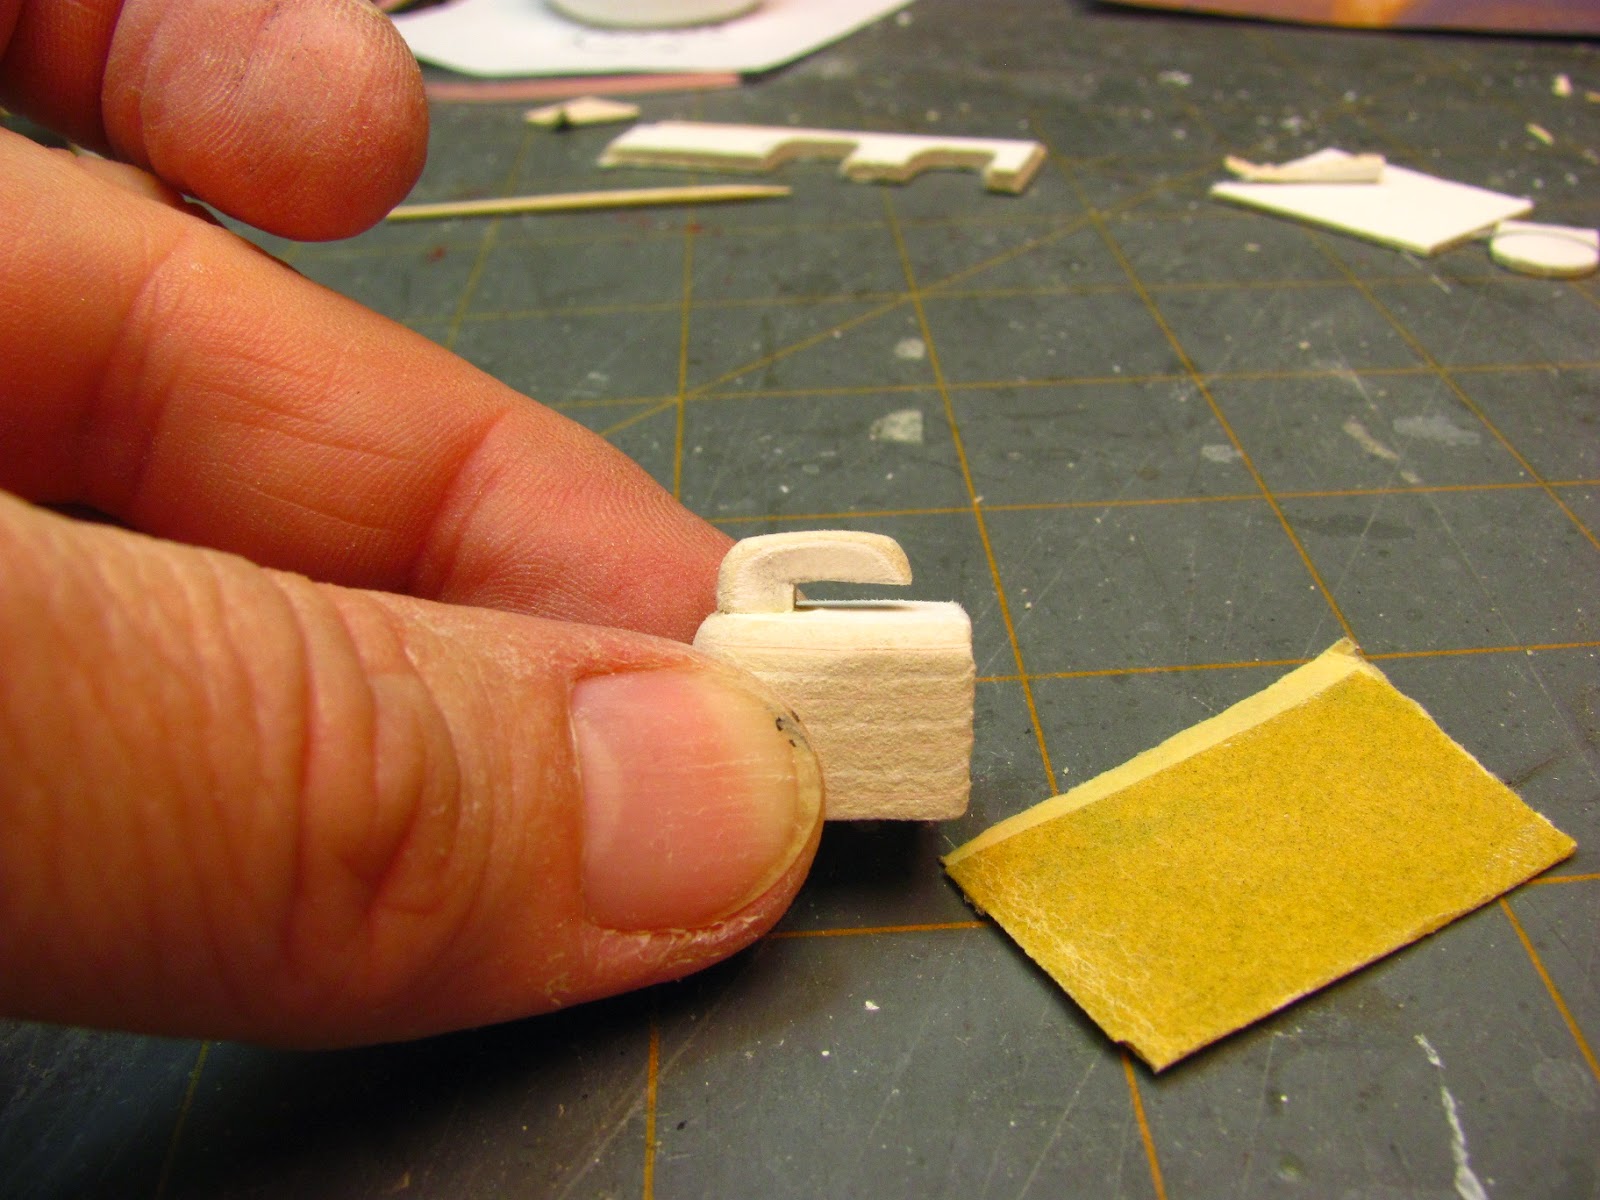
Cut an oval 1/4 inch wide and 3/8 inch tall, I cut this out with scissors.
Glue the oval onto the outside of one leg with yellow glue.

We need tiny dowels, you can buy them or sand a tooth pick.
This is good.

Do your best to keep the dowel straight and mark two holes with a "T" pin to drill into.
I am marking and drilling on the un-sanded side of the dowel. Look at the shape of the end of the dowel. This will be toward the washer.

Glue two pieces of tooth pick into the wood dowel.

It's all right if you went through with the drill bit. Push the tooth picks through and sand smooth.

Gently push the dowels into the mat board to make marks or dimples.

Make holes with a "T" pin for the drill bit.

Use a bit with the same diameter as your tooth pick dowels and drill into the oval and leg.
It's all right if you go into the bottom of the washer.

Glue with yellow glue the funnel dowel assembly onto the leg.
If you have any tooth pick coming through to the inside of the washer trim even.
Let this dry and then sand the mat board oval to fit closer to the dowel.

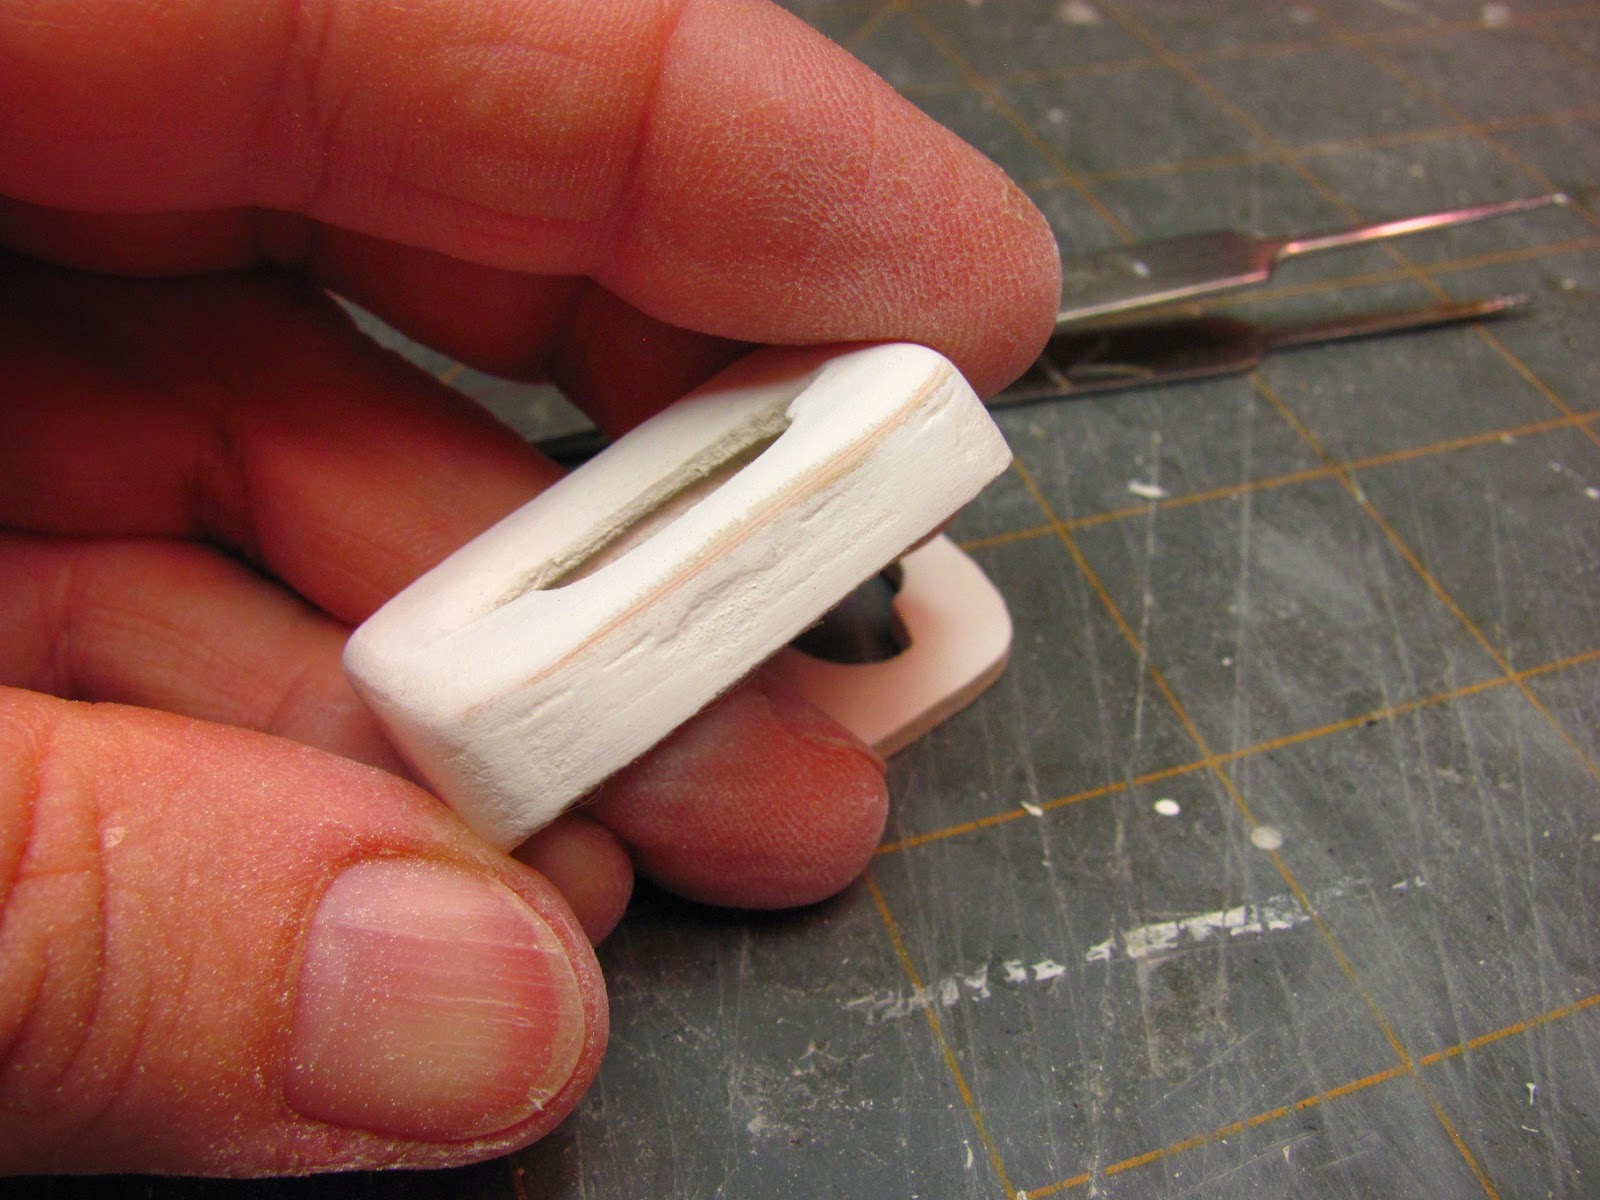
We are going to make the part I'm holding with tweezers, not the wringer part, yet. I'm going to call it the box.
I don't know what this does, I suspect it allows the whole wringer part to move out of the way of the top of the washer.

Trace a circle onto mat board. Measure 5/8 inch from the edge of the circle outward. Fill in with squared corners on one end.

You will cut 8 of these and glue together with yellow glue. Match the edges nicely.

Here's my stack.

Mark a hole at the center of the circle.

Drill a hole the diameter of a tooth pick.

The box should slip onto your bit of tooth pick sticking out of the funnel shape.

If you have drilled all the way through the box cut a bit of tooth pick and fill in the hole at the top.
The top edge of this piece gets rounded off with sand paper. Use 220 grit then finish with 300. Refer back to the picture above of the finished assembly. Do not sand on the flat side that is glued to the wringer assembly.
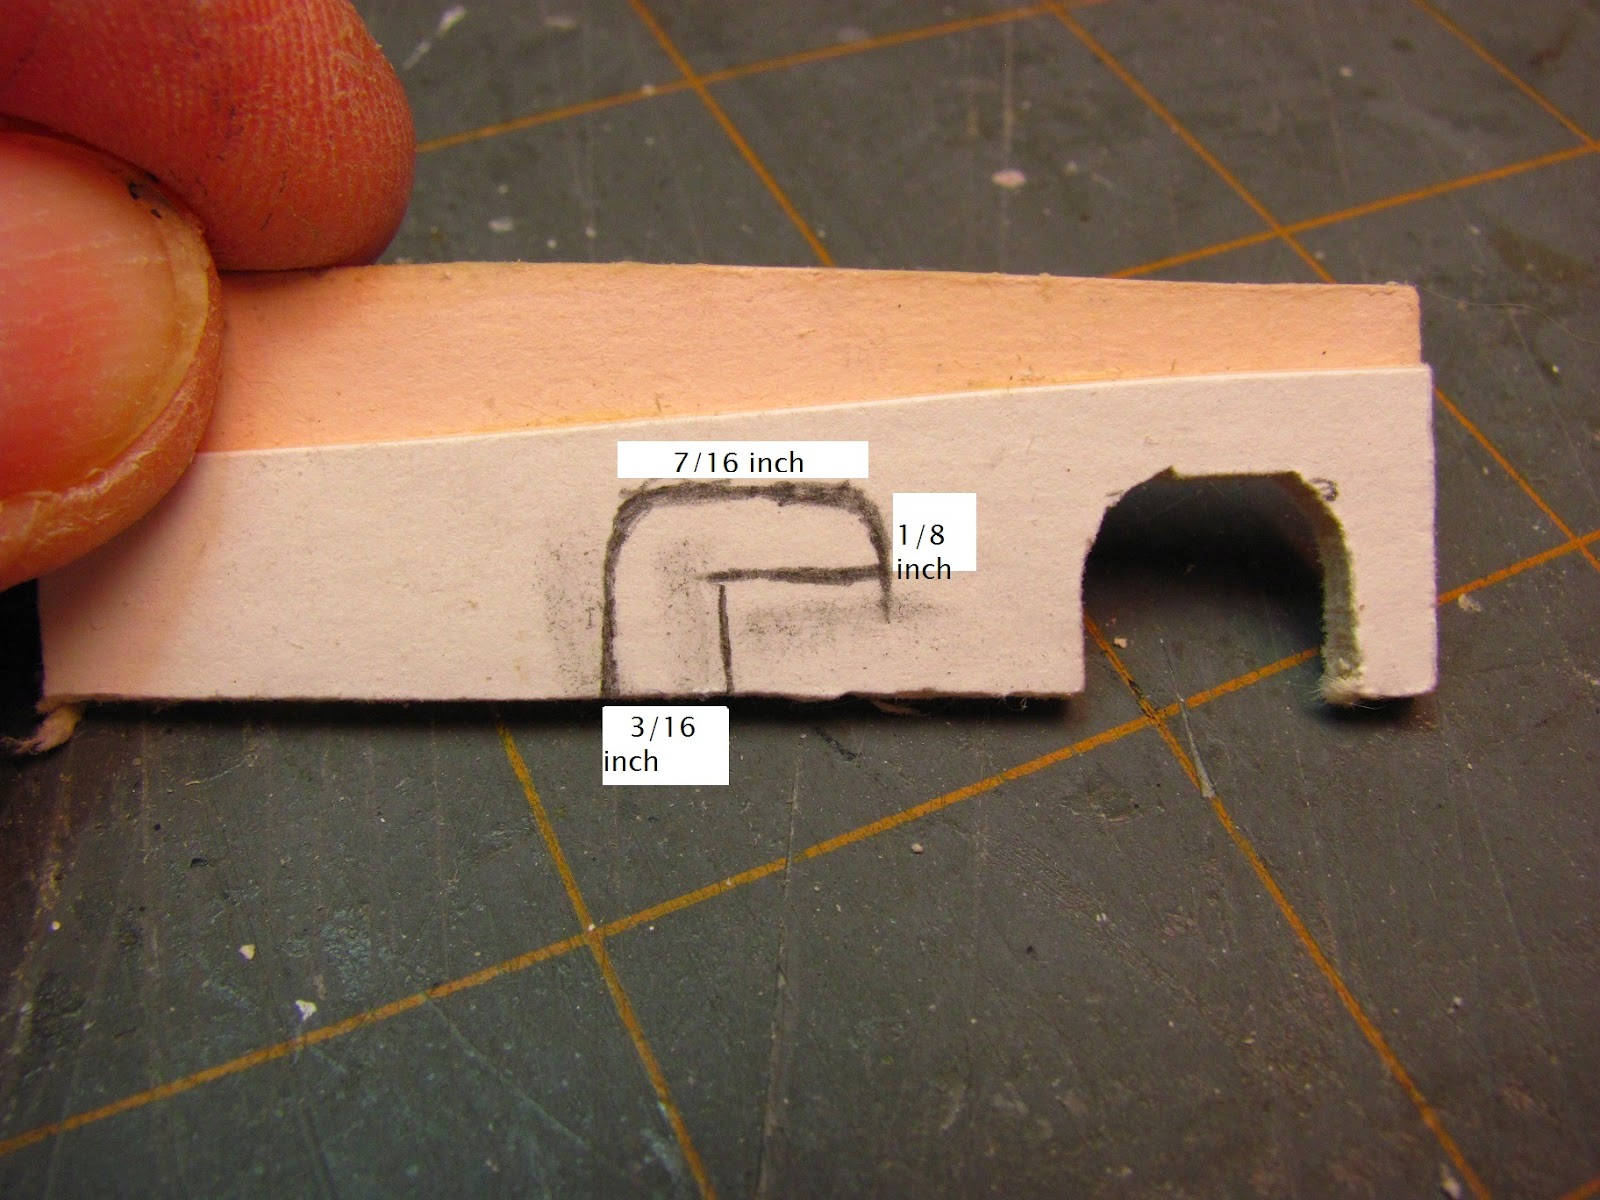
This is the handle. I did not make a pattern, it's so tiny I think we can do this with measurements.
1. it's 7/16 inch wide, from side to side.
2. the handle part is 1/8 inch thick.
3. the stem part that is attached to the machine is 3/16 inch wide.
You will need to cut two of these if you are using a craft knife and then glue them together with yellow glue. It doesn't matter about the height of the stem, we want that long to hang onto to sand the handle's edges round.

Cut out the handle and sand the edges round.

I cut out around the stem.

I've trimmed the stem down to about 3/32 inch, maybe a little less. This doesn't have much space between the handle and the top of the box.

Sand another tiny dowel from a tooth pick.

Make a hole in the bottom of the stem for the drill bit.

Drill a hole the size of your tiny dowel.

Here is the box with it's top edges rounded off. See the flat side? This will be glued to the wringer assembly.
Make a hole in the top of the box near the rounded edge.
You see I drilled through and haven't put my bit of tooth pick in to fill and cover the hole.
I filled my hole with a bit of tooth pick.
I drilled the hole for the tiny dowel to fit into.
I glued the tiny dowel into the stem of the handle and glued the tiny dowel into the box.

Paint the raw edges with the paint and yellow glue mixture to seal. You will be painting the mixture on all of the cut and raw edges of mat board throughout this tutorial several times, letting it dry and re-sanding until you a satisfied with the surface. Finish with 300 grit sand paper.

Use the circle template to find the lid size. It looks to be a perfect 1 1/4 inches.

Trace a 1 1/4 inch circle onto mat board, twice.
Cut them out and glue them together.

Just fits.

I centered the template over the lid and traced a 23/32 inch circle on the lid.

Sand the lid into a dome shape.
The new circle helps keep the sanding even. Sand the edge down to the first layer of mat board.

Lots of sanding.

Nice dome shape.

This is the gasket for the lid.
Trace a 1 3/8 inch circle onto card stock.

Center the template over your circle and trace a 1 1/8 inch circle.


Cut out the circle leaving the pencil line on.

Cut out the inner circle leaving about a scissors width of card stock and the line.

Glue the card stock gasket to the lid.

Although it's shiny with varnish I want you to use the paint and yellow glue mixture to seal the raw edges of the lid. Let it dry and re-apply, sand until you are satisfied with the surface.

This is the gasket, I've sealed it a couple to times and carefully sanded it. I painted it black.

I've stacked the gasket and washer top onto the bottom assembly.
No glue, yet.

Measure from the bottom edge of the top of the washer 7/16 inch and make a hole with a "T" pin.
Drill a hole the diameter of a tooth pick.

Look closely and you will see that I have stuck a tooth pick in the hole of the top of the washer.
Mark on the wood dowel where this tooth pick is.

Make a hole in the wood dowel with a "T" pin. Drill a hole in the dowel using a bit the diameter of a tooth pick.

Glue the tooth pick into the hole. If you've drilled through that's all right. Push the tooth pick through and sand smooth.

Trial fit, no glue.

On to the wringer assembly.
Trace and cut out 8 wringer bodies.
Glue them together with yellow glue.
Yellow glue for paper and wood, if I use the the other glue I will let you know.

I have my stack ready to cut on the scroll saw.

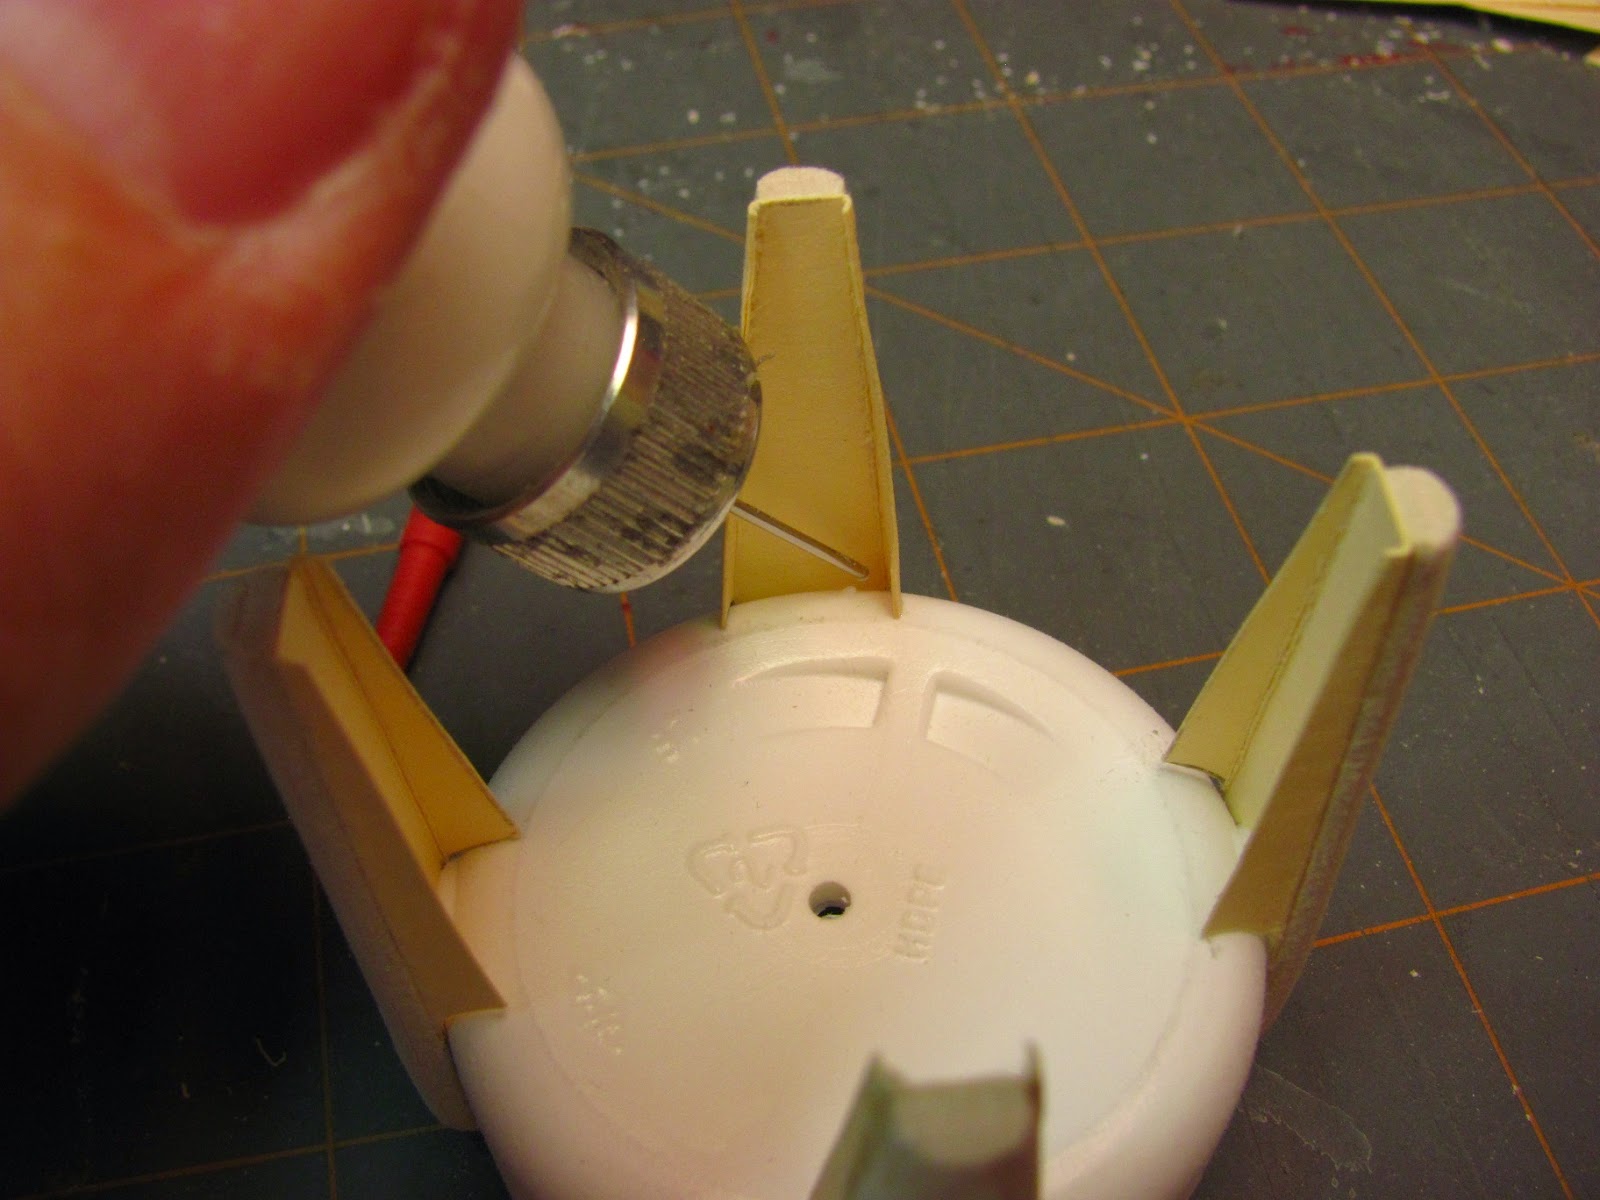
Trace the wringer fronts onto mat board 4 times. Cut them out and glue together two and two to make one for each side.

I've got mine glued up and ready to cut.

This is the glue mixture again that I want you to use to seal the cut and raw edges of the mat board.

I have painted this mixture onto the arm assembly.
I will be painting it onto the legs, too and sanding smooth.

I know I mentioned this earlier but I am showing you that I am painting the paint and glue mixture inside the legs also, adds strength.

I've got my wringer assembly parts cut out.

On each side of the wringer body mark lines where I have.

Sand the body above the line.

We are going to make the wringer have a slanted front and back.

Still sanding.
The width of the top will be 5/32 inch.
Every once in while sand the whole face to even things up.

It's there.

Glue one front on. Let the glue dry.

I am sanding the paint and glue mixture trying to smooth out the joins.

We will start sanding the wringer assembly. The edges are rounded and the front opening has a slope to it.

Only sand on the edges that have the front glued to it. Leave the back alone, we will glue the back to it after the rollers are in and then sand the edges.
I'm sanding, do you see where I've sanded a slope at the bottom of the opening?

More sanding.

Sand the slope on the other front.

I am showing this because I am sanding it smooth again using 300 grit sand paper. Finish up all of your sanding with 300 grit.

I am smoothing out the lid with 300 grit sand paper.
I haven't yet changed over to the paint and glue mixture.

I am sanding the joins of the legs to the leg sides. I won't be able to get rid of the seam but I will lessen it.

The arm is getting smoother. I am also painting the mixture on the tooth pick making it a little thicker. Don't paint the mixture on the tip that will go into the side of the washer top.
What ever I want to smooth out I paint on another layer of paint and glue mixture, let it dry thoroughly and sand.

I've painted the box with the paint and glue mixture and letting it dry.

I have painted the wringer parts with the paint and glue mixture. Paint the inside of the wringer body, too.

Cut 2 pieces of 3/16 inch dowel 1 inch long. These are the rollers.

Put these onto "T" pins.

Paint these with the paint and glue mixture and let dry. You should clean up the ends of the dowels, I haven't done that, yet.

These are my two small nails.

I want the knobs to be just a bit bigger.
I will use a 1/8 inch paper punch to do this.

Pierce two holes into card stock. Center the hole punch over the holes and punch.

There is the 1/8 inch circle with a hole in the center.

The circle is on my nail.

I've painted the paint and glue mixture onto the nail and card stock circle assembly.
Let this dry and you will have to re-apply the mixture .

I am still sanding and re-applying the paint and glue mixture.
Showing more sanding. I really want to get rid of the lines showing the stack of mat board. I will re-apply the paint and glue mixture until I am happy with the surface.

I have pierced a hole in the center of the bottom of the washer for the agitator knob.

This is totally optional. You can do without this.
On the front of the bottom of the washer there is a round depression where the agitator knob goes.
I had a bit that I put in my Dremel and scooped it out.
I don't know how else to do it, so I say again you don't need this. You can insert the knob into the hole without the depression being made.

On scrap of mat board trace the lever that goes into the front and back of the wringer. It's the thing that is painted aqua or red.

Do you see the shape I want you to trace? Just that top part, then draw a straight line across the bottom.
This is 3 layers of mat board and you need one for the front and back of the wringer.

I cut mine out leaving some on the bottom to hold onto while I sanded the edges round.

Do a trial fit.
Sand edges round.

Cut the piece away from the extra.

Glue these pieces into place even with the back side of the fronts.

These pieces should look like this.

Here is the one on the back of the wringer.

I've painted one roller black and the other one ivory.

This is the bar at the top of the wringer. Draw two lines 1/8 inch apart.
It is two layers of mat board.

It's 11/16 inch long.

Draw curved lines at the ends.

For those using a craft knife draw two of these on mat board, cut them out and glue them together.
I left extra to hold onto to sand the edges round.

I've sanded the edges round, cut the extra away and now I am marking a hole in the center for the drill.

Drill a hole for a tooth pick and glue it in. Paint it with the paint and glue mixture to seal the edges.

I have painted legs of the washer with the paint and glue mixture. I will sand them as smooth as I can get them.

I am happy with the surface of the wringer and finish sanded with the 300 grit sand paper.
Paint the inside of wringer body white and let dry.

The bar is painted with the paint and glue mixture.

I am still smoothing out the top of the lid.

Looks like I am giving the rollers a second coat of paint.

These are my knobs with the paint and glue mixture on them. They are finally taking shape.

Apply glue to the inside of the wringer body. I used the Grrrip glue for this.

Glue the rollers into the body.

Glue the back to the wringer body with yellow glue.

I am painting the washer parts.
I found that if I added acrylic thinner to the paint the paint would level, not leave any stroke marks to sand out.

I have sanded the edges smooth on the back of the wringer and finish sanded with 300 grit sand paper.

I've got my white paint on the lid and carefully painted the card stock gasket black.

I've painted the underside, also.
I've painted the paint and glue mixture onto the seam and will let it dry. I will sand it smooth. It will take a couple of coats to do get it smooth.

This is my quilling tool. I made it from a dowel and a large needle stuck into the end of the dowel. I use wire cutters to snip off the tip of the eye.

Showing the whole tool.

My quilling paper is 3/32 inch wide. If you want to cut this width from computer paper, fine. If you have 1/8 inch wide quilling paper you can use that just as well.

Insert the tip of your paper into the slot of the needle and begin to wind a tight roll.

Wind until you have 3/16 inch and glue the tip. This is one wheel.

There are four wheels.

Insert tooth picks into the centers and paint the wheels black. Give them a couple of coats.

Cut a strip of card stock, measure and mark three lines 1/8 inch apart.

Cut the strip on the last line drawn.
Score, using the back of your craft knife on the lines left.

Carefully bend on your scored lines. Bend the card stock so that the scored lines are on the inside of the fold. We don't want any ragged creases.

Paint this a "metal" color. I mixed silver and some gold together?? Paint both sides and let dry.

You will have to give the card stock another coat. I put a small cap over my paint to keep it wet.

This is the wringer assembly.

This is the box that is connected to the side of the wringer.
I have drilled a hole the size of a tooth pick into the center of the flat side of the box.

Glue a tooth pick into the hole.

Push the tooth pick into the side of the wringer. Make sure you are in the middle of the side of the wringer.

There's the dimple, I will make a hole with "T" pin and drill a hole for the tooth pick to fit into.

I've trimmed the tooth pick and you see the hole I've drilled into the wringer.

Use yellow glue to glue the to pieces together and hold for a bit until the glue sets up. You want a tight join.
You will need to apply the paint and glue mixture to this join to fill it.

I used my Grrrip glue to glue the gasket to the bottom of the washer body.

I turned the body upside down on the edge of my table to gently apply even pressure to the gasket.

Here is the wringer assembly with the paint and glue mixture applied. I will let this dry and then sand smooth.

Your piece of "metal" painted card stock is dry and ready to be cut and used.

Draw lines on the card stock 1/8 inch apart, four sets.

Cut the little strips apart and then cut diagonal lines from the middle of each side to the fold lines.

Glue these pieces to the bottom of the legs. I have the flat side toward the inside of the washer.

Another picture. I used my Grrrip glue for this. As I look at this maybe you should glue these with the flat side to the outside of the washer.

Make a hole with a "T" pin for the drill bit in the center of the wringer assembly.

Trim the tooth pick and glue the bar into the top of the wringer assembly.

If your glue is dry on the "metal" things that hold the wheels you can glue the wheels into those things.

Make a hole in the center of the lid for the knob.

You will drill through this. Use a bit that is the diameter of your nails.

Glue a circle of card stock over the hole.
Sand the edges of the card stock a bit and then paint it white.

I've painted my knobs red.
I inserted the agitator knob. I put a little Grrrip glue into the hole before hand.
I searched online for a sticker for the front of my machine.

Be careful when you are nipping off the extra on the knobs. You don't want to lose them somewhere in the room.
Glue in the lid knob.

I painted the lever we glued into the wringer assembly. Paint the lever on both sides of the wringer.
I have inserted a piece of card stock over the rollers so when I spray on the finish they won't get shiny.
When you are satisfied with the finishes on your parts you can give them a couple of light spray coats with the finish I showed in the previous post, I also show it later in this one. It's better to give several lights coats.

We are going to start working on the tub. This uses the little bottle.

Trace a 1 1/2 inch circle onto three pieces of mat board.

Center the 1 inch circle over your previous circle and trace.

Cut the circles out and glue them together with yellow glue.

Drill a hole into the side of this circle the diameter of your wire.

Cut about 7 inches of wire.

I am using this mat board circle to help secure the wire and also to lift the tub up off the bottom.
Glue the mat board and wire into the bottom of the washer.

The wire is coming from the bottom of the washer.

Inside the bottom of the bottle is a mould mark, it makes the bottom uneven. I have cut a piece of mat board to compensate for this.

I've glued this extra piece in on the low side. I've also added more glue, this time yellow glue.

Bend the wire up next to the side of the washer.

Bend it up in between these two legs.

Place the tub bottle into the washer and set the top of the washer onto the gasket. The tub has to be cut. I want it to fit up under the curve of the top of the washer. I sanded the tub bottle a little to make it easier to mark on. Make a pencil mark on the bottle where it's as high as the middle of the curve of the washer top.

You will have to make yourself another gauge.
I did not give measurements for this because I thought we could have differences.

I made my gauge and scored a line to cut on.
I cut the top off the bottle.

This is the agitator bottom. Trace a 1 1/8 inch circle onto card stock.

Mark the quarters.

Cut the circle out.

Cut a pie shape out about an 1/8 inch wide.

Over lap about a 1/16 inch and glue.

Cut a strip of card stock 1 inch wide and 3 inches long.

Run the strip over the edge of the table to curl.
You will need a bamboo skewer.

Glue the card stock to the skewer, leave about a 1/4 inch of card stock above the skewer, though.
Wind the card stock around the skewer, gluing as you go.

Wind until you have a 1/4 inch in diameter.

It's all right if your card stock looks like this we are going to round off the top.

Round off the top of the column.
Do you see that the at the top of the column it looks hollow. That's why we left a little card stock beyond the skewer.

Cut the skewer off, about a 1/4 inch left.

Punch a hole in the center of the bottom of the agitator.

Glue the column onto the bottom.

Trace a 3/4 inch circle onto two pieces of mat board.

Cut them out, glue them together.
Drill a hole through the center.

Glue this to the bottom of the agitator.

Trace four agitator wings onto card stock and cut out.

You will have to dry fit these before you glue them in. I might not have the angles right, I am sorry.

I've got all four glued on. Let the glue dry before you paint.

I've painted mine red. It will have a couple of coats before I spray it with finish.

I am showing the finish I use. I buy it at Wal-Mart.

This bottom has the same kind of mould mark and I put a piece of mat board in to compensate.

Play with that piece of mat board, you may have to add to it or take away from it to get your agitator to set level. When you do get it, level glue it in, I used my Grrrip glue.

I am applying Grrrip glue to the ring in the bottom of the washer.

I am applying Grrrip glue to the gasket.

Set your tub in the washer.

Set the top of the washer onto the gasket, remember to fit the tooth pick into the side of the washer top.

I held the two pieces together for awhile until the glue set.
I am now cutting off the wire to the height that I want.

I am using my quilling paper to make the threaded metal part of the hose.
I used Grrrip glue to glue the paper on. I wrapped the paper around the wire three times.

I painted this a metal color.

I cut a piece of quilling paper about 5/8 inch long.

Fold the ends to the middle and glue with yellow glue.

Curl this little piece of paper.

I scratched off a little square of finish and paint where I wanted my hose clip to go.

Please, please let this dry before you paint it.

I've painted the hose clip, let this dry.

I used the Grrrip glue to glue the wire into the hose clip.
You will have to hold it here until it dries enough to stay. The wire wants to spring out just enough to cause trouble.
I did not put in an electric cord. You may do this by painting a piece of crochet thread black and adding a plug made out of Fimo. I would glue it coming out from the bottom by the hose.
Get online and Google images for a label to shrink and glue to the front of the washer. I don't think I should get involved with that.
I know this has a lot of parts and pieces to cut, sand and fit together. I hope you are not discouraged by the size of this project. It all starts with the first step.
If you have any questions e-mail me at camceiling@frontiernet.net.
If you have pictures of finished tutorials you would like to share e-mail me at the address above.
Have fun, Expand on it, Make it better . . . . .
Just keep making minis!!
TTUL
Kris
Subscribe to:
Posts (Atom)