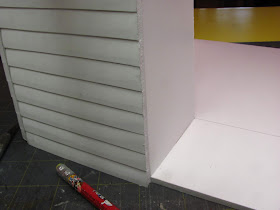
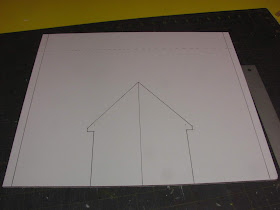
I am making a room box for this month's tutorial. Over the course of the next few months I will be finishing it and making things to go into it. I hope to create a Bohemian feel to the decor, at least I will try. I'm calling it the Bo-Ho Attic Room Box.
I am using 3/16" thick foam core and tacky glue for this tutorial.
Put a new blade in your craft knife.
I am going to use the French doors from an earlier tutorial to fill the dormer.
I've cut out the floor -
11 3/4" x 14", the two short back walls - 4" x 6 1/8"
and the two sides.
Refer to the drawing above for the measurements for the sides.
I am cutting siding into the foam core. Measure and mark at 1/2" up the sides and back walls. Draw a line across.
Use your craft knife to cut into BUT NOT THROUGH the foam core.
Use the end of a ruler or something similar to press the foam core down at the top of the cut.
If you press on one side of the ruler and slightly lift the other side you can slide it across the foam core without making any dents showing the size of your ruler.
When I first started I pushed the ruler down and moved it over and pushed the ruler down again. This made dents in my siding.
If you slide the ruler along the top of the cut you will get very nice siding.
This technique does weaken the foam core and also makes it warp.
We will take care of both of those problems.
I am putting in a window on one gable end. That will be one of the later tutorials, making a double hung window from mat board. It won't open.
Measure and mark 2 1/2" up from the bottom and 1 1/16" from the long side.
Cut the opening out.
I've glued the two sides on using tacky glue. The sides should be even with the floor at the long side, that's the side that will be open to you. There should be about a 1/4" extra at the short side, that's the side with the dormer.
The sides and backs are glued to the edge of the foam core, not on top of it.
Glue on the short back sides to the floor and sides. These should butt up against the sides.
I've got my square out and I am drawing the lines that I will glue the dormer side wall to. If you don't have a square measure and mark from the inside of the back wall 3" into the room box. Do this measuring at the edge of the wall and from the corner. Draw a line 4" long on those marks. Now, connect the end of that line with the edge of the back wall. I hope that makes sense.
The sides and the short back sides are glued on.
The side walls need a little support.
I've cut a strip that's 9 5/16" tall and about 3/4" wide.
I glued that to the sides to stiffen them up.
Cut the dormer side walls according to the diagram above.
I am setting these walls on the line that I drew earlier.
Mark the lines for the siding onto the dormer walls.
If you have a square, use it to keep the corners square.
I drew the lines, made the cuts and pressed the foam core at the top of the cuts.
Glue the dormer walls onto the floor and onto the short back sides.
The dormer walls are glued to the surface of the short back sides, not the edges.
These are the door walls. Cut two of them and set one aside for now.
Use the diagram above for your measurements.
I know I'm cheating a bit because I have the French doors all ready made. There will be enough time for you to go back and make them if you decide to make this project along with me.
So, I traced the opening from my doors and cut the openings out.
I have to tell you that I did have to scrap out my first try. I've never made a dormer and my measurements were wrong. I am working with pictures from both room boxes and along the way I did forget to take a picture or two. I do apologize.
With that said I forgot to take a picture of one of the door walls being measured against the dormer walls to match the siding. I did it the same way I matched the dormer wall against the short back wall. I drew the lines, cut on lines and pressed in the siding.
I've got the outside door wall glued in.
This is glued in 3/16" to 1/4" away from the edge of the dormer walls.
If you put your other door wall up against the outside door wall you can make sure this will all be even and flat.
Just don't glue the other door wall in, yet. Take it back off after you have them evened up.
Just showing another picture of the door wall glued in.
I've cut 2 strips for more stabilization. These are 14" long and about 3/4" wide.
This is the diagram for the roof, again this is NOT TO SCALE.
The outline of the roof is drawn.
I've drawn the score line. That's the peak of the roof. You only score it, don't cut through, don't worry if you do I'll show you a fix later on.
Ignore the lines drawn on the sides in this picture and the rest. I will explain later.
Cut the roof out.
Begin to follow the diagram drawing the lines in.
The next lines are 3/8" long.
Draw in the 1/4" lines next.
The center of the 15 3/8" side is 7 11/16". Mark that at the edge and measure and mark again farther up on the foam core.
Measure that center line you drew to 7 1/2" long.
Now, connect the lines as shown in the picture.
Cut the score line at the peak.
Cut out the dormer hole.
O.K. now you can draw the lines on the sides.
Turn the roof over and measure 1/2" away from the sides. This is the edge of the room box.
Remember, when I said don't worry if you cut through on a score line? I didn't cut through but I made a measuring mistake and did not want to waste this piece of foam core.
I cut the front part of the roof off and cut the right size for the front.
I placed the two pieces together and glued card stock onto the foam core and I'm back in business.
It's going pretty good. Like I said this is my second try and second day. Once I figured the dormer and made a few compromises it worked out fine.
This is the diagram for the dormer roof. This is NOT TO SCALE.
Follow the diagram above for the measurements.
My piece of foam core is 4 3/8" x 7 9/16".
The center of the 7 9/16" side is 3 23/32". Mark that at top and bottom and draw a center line. That's a score line, the peak of the dormer roof.
I've made marks on the side, 3/4" up from the bottom and 1/8" on either side of the center mark.
Connect the marks to make the triangle.
Cut the dormer roof out.
Turn the dormer roof over.
Measure and mark a line 1/4" away from the angled sides.
We are going to bevel this edge to fit into the dormer hole.
The secret to doing this is the first cut.
Cut along the line, not through.
Cut the bevel by following the line you have all ready cut. Keep your blade point on the table. Don't cut any of the foam core that's facing the table.
If you think your blade is dull put a new one in. A sharp blade will help you cut more accurately.
There's the bevel.
Here's the dormer roof ready to be glued in.
Glue the dormer roof into the hole.
Side view of the dormer roof.
Be sure you aren't gluing the dormer roof to the door wall.
Let the dormer roof dry.
I have not glued the whole roof onto the room box. I want to be able to get to everything so the roof won't be glued on for awhile.
I hope some of you make this journey with me. I haven't made a room box in years. I'm looking through catalogs and magazines trying to come up with things to make for you.
In the mean time I will put flooring in.
I have an idea about how to wall paper the room box. I'm thinking about cutting out all the pieces of the room box and wall papering them and then gluing them into the room box. What do you think?
Have fun, Expand on it, Make it better . . .
Just Keep Making Minis!
Kris


