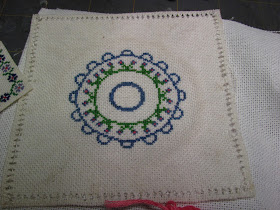
This month I am going to give you a cross stitch pattern for a table topper.
This is one of my very first room boxes, a vignette really.
The sea shell lamp is the first tutorial I posted on the blog, I believe.
Along the bottom of the table topper I have done a little pulled thread work to fancy up the hem.
I could see more of the pulled thread work on a coverlet alternating with a little cross stitch, couldn't you?
This is my pattern for the center cross stitch, it's 1/4 of the total pattern. The dots are blue, the crosses are green and the circles are pink.
I used 28 count evenweave fabric for the table topper. Years ago I didn't have to use a magnifying light to embroider this count, I found that I do now.
You could substitute with another count if you want to change the size of the embroidery.
This is the dirty old original. It's been in that box for years and look at the color change of the white fabric!
I am all set up with my thread, pattern and my fabric is in the hoop.
I used one strand of embroidery floss for this project.
I'm working on it . . .
A little more . . .
The embroidery is finished.
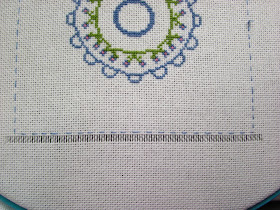
I counted 22 holes from the edge of the scalloped border and marked that with a basted line.
I did not think ahead, again. I ended up with 4 threads at the end. I left it.
Instead of counting 22 holes from the edge of the scalloped border on all 4 sides you could count 22 holes from the edge of the scalloped border at the bottom and only 21 from the border at the top. Count 22 holes from the edge of the scalloped border at the left side and only 21 at the border on the right side. I believe all of your bunches will be bunches of 3.
I will show you a picture later on with this mistake.
I am going to cut out 3 threads for the pulled thread work.
You can just cut 2 if you think the 3 threads make a too big space.
Use your tweezers to lift up a thread, one thread away from the basted line and cut.
The threads have been pulled. Un-do the thread a little at a time from both ends, when the thread is long enough for you to grasp try to pull it through. If it's hard to pull, un-do a few more threads. Pull one thread first, it will be the hardest. The other two threads will be easy to pull out.
I've enlarged this picture so you can see that I have cut 3 threads past the thread after the basted line.
This is one side done.
Here I am at the corner. I've cut the threads at this end and at the other corner. The threads have been un-done a bit.
Here's the corner with the threads pulled. Continue to pull thread out on the other two sides.
Just a note here, if you cut a thread that you didn't want to and it can happen . . . . use tacky glue and glue the ends back together, take a deep breath and go do something else for awhile.
This is a miniature, for display, it won't be used or washed like a full size tablecloth. The glue will work and no one will see it.
My threads are all pulled.
Apply a little tacky glue to the open corners to secure the cut threads. Let this dry.
Use a needle and thread to sew the hem stitch. I secured my thread on the wrong side by catching partial threads, not going through the fabric.
For the first bunch I caught the first thread with my needle and continued with the following instructions..
The next steps are pretty simple. Your needle goes under 3 threads.
Pull the thread through. Insert your needle under the same 3 threads.
Insert your needle under the sewing thread.
Pull the sewing thread tight. Go on to the next bunch of 3.
A few more bunches done.
Here's the mistake, can you see the 4 threads that I ended with?
I did not think ahead, again. I ended up with 4 threads at the end. I left it.
Instead of counting 22 holes from the edge of the scalloped border on all 4 sides you could count 22 holes from the edge of the scalloped border at the bottom and only 21 from the border at the top. Count 22 holes from the edge of the scalloped border at the left side and only 21 at the border on the right side. I believe all of your bunches will be bunches of 3.
At the corner sew an "X".
Weave your sewing thread over and under the legs of the "X".
To secure your thread insert the needle into the middle of the "X" and go on to the other side.
When you run out of thread carefully hide it on the wrong side of the table topper by just catching part of the fabric, don't go through the fabric.
Count 3 threads away from the pulled thread work and apply tacky glue into the space between the third and fourth threads. Let this dry. Apply the tacky glue to the WRONG side of the table topper.
Can you see the threads that I was talking about ? Use your fabric scissors to cut the fabric away after the glue has dried thoroughly.
All done.
I've replaced the old table topper with the new one.
My "table" is made from card board. I made a tube and glued a top on the tube.
The folds in the tablecloths are glued to the card board evenly.
I hope this might interest some you. To those that like needle work this makes a nice gift to a miniaturist that doesn't take to needlework and will be very much appreciated!
Questions and pictures send to camceiling@frontiernet.net
Happy Thanksgiving!
Have fun, Expand on it, Make it better . . .
Just keep making minis!
Talk to you later, Kris


