It's spring time and I have peepers in my breeze way/work room.
My husband says we run a retirement home for chickens. Our laying hens run out of eggs and live for about 8 to 10 years and pass away. We've had hens live 13 to 14 years.
These 12 birds will replenish my flock of 3, Burma, Blondie and Spot. They will join the roosters, Major and Lucky.
On to this month's tutorial. So I don't forget, I have Hobby Builders Supply linked to the blog. The link is on the right side, www.miniatures.com.
I was invited to build along with other bloggers the Hobby Builders room box.
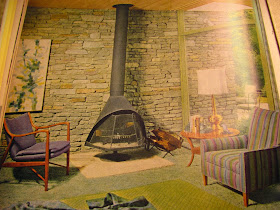
The first time I saw the room box I thought of this stove/fireplace.
I went to my old decorating books to look for rooms with the fireplace in them.
I found a few to give inspiration for the room.
I looked on-line for a company that had a page with measurements.
The measurements are for making a miniature in scale. I find that having the full-size measurements makes the job easier.
I scaled the largest size, the 38 inch.
This is Miss Tigger, she's keeping me company today.
This is the room box that Hobby Builders Supply is using for this year's Creatin' Contest. I know it's a building but I see a walk out basement and that's how I am going to decorate.
Now, I am not a structure person, the so the outside is going to take some time.
I've got the building put together, the windows are glued in, though.
This is setting on my dining room table and the cats are using it to sleep in. I just know you all know about that!
This is the prototype in the room.
I will not be painting mine for awhile as I don't know just yet what colors I am going to go with. I do know it's going to be bright, maybe orange! It's the 60's.
This is Nancy's pattern. When I tried this out I didn't have to re-size it. This is what I did:
right click on the pattern, a window will appear, left click on "copy image".
Without closing out of the blog, open Word.
Left click on "paste".
The pattern will appear on the screen.
Print the pattern out onto card stock.
Measure the square in the top left corner of the pattern sheet, it should measure 1 inch, all sides.
If it doesn't, go to the instructions on the left of the blog, in the "Things to do, Things to see" list and follow the directions in HOW TO RE-SIZE THE PATTERNS. I recommend printing these instructions out to read as you do.
You will need a length of 3/4 inch dowel. Some to cut a small piece from, 2 1/2 inches and whatever is left for a form to wrap card stock around temporarily. This can be what's left of a new piece or as little as 12 inches.
I cut my card stock base pattern out and traced it onto mat board.
Cut the hole out on your PATTERN ONLY.
When tracing the pattern trace the hole, too. This is for placing the pedestal.
Cut the base out.
Remember, a sharp pencil makes a closer line to your pattern.
To make the pedestal use your circle template to trace a 1 1/2" circle onto mat board.
Cut this out.
I have two pieces of card stock.
Use yellow carpenter's glue for this tutorial.
Apply the yellow glue to one side of the card stock.
Smear it smooth.
Press the card stock together and rub over it to get good adhesion.
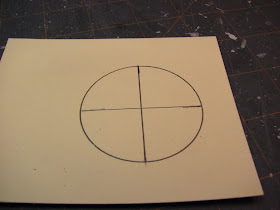
Trace a 2 inch circle onto this doubled piece of card stock.
Mark your quarters onto the card stock.
This is my 2 inch circle with quarters marked.
Measure from the edge of the circle towards the center 7/16 inch and mark on the quarter lines.
Using the new marks as a guide, trace a 1 1/8 inch circle onto the 2 inch circle.
You should have this, now.
Time out for kitty T.V. The cats like to watch the chicks hopping and bopping around. The cats get board after a short while and go off and find a comfy place to sleep.
The structure you see on the left is the bunny garage, that's for Ginger, my rabbit. I have mentioned him before, he's 9 this year and runs loose in my breezeway.
Cut on one of the lines to the center of the circle.
Almost got the shot, Ginger went over and Tigger was cleaning him. He's going into the red tube under my knitting machine.
Fold the circle into a cone and fit it into the 1 3/8 inch circle. Make a mark where the overlap stops.
I am showing my mark.
Apply yellow glue and glue the cone together.
This is the cone after I've glued it together. Make sure the lines of the circle match.
Center and glue the cone onto the 1 1/2 inch circle of mat board you cut out earlier.
Got it.
Cut a strip of card stock 1/2 inch wide by 9 to 10 inches long.
I cut a 3/4 inch dowel 2 1/2 inches long. We are going to use this a couple of times.
Use the yellow glue to wrap and glue the strip of card stock around the dowel until you run out of card stock. Don't glue the card stock to the dowel.
This is the strip taken off the dowel.
Glue the 1/2 wide tube to the cone using the circle as a guide.
I added a little more glue to the inside.
Now, Tigger is in the bunny garage and Ginger is back eating some more breakfast.
This is my pattern.
Cut out your card stock hood.
I am tracing mine onto card stock.
If you printed your pattern out on card stock you can just cut your hood out.
I've got my card stock hood cut out.
Run the card stock hood over the edge of your table to start the curve on the hood.
Apply yellow glue to the overlap on the hood.
Bring the other end around and press to seal.
Apply glue to the back edge of the mat board base.
The back of the base is where Nancy printed "Fireplace Base".
Press and seal the hood onto the base.
The front of the fireplace.
Digger, Tigger's brother is now on my table "helping out".
Apply yellow glue to the bottom of the base on the circle you traced.
The fireplace should set evenly. I like to set things like this up at eye level so I can see.
The reason I have you double the cone in the pedestal is you might want to press on the base to level things up, that's fine to do. The doubled card stock prevents the cone from collapsing. Been there, done that!
This is the 2 1/2 inch piece of 3/4 inch dowel.
I thought I needed some stabilization for the structure. I used yellow glue to glue the dowel into the top of the hood.
Make sure you get the dowel straight.
All glued in.
We have been using card stock for a long time and I never have talked about grain. I know most of you probably know about grain but I want to mention a couple of things for those that don't.
Paper and card stock have a grain, like fabric and wood. Have you ever ripped newspaper and found that the newspaper ripped better one way than the other? You found the grain when you get a nice long strip. This is also true when you are bending card stock. One way the card stock has a nice smooth appearance and the other way it has a creased look.
This was wrapped around the dowel against the grain.
This was wrapped with the grain, it's surface is nice and smooth.
Most of the time we are making things so small that it doesn't show. We are about to make a stove pipe and it will show.
The stove pipe will have to slip over the dowel AND the card stock it's glued to at the top of the hood.
Make a spacer by cutting a strip of card stock 3/4 inch by 4 3/4 inch. This spacer the allow the stove pipe to slip easily over the dowel and card stock.
Wrap and glue this strip twice around the bottom of your long piece of dowel rod. Don't glue the strip to the dowel rod. SLIDE THE SPACER CARD STOCK DOWN SO THAT'S EVEN WITH THE END OF THE DOWEL.
The stove pipe is cut from card stock and is 2 3/4 by how ever long you need it.
I am not making a bend in my pipe, I haven't figured that out. I know that Chrysnbon makes wood burning stoves with pipe. If you need a bend in your pipe you might want to check their kits out for the stove pipe. Hobby Builders Supply carries these.
First run the card stock over the edge of your table to get the curve started. Wrap and glue the card stock around the dowel. Don't glue the card stock stove pipe to the dowel OR the little spacer we made. The spacer has to come out.
Here's the dowel, the spacer and my stove pipe.
I've smeared glue onto the dowel.
Stove pipe is on.
Back view.
I want to make a damper handle. The damper opens and closes the flu or stove pipe. It regulates the fire and smoke. This is optional.
I am going to use 26 gauge green paddle wire. I am sure other styles can be made using other materials.
Our damper handle looked like a spring. The spring part was the part you touched to move the damper. I believe the handle was styled like a spring to keep the handle cool to the touch.
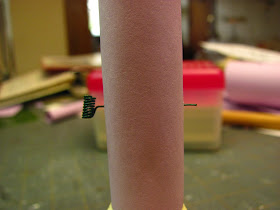
I wrapped the wire around a toothpick.
I have this wrapped too many times and too close together as I look at it now.
Wrap yours less and leave a little space between the wraps.
Looking at the picture above bend the wire and bend it again like my picture.
Slip the wire off the toothpick and cut the wire off at about an inch.
To get the hole drilled into the stove pipe we are going to need a guide.
Cut a strip of card stock 1 inch by 2 3/4 inches.
Wrap and glue this around the stove pipe at the top of the hood. Don't glue to the stove pipe.
Slip the guide off the stove pipe and set it into the 13/16 inch hole of the circle template.
Mark the halves.
Slip the guide back onto the stove pipe and transfer the "half" marks onto the stove pipe.
Slip the guide off and start the holes with a "T" pin.
I have the hood of the fireplace hanging off my table.
I am using a #61 bit in my Dremel.
You will use what ever size of bit fits your wire that you are using.
These tiny bits are available from Hobby Builders Supply.
To drill this hole I am only drilling a little bit from each side, switching back and forth until the holes meet inside.
I haven't removed my toothpick but I have my damper handle inserted into the stove pipe. I will trim the length.
I have the handle trimmed.
One more piece to make.
I cut a strip of card stock 1/4 inch wide to fit the length of the front.
Side view.
Other side view.
It's done,
As I mentioned before I am not painting mine yet. I will use craft paint, something like Delta. Paint and paint, sand after two coats. Paint and sand until I am satisfied with the surface and then I will probably spray the finish on using one of the many brands of spray varnish. I use Krylon from Wal-Mart.
This was fun to create and I hope some of you try it out. I will be searching for more 60's and 70's things to put inside my basement!
If you have any questions or you have pictures of finished tutorials e-mail me at
camceiling@frontiernet.net
Have fun, Expand on it, Make it better . . . . . .
Just Keep Making Minis!
TTUL Kris


