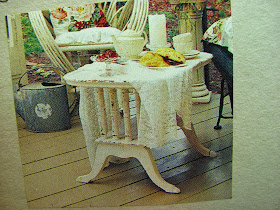
This is the inspiration for this month's blog.
This is the finished table made from mat board and tooth picks.
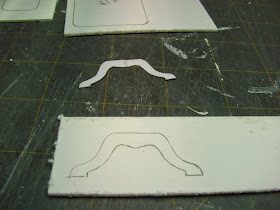
These are the patterns. Thank you Nancy.
Directions for getting these patterns to size is under " HOW TO RE-SIZE THE PATTERNS", that's in the "Things to do, Things to see" list at the left side of the blog.
Trace your patterns onto mat board, 1 layer for each pattern.
The legs are 2 layers of mat board. Trace twice, cut out and glue the layers together with yellow carpenter's glue. Make 2 sets of legs.
Just in case you haven't seen this bottle before! This is what we will glue everything together with.
I use wood glue because it dries hard. Tacky glues always stay flexible.
I am going to show you how I cut multiples with my scroll saw.
I've traced the leg pattern and I am gluing to the second piece of mat board.
When I glue pieces together I smear the glue like this until the glue is about to seize up.
Slide the pieces back and forth until it gets hard to move them, then line up the pieces.
I glue up another set.
It would really be best if we let these dry. If I were taking my time I would set a heavy book on top and go do something else for a couple of hours.
I am applying dots of glue at the edges on the plain set of mat board.
Just the edges, not all over.
Press the 2 sets together.
I use "skip tooth" blades in my scroll saw.
I am beginning to cut the legs.
I've got the sets of legs cut.
That's how I cut multiples of things.
Since the glue is only on the edges the layers are held together without gluing my legs together.
Cut out the table top.
The table top and apron are cut out from 1 layer of mat board, each.
Apply glue to the table top and center the apron on. Smear the apron around a bit until it seizes up and then center it onto the table top.
This is how it should look.
Cut out the shelf.
Round off the edges of the table top and shelf. I used 220 grit sand paper.
I am showing the table top rounded off.
Round off the edges of the legs.
Mix equal parts of yellow carpenter's glue and paint together for a sealer.
Brush this onto the edges of the mat board. If the mixture is too thick, you want it to be smooth and easy to apply, add more paint.
I will apply this mixture a couple of times.
Measure and mark 1/16" from each edge of the shelf.
Glue the legs onto the shelf leaving the 1/16" on the edge. To get the glue to seize with butt gluing I lift the leg on and off a couple of times.
Please, let this dry.
Cut the tip off of the tooth picks and measure and mark 1 1/8". You will need 6 tooth picks.
You can decorate the tooth picks by using small files and sand paper to create a "turned" spindle. You can also buy miniature spindles from Hobby Builders.
The inspiration picture shows 4 spindles but I thought 3 would be easier to do.
Cut from 1 layer of mat board 2 pieces 1/4" wide and 13/16" long.
Mark and measure the center then mark and measure 1/8" in from each end of these pieces.
Mark with a "T" pin and drill holes the diameter of the tooth picks.
Glue the tooth picks into the holes.
Set this tooth pick assembly onto the shelf and leg assembly.
Center it over the leg with equal amounts left on each side.
Mark where the tooth picks are with a pencil.
Pierce a hole into the marks you've made.
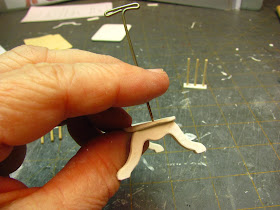
Carefully hold the legs in one hand and the "T" pin in the other.
I am holding the camera or I would be holding the legs.
I am going to drill holes into the shelf and the top of the legs. You know how I don't like to butt glue anything and this will be doweling the legs on.
I used graduated drill bits, starting out tiny and moved up the the diameter of the tooth pick. This makes it easier to drill into this delicate piece.
After the holes are drilled I did a dry fit.
Glue the tooth pick assemblies into the shelf/leg.
Measure so that both are the same height. This glue doesn't dry too fast so you have time to adjust.
Apply glue to the tops of the tooth pick assembly.
I added this piece of mat board to the top of the tooth picks because it would have been hard not to drill through the table top.
Center the assembly onto the table top and I used tweezers to press the mat board down.
Let dry.
Just showing another angle.
When this join was dry I used 220 grit sand paper to sand a bevel on the edge. This will make this piece less noticeable.
Showing you how that looks. I didn't bother with the inner edge.
Here it is waiting for a nice shabby chic finish.
On the left side of the blog in the "Things to do, Things to see" list I have a tiny tutorial, "How to paint an aged finish" you could try.
This looks like a nice tea time table with bit of lace draped over it. I had fun doing this, didn't take too long. By the way this table could be made from basswood following the same directions.
Keep sending in the pictures for the Gallery to camceiling@frontiernet.net
If you have any questions send them to me at the same address.
Have fun, Expand on it, make it Better . . . .
Just keep making minis!!!
TTUL Kris


