Pages
▼
Friday, June 30, 2017
Sunday, June 25, 2017
SIMPLE 1 INCH SCALE UPHOLSTERED CHAIR FROM POSTER BOARD - How to make a simple 1 inch scale dollhouse upholstered chair from poster board.
Do you have kids or grandkids roaming around the house this summer? Would they be interested in making a chair with you?
This is my first chair that I made over 20 years ago. My daughter needed a living room set and I looked through Hobby Builders and they had this simple looking set in the catalog. It was the least expensive set but still couldn't get it. I came up with a pattern and she was very happy to finish her living room!
Here are Nancy's lovely patterns to follow.
I will have a kit available, also.
Use the instructions in the "Things to do, Things to see" list at the left of the blog, HOW TO RE-SIZE THE PATTERNS to print your patterns out.
Use glue stick to glue the fabric to the poster board.
Using tacky glue to glue everything else.
Be sure to have baby wipes or a wet cloth to wipe your fingers clean of glue. Wipe your fingers frequently.
Print Nancy's patterns out onto card stock. Trace around the patterns onto poster board. I get my poster board from Michaels. I use the heavy weight poster board.
Use the back of your craft knife to score on the lines.
The kit will have this cut out and scored for you.
This is the chair body.
Very important, please use 100% cotton fabric. Go to the quilting section of your fabric store or go to a quilt fabric store. 100% cotton fabric always glues.
Apply glue stick to the surface of the poster board.
PLEASE NOTE THE POSITION OF THE CHAIR BODY, APPLY THE GLUE STICK TO THIS SIDE.
Place your fabric wrong side up on the table and press the chair body onto the fabric.
Smooth over the top of the chair body.
Make sure you have extra fabric all around.
You may draw around the chair body 1/4" away from the edge of the edge. This will be your cutting line.
I've trimmed off the extra fabric.
Look on the left, that fabric has been trimmed to the edge of the poster board.
In the center I have cut into the corners.
So the fabric can be glued down smoothly I've cut "V" shapes around the curved parts of the body.
I've also cut "V" shapes at the scored lines.
This picture shows the other side of the chair body.
Apply glue stick to the edges of the poster board body and press the extra fabric into the glue.
In this picture I've all ready glue up the bottom.
Don't glue the center down.
I've glued everything but the center.
Turn the chair body around and this is what it should look like.
Apply tacky glue to the long side of the back.
Smear the glue with your fingers.
Wipe your fingers.
Bend the flap on the other end of the body.
Bring the two ends together and press the flap into the glue. The flap will be inside the body.
Press the body of the chair together
making sure the edges are even.
This is how the chair should look so far.
Trace around the patterns to cut a chair base from four layers of foam core and two layers of mat board.
Glue them together with tacky glue.
The kit will have this all ready glued cut and glued together.
Apply tacky glue to the inside of the chair along the bottom.
Smear the glue and wipe your fingers.
Slip the chair onto the base.
Apply tacky glue to the top of the base.
Press the fabric onto the top of the base.
Press the sides of the chair to the sides of the base.
Stretch a large rubber band around the base of the chair.
Let the glue dry awhile.
In my part of the country the produce departments use large rubber bands to bind broccoli together. I save those rubber bands.
This is the inside of the chair.
Trace the pattern onto poster board and cut out. Score on the lines.
Don't glue, we are just doing a dry fit.
I use Thermolam Plus, SEW IN, not the iron on. I buy this from Walmart or Joann's.
Use the patterns cut the batting.
The batting is included in the kit.
Apply tacky glue to the middle part of the inside. Smear the glue.
Wipe off your fingers.
Press the small piece of batting into the middle of the back.
There should be space left all around.
Add a little more glue around the first layer of batting and press on the larger piece of batting. This piece should be even at the top and have a little space left on the sides and at the bottom.
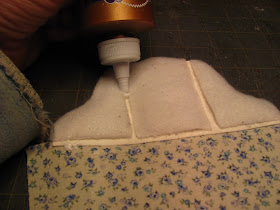
The sides are next. Apply tacky glue to the sides of the inside of the chair. Press the small pieces of the batting into the glue. The batting should be in the middle with space all around.
Apply a little more glue around the edges and press the larger piece of batting on top. The outside curved edge should be even. Clean your fingers.
Just dry fitting, again to see how everything looks.
Apply tacky glue to the bottom of the wrong side of the inside of the chair.
Press the wrong side of the fabric into the glue.
Turn the indies of the chair over and apply tacky glue along the bottom.
Apply tacky glue in the spaces between the batting.
Fold the fabric up onto the inside of the chair and with your fingers press the fabric into the glue.
This is the back of the inside of the chair.
Trim off the extra fabric leaving enough to fold and glue to the wrong side of the poster board. Cut "V" shapes out along the curved edge.
Apply tacky glue to the edge a little at a time. Smear the glue, wipe your fingers and then fold the fabric over and press into the glue.
I like to start with the middle of the arm, then press the fabric at the end of the arm. After that I will work along the top.
One side is done.
All of the extra fabric has been glued to the back of the poster board.
This is how the inside of the chair should look.
Apply tacky glue to the inside of the chair body.
Smear the glue out to the edges, wipe off your fingers.
Press the inside of the chair into the body. Press all around the edges to make sure you have a good seal. You can remove the rubber band.
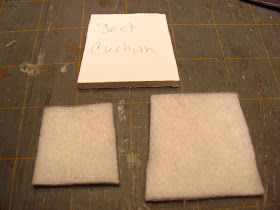
This is the seat cushion and the first and second layer of batting.
The front of the seat cushion is wider than the back.
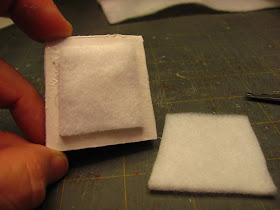
Apply tacky glue to the seat cushion and press the batting into the glue. There should be space left around.
Apply tacky glue to the space you left and press the next piece of batting into the glue.
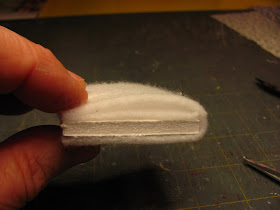
The next piece of batting is the largest; it will cover the bottom and top of the cushion.
Apply tacky glue to the bottom of the cushion and press the batting into the glue leaving extra at the front of the cushion to fold over to the top of the cushion.
Fold the extra batting over to the top of the cushion.
Cut your fabric to fit the seat cushion. Long enough for extra to be folded to the bottom.
Apply tacky glue to the bottom at the front of the seat cushion.
Don't smear this.
Press one end of the wrong side of the fabric into the glue.
Apply tacky glue to the other end of the seat cushion.
Fold the fabric over to the bottom of the cushion and press into the glue.
Apply tacky glue to the ends of the seat cushion and fold the fabric over and press into the glue.
Apply tacky glue to the ends and across the foam core.
Fold the top fabric down and press into the glue.
Trim off the bottom fabric.
If the fabric comes apart don't worry. Apply a little tacky glue and pinch the fabric together.
Slide your seat cushion into the chair and you are done!
I have tutorials showing how to measure and make skirts for a chair in the "Things to do, Things to see" list, Make and upholster a 1 inch scale chair, in the same list there is a tutorial showing how to make a ruffle, Pin cushion box or large pouf.
Until next time,
Have fun, Expand on it, Make it better . . . .
Just keep making minis!
Kris


